Table of Contents
Advertisement
Advertisement
Table of Contents

Summary of Contents for Prepology PPICE103-TOMATO
- Page 1 K89649 PORTABLE AUTOMATIC ICE MAKER MODEL NO.: PPICE103-TOMATO PPICE103-OCEANBLUE PPICE103-CPEPPER For service assistance and product information, please call: 1-800-968-9853. Curtis International Ltd. 7045 BECKETT DRIVE,UNIT 15, MISSISSAUGA, ON, L5S 2A3 www.curtisint.com...
-
Page 2: Important Safeguards
IMPORTANT SAFEGUARDS When using electrical appliances, basic safety precautions should always be followed including the following Read all instructions. Do not touch hot surfaces. Use handles or knobs. To protect against electrical hazards, do not immerse cord, plugs, or the appliance in water or other liquid. -
Page 3: Safety Instructions
CAUTION – Risk of fire or explosion. Dispose of property in accordance with federal or local regulations. Flammable refrigerant used . CAUTION – Risk of fire or explosion due to puncture of refrigerant tubing;follow handling instructions carefully. Flammable refrigerant used. The ice maker should be installed in accordance with the safety standard for refrigeration systems, ashrae15. -
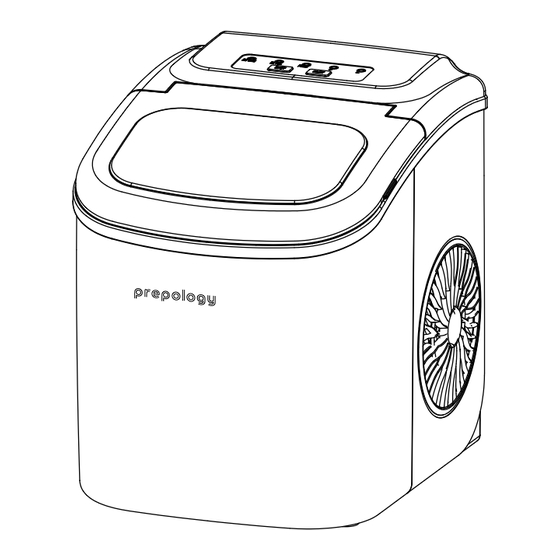
Page 4: Description Of Parts
DESCRIPTION OF PARTS General instrucion 1. Ice scoop 2. Ice full sensor 3. Ice basket 4. Top cover with transparent window 5. Air exhausting 6. Water drain cap: at front btm side of the unit 7. MAXIMUM WATER LEVEL: Remove the ice basket, you can see the water level mark. 8. - Page 5 DESCRIPTION OF PARTS Postion of control panel & function Control Panel: Easy to use, visible functions touch display setting. A. Selected ice size displaying: Small and Large B. Power indicator C. Ice-Full indicato D .Water shortage indicator E. Button to turn on/off the unit F.
-
Page 6: Before First Use
BEFORE FIRST USE This portable icemaker uses a fully automatic control system, with an advanced microcomputer for easy and convenient ice making. Making ice is simple and fast. Just add water, plug into an outlet, and press the ON button. You can select one of the two ice cube sizes with the touch of a button. -
Page 7: Automatic Self-Cleaning Program
Press the Power Button and the green indicator light will remain on. To change between either the small or large ice size, press the Select Button until the light is lit up beside the desired ice size. The first ice making cycle will last approximately 8 - 13 minutes depending on the ice size that is selected. -
Page 8: Care And Cleaning
CARE AND CLEANING Stop the Ice Making Cycle by pressing the Power Button and the green LED light will go out. Unplug the Ice Maker from the wall outlet. Allow the unit to warm up to room temperature. If the Water Tray is not in the vertical position behind the Evaporator Fingers, gently push the Water Tray back so that all water drains into the Water Reservoir. - Page 9 Turn off the icemaker, pull out the electric plug, fill it with water if needed, replace the plug and then restart the unit. or Inspect relative parts; remove the drain cap on Electrical Power Surge the back of the unit and “Ice Full”...
- Page 10 PRODUCT SPECIFICATIONS: Input Voltage: 115V 60Hz Power Consumption: 90-120 W Daily Ice Output: 12 KGS/24H Ice-Making Amount Per Time: 9 PCS Refrigerant: R600a Dimensions: Product Depth (in.): 11.6 Product Height (in.): 11.4 Product Width (in.): 8.7 In Box Weight (lbs): 15.4 Out of Box Weight (lbs): 14.1 Box Dimensions (in.): 9.8X12.2X12.6 Power Cord Length (in.): 70.9...
- Page 11 To make a warranty claim, please email support2@curtiscs.com or call 1-800-968-9853. 1 Year Warranty This product is warranted to be free from defects in material and workmanship for a period of one (1) year from the date of original purchase. During this period, your exclusive remedy is repair or replacement of this product or component found to be defective, at our option;...
Need help?
Do you have a question about the PPICE103-TOMATO and is the answer not in the manual?
Questions and answers
I need a replacement basket