Table of Contents
Advertisement
Quick Links
Advertisement
Table of Contents

Summary of Contents for Element EM1601RQCW
- Page 1 1.6 cu. ft. Over The Range Microwave User Manual EM1601RQCW EM1601RQCB EM1601RQCS...
- Page 2 (3) DOOR SEALS AND SEALING SURFACES e oven should not be adjusted or repaired by anyone except properly quali ed service personnel. SPECIFICATIONS Model: EM1601RQCW / EM1601RQCB / EM1601RQCS Rated Voltage: 120V~60Hz Rated Input Power(Microwave): 1550 Watt Rated Output Power(Microwave):...
- Page 3 IMPORTANT SAFETY INSTRUCTIONS When using electrical appliances basic safety precautions should be followed, including the following: WARNING - To reduce the risk of burns, electric shock, re, injury to persons or exposure to excessive microwave energy: 1. Read all instructions before using the appliance. 2.
- Page 4 THIS COULD RESULT IN VERY HOT LIQUID SUDDENLY BOILING OVER WHEN THE CONTAINER IS DISTURBED OR A UTENSIL IS INSERTED INTO THE LIQUID. To reduce the risk of injury to persons: 1) Do not overheat the liquid. 2) Stir the liquid both before and halfway through heating it. 3) Do not use straight-sided containers with narrow necks.
- Page 5 WARNING - Improper use of the grounding can result in a risk of electric shock. Consult a quali ed electrician or serviceman if the grounding instructions are not completely understood or if doubting as to whether the appliance is properly grounded. If it is necessary to use an extension cord, use only a 3-wire extension cord that has a 3-blade grounded plug, and 3-slot receptacle that will accept the plug on the appliance.
- Page 6 UTENSILS Personal Injury Hazard CAUTION - Tightly-closed utensils could explode. Closed containers should be opened and plastic pouches should be pierced before cooking. See the instructions on "Materials you can use in microwave oven or to be avoided in microwave." ere may be certain non-metallic utensils that are not safe to use for microwaving.
- Page 7 Materials you can use in microwave oven Utensils Remarks Plastic Microwave-safe only. Follow the manufacturer* instructions. Should be labeled "Microwave Safe". Some plastic containers so en, as the food inside gets hot. "Boiling bags" and tightly closed plastic bags should be slit, pierced or vented as directed by package.
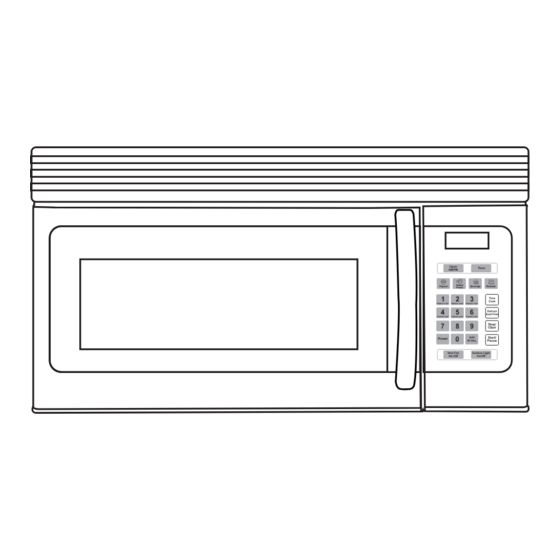
- Page 8 PART NAMES Microwave features Window FRONT VIEW Interlock system Door assembly Turntable ring assembly Turntable Sha Turntable glass tray Control panel Front vent grill Surface lights Ventilation lters Bottom View Front Rear...
- Page 9 OPERATION INSTRUCTIONS 1. Clock Setting 1). Press "CLOCK/AM/PM",the unit enters the clock setting states.AM indicator will light . "0:00" ash to remind you to input the time. 2). Press "CLOCK/AM/PM " again to select AM or PM. e responding AM or PM indicator lights.
- Page 10 5) Press "1","5","0","0" to input cooking time; 6) Press "POWER" to select the microwave power; 7) Press "8" to choose 80% microwave power; 8) Press "START" to start cooking. Note: a.Microwave cooking can be set as two stages only. Defrost program and auto menu cannot be set here.
- Page 11 6.Hood Function 1) When the exhaust fan is under o states, press " VENT FAN/H/L/OFF " once to choose the fan with high speed; 2) Press "VENT FAN/H/L/OFF" twice to choose the fan with low speed; 3) Press "VENT FAN/H/L/OFF" three times to choose the fan to be o . 4) Except lock states, the fan can be adjusted anytime.
- Page 12 e menu chart: Menu Power Weight P100 1.75 Oz Popcorn P100 3.0 Oz P100 3.5 Oz P100 P100 Baked potato P100 P100 P100 Beverage P100 8.0 Oz P100 16.0 Oz P100 Reheat 24.0 Oz P100 11. Inquiring Function (1) Under microwave cooking states, press " POWER" to check the power level. (2) During cooking states, press "CLOCK/AM/PM"to check the clock.
- Page 13 MAINTENANCE Troubleshooting Check your problem by using the chart below and try the solutions for each problem. If the microwave still does not work properly, contact the nearest authorized service center. TROUBLE POSSIBLE CAUSE POSSIBLE REMEDY a. Electrical cord for oven is a.
- Page 14 CLEANING AND CARE Disconnect the power cord before cleaning or leave the door open to deactivate the oven during cleaning. Cleaning the exhaust lters Surface light replacement e microwave v entilation e xhaust lters s hould b e removed a nd cleaned o en; ge nerally at least once every month.
- Page 15 CLEANING AND CARE Disconnect the power cord before cleaning or leave the door open to deactivate the oven during cleaning. Charcoal lter replacement Oven light replacement Remove the vent grill per instructions 1-4 above and Charcoal Filter installed in your microwave is used charcoal lter, if used.
- Page 16 CLEANING AND CARE Disconnect the power cord before cleaning or leave the door open to deactivate the oven during cleaning. Cleaning suggestions For best performance and for safety reasons, keep the oven • Wash the door window with very mild soap and clean inside and outside.
- Page 17 Element’s authorized service provider to be defective in material or workmanship, Element will, at its sole and absolute discretion and option: (i) repair the defective part or component at no charge to the Original Customer, (ii) replace the defective Product with a...
- Page 18 States, and only applies to Product if it was purchased and serviced in the United States. The addition of equipment or features to the Product that are not manufactured or recommended by Element could affect the intended function of the Product, and therefore may void the Warranty. Furthermore, the exposure of the Product to chemicals,...
- Page 19 Where any term of this Warranty is prohibited by applicable law, it shall be null and void, but the remainder of this Warranty shall remain in effect. PLEASE DIRECT ALL CORRESPONDENCE TO: Element Appliance Company, LLC customerservice@elementelectronics.com (888) 842-3577 https://elementelectronics.com...
- Page 20 Element, the Element Logo, and Bring it home are trademarks of Element Brand Holding, LLC. All other trademarks are the property of their respective owner, who has not sponsored, endorsed, or approved this product. ©2023 Element Appliance Company, LLC. All rights reserved.
- Page 21 Over the Range Installation Microwave Instructions BEFORE YOU BEGIN Note to Consumer – Read these instructions completely and carefully. Keep these • instructions for future reference. IMPORTANT – Save these • • Skill level – Installation of this appliance requires instructions for local inspector’s use.
-
Page 22: Table Of Contents
Installation Instructions Adapting Microwave Blower CONTENTS for Outside Back Exhaust...17 – 18 General information Mount the Microwave ....19 Important Safety Instructions ......3 Recirculating .........20 –22 Electrical Requirements ......... 3 Attach Mounting Plate to Wall..Damage – Shipment/Installation...... 4 Preparation of Top Cabinet ....20 Parts Included.......... -
Page 23: Important Safety Instructions
Installation Instructions IMPORTANT SAFETY INSTRUCTIONS This product requires a three-prong grounded You should have the wall receptacle and circuit outlet. The installer must perform a ground checked by a qualified electrician to make sure the continuity check on the power outlet box before receptacle is properly grounded. -
Page 24: Damage-Shipment/ Installation
Installation Instructions DAMAGE—SHIPMENT/ PARTS INCLUDED (CONT.) INSTALLATION ADDITIONAL PARTS • If the unit is damaged in shipment, return the PART QUANTITY unit to the store in which it was bought for repair or replacement. • If the unit is damaged by the customer, Combined repair or replacement is the responsibility of Top Cabinet... -
Page 25: Tools You Will Need
Installation Instructions TOOLS YOU WILL NEED Ruler or tape measure and Pencil straight edge Carpenter square # 1 Phillips screwdriver (optional) Tin snips (for cutting damper, Scissors if required) " " Electric drill with ⁄ ⁄ (to cut template, if "... -
Page 26: Placement Of The Mounting Plate
Installation Instructions PLACEMENT OF THE MOUNTING PLATE REMOVING THE FINDING THE WALL STUDS MICROWAVE OVEN FROM THE CARTON/REMOVING THE MOUNTING PLATE 1 Remove the installation instructions, filters, glass tray and the small hardware bag. Do not remove the Styrofoam protecting the front of Wall the oven. -
Page 27: Determining Wall Plate Location
Inst allat ion Inst ruct ions WALL PLATE LOCATION UNDER YOUR CABINET C. DETERM INING Plate position—beneath flat bottom Plate position—beneath framed recessed cabinet cabinet bottom NOTE: IT IS VERY READ AND FOLLO IMPOR IN THE INSTAL W THE TANT BEFOR E PROCE LATION... -
Page 28: Aligning The Wall Plate
Installation Instructions ALIGNING THE WALL PLATE 3/8" TO EDGE 12" Trim the rear wall template along the dotted line. NOTE: IT IS VERY IMPORTANT TO READ AND FOLLOW THE DIRECTIONS IN THE INSTALLATION INSTRUCTIONS BEFORE PROCEEDING WITH THIS REAR WALL TEMPLATE. This Rear Wall Template serves to position the bottom 4"... -
Page 29: Installation Types
Installation Instructions INSTALLATION TYPES (Choose A, B or C) This microwave is designed for adaptation to the NOTE: This microwave is shipped assembled for following three types of ventilation: Recirculating. Select the type of ventilation required for your installation and proceed to A. -
Page 30: Hood Exhaust
Installation Instructions INSTALLATION INSTRUCTIONS FOR EXTERNAL EXHAUST DUCTING Maximum duct length: NOTE: If you need to install ducts, note that the total duct length of 3 ⁄ " x 10" (8.2 x 25.4 cm) For satisfactory air movement, the total duct length of rectangular or 5"... - Page 31 Installation Instructions EXTERNAL EXHAUST DUCTING NOTE: Read these next two pages only if you plan to vent your exhaust to the outside. If you plan to recirculate the air back into the room, proceed to page 20. OUTSIDE TOP EXHAUST (EXAMPLE ONLY) The following chart describes an example of one possible ductwork installation.
-
Page 32: Aoutside Top Exhaust
Installation Instructions OUTSIDE TOP EXHAUST (Vertical Duct) INSTALLATION OVERVIEW A1. Attach Mounting Plate to Wall A2. Prepare Top Cabinet A3. Adapting Microwave Blower for Outside Top Exhaust A4. Check Damper Operation A5. Mount Microwave 3/8" TO EDGE A6. Adjust Exhaust Adaptor along the dotted line. -
Page 33: Preparation Of Top Cabinet
Installation Instructions USE TOP CABINET TEMPLATE Carefully pull out the blower unit. The FOR PREPARATION OF TOP wires will extend far enough to allow you CABINET to adjust the blower unit. End B You need to drill holes for the top support screws, a hole large enough for the power cord to fit through, and a cutout large enough for the exhaust adaptor. -
Page 34: Checking For Proper Damper Operation
Installation Instructions MOUNT THE A3. ADAPTING MICROWAVE MICROWAVE BLOWER FOR OUTSIDE TOP EXHAUST 5 Secure blower unit to microwave with the screw removed in Step 1. Make sure the screw is tight. Replace blower plate with the screw removed in Step 1. Make sure the screw is tight. -
Page 35: Mount The Microwave
Installation Instructions MOUNT THE MICROWAVE ADJUST THE EXHAUST ADAPTOR (cont.) Open the top cabinet and adjust the exhaust Cabinet Front adaptor to connect to the house duct. Cabinet Bottom Shelf Filler Block Back of Damper Blower Plate Microwave Equivalent to Depth of Cabinet Recess Self-Aligning Screw... -
Page 36: Boutside Back Exhaust
Installation Instructions OUTSIDE BACK EXHAUST (Horizontal Duct) INSTALLATION OVERVIEW B1. Prepare Rear Wall B2. Remove Blower Plate B3. Attach Mounting Plate to Wall B4. Prepare Top Cabinet B5. Adjust Blower 3/8" TO EDGE along the dotted line. Trim the rear wall template 12"... -
Page 37: Attach Mounting Plate To Wall
Installation Instructions You need to drill holes for the top support screws ATTACH THE MOUNTING and a hole large enough for the power cord to fit PLATE TO THE WALL through. • Read the instructions on the TOP CABINET TEMPLATE. Attach the plate to the wall using toggle bolts. - Page 38 Installation Instructions Roll the blower unit 90° Place the blower unit back into the opening. Before Rotation After Rotation AFTER: Fan Blade Openings Facing Back End A End B Back of Back of Microwave Microwave Rotate blower unit counterclockwise 180°. CAUTION: Do not pull or stretch the blower unit wiring.
-
Page 39: Mount The Microwave
Installation Instructions Cabinet Front MOUNT THE MICROWAVE Cabinet Bottom Shelf OVEN Filler Block Equivalent to Depth of Cabinet Recess Self-Aligning Screw FOR EASIER INSTALLATION AND PERSONAL Microwave Top SAFETY, WE RECOMMEND THAT TWO PEOPLE INSTALL THIS MICROWAVE. Attach the microwave to the top cabinet. IMPORTANT: Do not grip or use handle Insert 2 self-aligning during installation. -
Page 40: Recirculating
Installation Instructions RECIRCULATING (Non-Vented Ductless) INSTALLATION OVERVIEW C1. Attach Mounting Plate to Wall C2. Prepare Top Cabinet C3. Check Blower Plate 3/8" TO EDGE along the dotted line. Trim the rear wall template 12" NOTE: IT IS VERY IMPORTANT READ AND FOLLOW THE DIRECTIONS IN THE INSTALLATION INSTRUCTIONS... -
Page 41: Check Blower Plate
Installation Instructions CHECK BLOWER PLATE NOTE: When mounting the microwave, thread power cord Blower Plate through hole in bottom of top cabinet. Keep it tight Lift microwave, tilt throughout Steps 1–3. Do it forward, and not pinch cord or lift oven hook slots at back by pulling cord. -
Page 42: Mount The Microwave
Installation Instructions MOUNT THE MICROWAVE C5. INSTALLING OR CHANGE (cont.) THE CHARCOAL FILTER Insert 2 self-aligning NOTE: The charcoal filter is factory installed in screws through outer top recirculating models. Follow these steps to replace a cabinet holes. Turn two filter or to install a filter after converting a vented full turns on each screw. -
Page 43: Before You Use Your Microwave
Installation Instructions BEFORE YOU USE YOUR MICROWAVE Make sure the microwave has been Read the USE & CARE Manual. installed according to instructions. KEEP INSTALLATION INSTRUCTIONS FOR THE LOCAL INSPECTOR’S USE. Remove all packing material from the microwave. Install turntable ring and glass tray in cavity Replace house fuse or turn breaker back on. - Page 44 3/8" TO EDGE 12" Trim the rear wall template along the dotted line. NOTE: IT IS VERY IMPORTANT TO READ AND FOLLOW THE DIRECTIONS IN THE INSTALLATION INSTRUCTIONS BEFORE PROCEEDING WITH THIS REAR WALL TEMPLATE. This Rear Wall Template serves to position the bottom 4"...
Need help?
Do you have a question about the EM1601RQCW and is the answer not in the manual?
Questions and answers