Table of Contents
Advertisement
Quick Links
quickstart guide
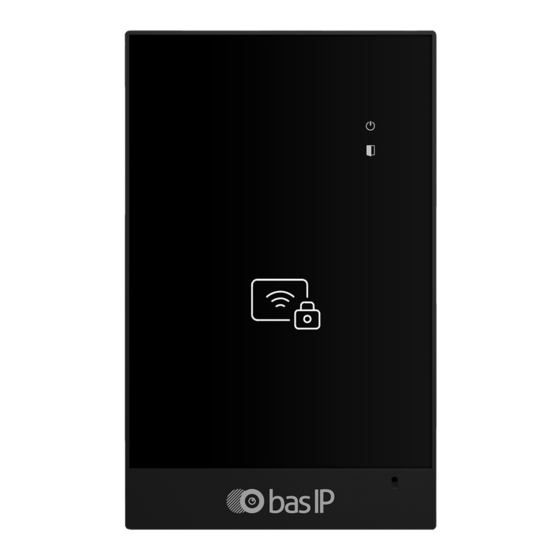
CR-02BD
READER WITH CONTROLLER
External contactless card and key fob reader with built-in controller
and UKEY technology support: Mifare® Plus and Mifare® Classic,
Bluetooth, NFC card, key fob, and mobile ID reader.
Using an external network proximity card reader BAS-IP CR-02BD,
you can read contactless cards, key fobs, as well as mobile identifiers
from mobile devices and open the connected lock.
1
Loudspeaker
2
Power indicator
3
Opens door indicator
4
Card reader
Full User Manual
wiki.bas-ip.com
Advertisement
Table of Contents

Related Manuals for BAS-IP CR-02BD


Summary of Contents for BAS-IP CR-02BD
- Page 1 UKEY technology support: Mifare® Plus and Mifare® Classic, Bluetooth, NFC card, key fob, and mobile ID reader. Using an external network proximity card reader BAS-IP CR-02BD, you can read contactless cards, key fobs, as well as mobile identifiers from mobile devices and open the connected lock.
- Page 2 Login To configure the reader remotely via the WEB interface, you need to connect to it with an Internet browser on your PC. The panel must be connected in the same network segment as the PC from which it is planned to perform the configuration. To find the device in the LAN, it is required to use the Remote search and upgrade tool.
-
Page 3: Device Info
Main After successful authorization, the following interface will be displayed: Device info Framework: a version of the framework. • Launcher: a version of the launcher. • • Serial number: serial number of the device which will be used for the communication with Link software. Network info •... -
Page 4: Management System
• Custom NTP Management system • Current device date / time: shows • Use the BAS-IP Link server: enable / disable the current device's date and time. the usage of the BAS-IP Link server. • URL: management server address. •... -
Page 5: Device Settings
Device Apartment settings Mode: device operation mode (an individual mode must be set for the reader). • When working with the elevator module, it is necessary to set a unit mode. Building: building number. • • Unit: unit number. • Flor: floor number. - Page 6 Apartments Here you can add, edit or look at a list of flats and get detailed information about each apartment. An apartment is a logical entity to bind identifiers, access codes, redirection rules, and other information about residents. How to add a new apartment to the device memory? Log in to the device web interface.
-
Page 7: Access Management
Access management Access management At this part, you can change information about: Master card • This card is used to add other cards to panel memory. Here you can specify the card number. To add a master card if its number is unknown: Open Access management tab of panel wen interface. - Page 8 Locks management At this part, you can configure the functioning of 1 or 2 (when using SH-42) locks. The following parameters can be configured: Lock open time is a period (1-300 sec) during which relay contacts will be closed or open •...
-
Page 9: Additional Settings
Open lock In this section, you can remotely open lock #1 or lock #2 (when using SH-42) by clicking the corresponding button. Additional settings Here you can: Set the Floor number for further features that work only with the elevator control •... - Page 10 To configure this feature you must: • Log in to the entrance panel web interface. By default, the username is admin, and the password is 123456 • Open the Access management tab and find the Server manage access section. • Enable the feature.
- Page 11 Also, you can check and update the current door sensor input status (open / closed). Identifiers Here you can add or view a table with previously added identifiers. This table contains information about the identifier owner, its type, number, validity period, amount of available passes, and the number of the lock that identifiers are allowed to open.
- Page 12 Logs, from where it can be copied. • UKEY allows using smartphones as identifiers (BAS-IP UKEY app is required). You must enter the identifier number in the Identifier number field. To find out the number, bring the phone to a reader and the number will be displayed in the Logs, from where it can be copied into this field.
-
Page 13: Access Restrictions
Access restrictions In this menu, you can set the access restrictions according to which the access peculiarities of various users and their identifiers are determined. For example, you can create a restriction that will provide access at a chosen time or day and apply it to necessary identifiers. How to add a new identifier to a panel memory •... - Page 14 frequency of repetitions • Available options are: Never: the restriction will work once • Daily: the restriction will be active every day for a specified time period. • For example, the identifier will work every day from 9:00-18:00 • Weekly: the restriction will work on the specified days and hours, e.g., every Tuesday or every Monday and Friday (depending on settings) •...
- Page 15 Logs This tab contains a log that displays all the events that happened with the panel: login to the web interface, an unknown identifier used, etc. When the number of events exceeds 10,000, the oldest entries are deleted. List of all events displayed in the log Priority Category Event...
- Page 16 List of all events displayed in the log Priority Category Event Access Lock opened too long Access Not valid identifier Access Wrong input code Access Access denied by remote server High Access Access denied by the web interface Access Unknown identifier Access Unknown QR code Emergency...
-
Page 17: Passwords Management
Security Passwords management • Old password: Current password input field. Default values The default admin password is 123456 • New password: New password input field. • Confirm: Confirm the password input field. -
Page 18: Export / Import Data
System In this tab, you can back up or restore module settings, export / import data, update software, change the language, reboot the device, etc. Settings In this section, you can save all web interface settings (except network settings) by clicking the Backup whole settings button. -
Page 19: Clear Data
English • Spanish Firmware upgrade By default, the BAS-IP server is used for updates. You have several ways to update panel firmware: Automatically: check for software updates and if it is released, click Update Firmware. • The update process will take some time and in the end, the panel will reboot. - Page 20 Manually: download the necessary firmware from the webpage, click Choose file • and upload the downloaded file. Click Update Firmware and wait for the process to complete (in the end the panel will reboot) You also can use a custom server (is used in closed intercom networks) for firmware updates. The custom server must meet certain conditions for its correct work: the server must have the version.json file and the file with the necessary firmware.
Need help?
Do you have a question about the CR-02BD and is the answer not in the manual?
Questions and answers