Advertisement
Quick Links
Advertisement

Related Manuals for Gardyn HOME KIT 3.0

Summary of Contents for Gardyn HOME KIT 3.0
- Page 1 HOME KIT Grow Guide...
- Page 2 Let’s take your growing experience to the next level. The Gardyn essentials to help you grow with peace of mind Once you set up your new Gardyn, you’ll see your first sprouts in a Your Gardyn’s care cycle matter of days. From there, get to know all of the Garydn essentials, including the Nursery, Trellis, Microgreens, Vase, and more! Let’s get Gardyning!
- Page 3 Meet Your Gardyn Home Watch Video Upper blades Light protective caps Safety strap LED light bars Cameras Metal rod Columns Main switch Wood cap to watering compartment Light switch Lid locks Lower blades Water tank Water pump Reminder: Do not plug the device in until instructed to do so.
- Page 4 ST EP 1 Unpack cautiously Watch Video Lid with wood cap 2 LED light bars Carefully unpack the parts following the order in the video. 2 upper blades and rod Water tank Accessory bag 3 columns Power supply 30 yPods H OM E K I T - GR O W GUI DE H OM E KIT - SET U P...
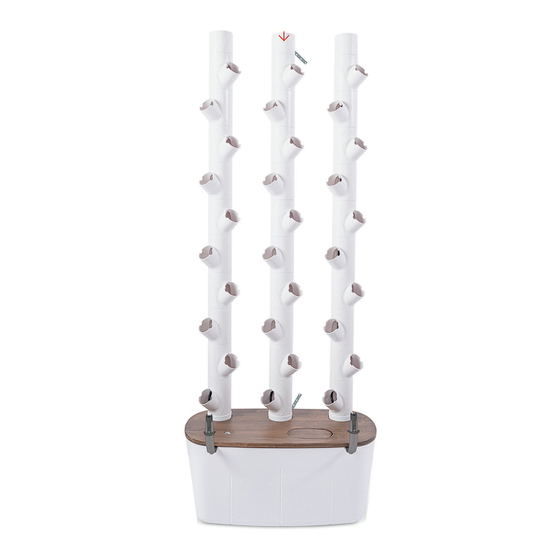
- Page 5 ST EP 2 Assemble the columns Align the arrows, then twist. When completed, the arrows will no longer align. Watch Video Gently pull on the end of the irrigation hoses to ensure they are straight inside the columns and avoid any kinks. Identify the center column with the safety strap.
- Page 6 ST EP 3 Mount and lock the lid Remove the transportation plug and lower the water pump. The plug’s appearance may vary slightly from the one shown. Watch Video Open the lid locks to mount and lock the lid onto the water tank.
- Page 7 ST EP 4 Connect the columns Ensure all open slots face the front of the lid, as shown. Watch Video Start with the middle column identified by the safety strap in the back. Hold the column vertically and plug the hose connector onto the tube inside the column’s base until snug.
- Page 8 ST EP 5 Attach the LED light bars Starting with either side, hold the bar vertically to carefully Watch Video yet firmly slide the bottom of the light onto the lower blades attached to the lid. Press until you see the grey post in the notch of the light bar. Carefully open and unpack the box containing the 2 LED light bars.
- Page 9 ST EP 6 Insert upper blades and slide light protective caps until flush Mount upper blades with light bars. Watch Video Insert the metal rod on the back of the columns. Insert plugs to secure. Your kit comes with an extra plug should you ever need it.
- Page 10 Check progress Safety strap At this stage, you should see the following: The 3 columns have all slots facing the lights and all vine designs aligned. WARNING: Prevent the device from tipping over. The safety strap is attached to the middle column. The device must be securely attached to the wall.
- Page 11 3 times once it is fully powered up. DO NOT ADD PLANT FOOD when you start your Gardyn. Kelby will help you learn when it’s time to start feeding your plants later on. H OM E K I T - GR O W GUI DE...
- Page 12 Placement Guide 30 plants or fewer to start? The choice is yours! If you plant fewer than 30, be sure to cover open slots with Gardyn Caps, available in the app. Time to plant! Place the yCubes into the yPods.
- Page 13 Connect your Gardyn to get growing Download the app The full Gardyn experience awaits you in the app. Activate your membership Meet your AI Gardyning Assistant Kelby Discover and shop for your favorite varieties Control your device at your fingertips...
- Page 14 Grow with confidence and ease using our unique accessories. Scan to shop Nursery Enjoy continuous harvests by germinating new yCubes after you’ve started your Gardyn, plus grow Microgreens with ease. HydroBoost Reduce the frequency and intensity of cleaning while boosting plant health with our plant-based water treatment solution.
- Page 15 Get to know the life cycle of your device from seed to harvest and beyond. Your Gardyn’s Care Cycle You’ll get the hang of this simple routine in no time. Plus, Kelby and the app will guide members on all the details!
-
Page 16: Safety Instructions
DANGER – To reduce the risk of electric shock: ● Reorient or relocate the receiving antenna. ● Always unplug the Gardyn Home from the electrical outlet before cleaning or performing maintenance operations. ● Increase the separation between the equipment and receiver. - Page 17 Questions? Explore the Help Center support@mygardyn.com Gardyn Home – Grow Guide – Ed. 7 © 2018-2023 – Gardyn, Inc. – All rights reserved...
Need help?
Do you have a question about the HOME KIT 3.0 and is the answer not in the manual?
Questions and answers