Table of Contents
Advertisement
Available languages
Available languages
Quick Links
Advertisement
Table of Contents

Summary of Contents for ARGETRON Kamino DMX 512 Master
- Page 1 Kamino DMX 512 Master User Manual...
-
Page 2: Table Of Contents
4- Technical Drawing 5- Connection Diagrams 6- Product Features 6.1. General Characteristics 6.2. Use of On-Off Buttons 6.3. Using "ARGETRON DMX MASTER" software 6.3.1. Select the design mode 6.3.2. Step adding 6.3.3. Create a scenario 6.3.4. Upload the scenarios v1.0... - Page 3 4- Teknik Çizim 5- Bağlantı Şekilleri 6- Ürün Özellikleri 6.1. Genel Özellikler 6.2. On-Off Buton Kullanımı 6.3. “ARGETRON DMX MASTER” yazılımının kullanılması 6.3.1. Tasarım modunu seçin 6.3.2. Adım ekleme 6.3.3. Bir senaryo oluşturun 6.3.4. Senaryo yükleyin Kamino DMX 512 Master...
- Page 4 English...
-
Page 5: 1- General Explanations
1- General Explanations 1.1. Symbols and general safety explanations Read this User Manual carefully before using ARGETRON Kamino DMX 512 Master. Subject to modification without prior notice. Typographical and other errors do not jus- tify any claim for damages. All dimensions should be verified using an actual part. -
Page 6: Warranty
If you think the device is malfunctioning, please contact your local distributor. For details, please visit www.argetron.com. The device is not suitable for unauthorized intervention. All repair authorization of the device is the responsibility of the manufacturer. -
Page 7: Disposal
1.4. Support For technical questions, installation problems and repairs, please contact the address below. ARGETRON Ltd. Sti. İkitelli O.S.B. Bedrettin Dalan Bulvarı Metro AVM. B Block Floor:1 No:27 Basaksehir/Istanbul/Turkey www.argetron.com info@argetron.com +90 212 4070181 1.5. Certificate v1.0 Kamino DMX 512 Master... -
Page 8: 2- Installation
"ON" position. If you do not want to use this ending resistor spe- cific to your application, you can switch it to the "OFF" position. We strongly recommend using twisted cable for transmission of dmx data. v1.0 Kamino DMX 512 Master... -
Page 9: Power Supply Connection
User Manual 2.2. Power Supply Connection Argetron Kamino DMX 512 Master has a wide input voltage value in the range of 12Vdc-48Vdc. Do not apply DC Voltage outside of this range. There is a 2-pin terminal to connect the power supply. In case of reverse connection, the device will not operate. -
Page 10: 3- Technical Specifications
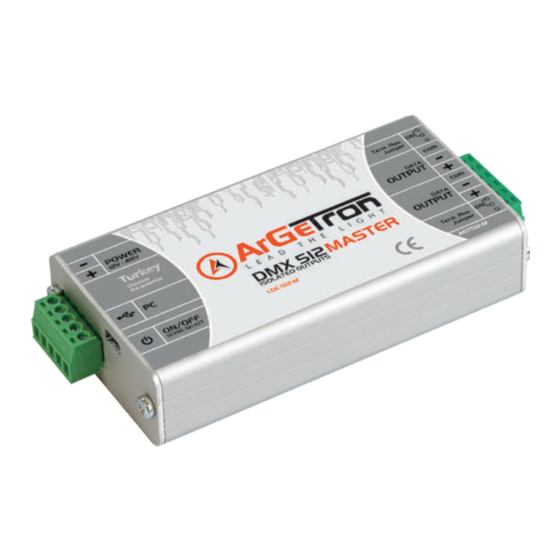
Interfaces 1x3 pin screwable terminal plug for • DMX512 output for Universe1 1x3 pin screwable terminal plug for • DMX512 output for Universe1 User Interfaces 1 Pieces button USB Port USB 2.0, Type B Certificate v1.0 Kamino DMX 512 Master... -
Page 11: 4- Technical Drawing
User Manual 4- Technical Drawing v1.0 Kamino DMX 512 Master... -
Page 12: 5- Connection Diagrams
DMX Receiver DMX Receiver Decoder Decoder Term. Res. POWER Jumper 12V - 48V DATA OUTPUT DATA OUTPUT DMX 512 MASTER ISOLATED OUTPUTS LCD-512-M ON/OFF Term. Res. Jumper SCENE SELECT AGT512-M DMX Receiver DMX Receiver Decoder Decoder v1.0 Kamino DMX 512 Master... -
Page 13: 6- Product Features
User Manual 6- Product Features 6.1. General characteristics Kamino DMX 512 Master is designed in full compliance with ANSI E1.11 - 2008 (R2018) and ANSI E1.20 - 2010 standards. The device has a single universe. Your scenarios that you create on the computer using its special software can run offline independently of the computer after uploading via USB. -
Page 14: Use Of On-Off Buttons
On-Off: If this button is pressed for a long time, the Master will stop sending data. With the second long press, the Master will continue to send data again. 6.3. Using "ARGETRON DMX MASTER" Software Install the free software that comes with the product to your computer. During the instal- lation, you should pay attention that the USB drivers are up to date. -
Page 15: Select The Design Mode
3 channels. When the user right-clicks on the boxes indicated with their addresses on the screen, they can select the color in which the lighting fixtures will work at that moment. (Figure-2) v1.0 Kamino DMX 512 Master... - Page 16 On the "channel mode" screen, the DMX channel is individually visible and controllable. The user can make original designs such as a classic light table by adjusting the level of 512 channels with the buttons on the screen. Channel Mode v1.0 Kamino DMX 512 Master...
-
Page 17: Step Adding
2- Step adding After designing with "product mode" or "channel mode", you can do the steps of the scenario you want to create by entering the time of this step and clicking the "add below" button. Figure-4 v1.0 Kamino DMX 512 Master... -
Page 18: Create A Scenario
User Manual 3- Create a scenario: By clicking the "Add to Scenario" button, we can add steps to our list and increase our scenario steps. (Figure 5) Figure-5 v1.0 Kamino DMX 512 Master... - Page 19 You can add many scenarios to the list on the left. You can switch between the scenar- ios you have added to this list by pressing the button on the side of Kamino DMX 512 Master. (Figure 6) Figure-6 v1.0 Kamino DMX 512 Master...
-
Page 20: Upload The Scenarios
"ComPort" tab under the "Settings" tab. Now all you have to do is to upload all the scenarios you have prepared to Kamino DMX 512 Master on the "Download" button. v1.0 Kamino DMX 512 Master... - Page 21 Türkçe...
-
Page 22: 1- Genel Açıklamalar
1- Genel Açıklamalar 1.1. Semboller ve Genel Güvenlik Açıklamları ARGETRON Kamino DMX 512 Master’ı kullanmadan önce bu Kullanım Kılavuzunu dik- katlice okuyun. Önceden haber verilmeksizin değiştirilebilir. Yazım hataları ve diğer hat- alar herhangi bir tazminat talebini haklı çıkarmaz. Tüm boyutlar gerçek bir parça kul- lanılarak doğrulanmalıdır. -
Page 23: Garanti
üretim hatalarını kapsayan bu garanti ürünün kapağı açılırsa geçersiz olacaktır. Cihazın arızalandığını düşünüyorsanız lütfen yerel dağıtıcınız ile temasa geçiniz. Detaylar için lütfen www.argetron.com u ziyaret ediniz. Cihaz yetkisiz kişilerin müdahalesine uygun değildir. Cihazın tüm tamir sorumluluğu üretici sorumluluğundadır. -
Page 24: Geri Dönüşüm
Teknik sorular, montaj sorunları ve tamir ile ilgili lütfen aşağıdaki adres ile temas kurunuz. ARGETRON Ltd. Sti. İkitelli O.S.B. Bedrettin Dalan Bulvarı Metro AVM. B Blok Kat:1 No:27 Başaksehir/İstanbul/Türkiye www.argetron.com info@argetron.com +90 212 4070181 1.5. Sertifika v1.0 Kamino DMX 512 Master... -
Page 25: 2- Montaj
Her bir DMX çıkışının yanında sonlandırma direncini aktive etmek için 3 pin bulunmak- tadır. Bunlar fabrika çıkışında “ON” pozisyonuna ayarlanmıştır. Uygulamanıza özel bu sonlandırma direnci kullanmak istemiyorsanız “OFF” pozisyonuna alabilirsiniz. Dmx datasının iletilmesinde twisted kablo kullanmanızı önemle tavsiye ederiz. v1.0 Kamino DMX 512 Master... -
Page 26: Güç Kaynağı Bağlantısı
Kullanım Kılavuzu 2.2. Güç kaynağı bağlantısı Argetron Kamino DMX 512 Master 12Vdc-48Vdc aralığında geniş bir giriş gerilim değer- ine sahiptir. Bu aralık dışlında DC Gerilim uygulamayınız. Güç kaynağını bağlamak için 2 pinli terminal bulunmaktadır. Ters bağlantı durumunda cihaz çalışmayacaktır. SELV Sınıf 2 uyumlu güç kaynağı kullanınız. -
Page 27: 3- Teknik Özellikler
Ip20 Elektriksel Güvenlik Selv Bağlantı Arayüzü 1x 3 pin vidalı bağlantı klemens • DMX512 (Çıkış) 1x3 pin vidalı bağlantı klemens • DMX512 (Çıkış) Kullanıcı Arayüzü 1 adet buton USB Port USB 2.0, Type B Sertifika v1.0 Kamino DMX 512 Master... -
Page 28: 4- Teknik Çizim
Kullanım Kılavuzu 4- Teknik Çizim v1.0 Kamino DMX 512 Master... -
Page 29: 5- Bağlantı Şekilleri
DMX Receiver DMX Receiver Decoder Decoder Term. Res. POWER Jumper 12V - 48V DATA OUTPUT DATA DMX 512 MASTER OUTPUT ISOLATED OUTPUTS LCD-512-M ON/OFF Term. Res. Jumper SCENE SELECT AGT512-M DMX Receiver DMX Receiver Decoder Decoder v1.0 Kamino DMX 512 Master... -
Page 30: 6- Ürün Özellikleri
Kullanım Kılavuzu 6- Ürün Özellikleri 6.1. Genel Özellikler Kamino DMX 512 Master ANSI E1.11 – 2008 (R2018) ve ANSI E1.20 – 2010 standartları- na uygun olarak tasarlanmıştır. Cihaz tek evrene sahiptir. Özel yazılımını kullanarak bilgisayarda oluşturduğunuz senaryolarınız USB üzerinden yükledikten sonra bilgisayardan bağımsız bir şekilde offline olarak çalışabilir. -
Page 31: On-Off Buton Kullanımı
6.3. “ARGETRON DMX MASTER” Yazılımının Kullanılması Ürün ile berabaer ücretsiz gelen yazılımı bilgisayarınıza yükleyiniz. Yükleme esnasında USB sürücülerinin güncel olduğun dikkat etmelisiniz. DMX Master yazılımının güncel hali için lütfen www.argetron.com adresini ziyaret ediniz. DMX Master Yazılımı nasıl kullanılacağı aşağıdaki yönergelerde şekiller ile gösterilmekte- dir. -
Page 32: Tasarım Modunu Seçin
Product Display Ürün Ekranı "Ürün modu" tasarımları aydınlatma armatürüne dayanmaktadır. 3 kanaldan oluşan armatürleri temsil eden kutucuk şeklinde görünüm vardır. Kullanıcı ekranda adresleri ile belirtilen kutucuklara sağ tıkladığında aydınlatma armatürlerinin o anda çalışacağı rengi seçebilir. (Figür-2) v1.0 Kamino DMX 512 Master... - Page 33 Kullanım Kılavuzu Figür-2 "Kanal modu" ekranında, DMX kanalına ayrı ayrı görülebilir ve kontrol edilebilir olarak görünmektedir. Kullanıcı, ekrandaki butonlar ile 512 kanalın seviyesini ayarlayarak klasik bir ışıklı masa gibi özgün tasarımlar yapabilir. Channel Mode Kanal Modu v1.0 Kamino DMX 512 Master...
-
Page 34: Adım Ekleme
Kullanım Kılavuzu 2- Adım ekleme: "Ürün modu" veya "kanal modu" ile tasarım yaptıktan sonra, oluşturmak istediğiniz senaryonun adımlarını bu adımın zamanını girip "aşağıya ekle" butonuna basarak yapa- bilirsiniz. Figür-4 v1.0 Kamino DMX 512 Master... -
Page 35: Bir Senaryo Oluşturun
Kullanım Kılavuzu 3- Bir senaryo oluşturun: "Senaryoya Ekle" butonuna basarak listemize adımlar ekleyerek Senaryo adımlarınızı çoğaltabilirsiniz. (Figür-5) Figür-5 v1.0 Aida PWM Repeater... - Page 36 Kullanım Kılavuzu Sol taraftaki listeye birçok senaryo ekleyebilirsiniz. Bu listeye eklediğiniz senaryolar arasında Kamino DMX 512 Master 'ın yan tarafında bulunan butona basarak geçiş yap- abilinir. (Figür-6) Figür-6 v1.0 Kamino DMX 512 Master...
-
Page 37: Senaryo Yükleyin
4- Senaryo yükleyin: Senaryonuzu yüklemeden önce, sanal comport sürücülerini yüklemeniz gerekir. "Ayar- lar" sekmesi altındaki "ComPort" sekmesi ile uygun bağlantı noktasını seçmelisiniz. Artık tek yapmanız gereken, hazırladığınız tüm senaryoları "yükle" düğmesine Kamino DMX 512 Master’a yüklemek. v1.0 Kamino DMX 512 Master...
Need help?
Do you have a question about the Kamino DMX 512 Master and is the answer not in the manual?
Questions and answers