Table of Contents
Advertisement
Available languages
Available languages
Operator's
Manual
25cc/1.5 cu.in. 2-Cycle
17 Inch Cutting Path / 0.080 Inch Line
GASOLINE
WEEDWAOKER
®
Model No.
358.791031
•
Safety
•
Assembly
•
Operation
•
Maintenance
•
Parts List
•
Espar_ol, p. 24
WARNING:
Read and follow all Safety
Rules and Operating
Instructions
before first use of this product.
For answers
to your questions
about this product:
Call 7 am-7
pm, Mon.-Sat.,
or 10 am-7
pm, Sun.
1-800-235-5878
_Ho°_s
listed are Central
Time)
Sears, Roebuck
and Co., Hoffman
Estates,
IL 60179 U.S.A.
545167683
Rev. 1 1/18/08
BRW
Advertisement
Table of Contents

Related Manuals for Craftsman GASOLINE WEEDWACKER 358.791031


Summary of Contents for Craftsman GASOLINE WEEDWACKER 358.791031
- Page 1 Operator's Manual 25cc/1.5 cu.in. 2-Cycle 17 Inch Cutting Path / 0.080 Inch Line GASOLINE WEEDWAOKER Model No. 358.791031 • Safety • Assembly • Operation • Maintenance • Parts List • Espar_ol, p. 24 WARNING: Read and follow all Safety Instructions before first use of this product.
- Page 2 When used and maintained according to the operator's manual, if this product fails due to a defect in material or workmanship it to any Sears store, Sears Service Center, or other Craftsman outlet in the United States for free repair (or replacement if repair proves impossible).
- Page 3 Hazard zone f orthrown objects. • Trimmer line throws objects violently. • You and others can beblinded/injured. • Keep c hildren, bystanders, 50feet ( 15 meters) away. Do not wear jewelry, loose clothing, or clothing with loosing hanging secure straps, ties, tassels, etc. They can...
- Page 4 Never use flailing devices with any attach- ment. This unit (when used with sup- plied line trimmer attachment) is de- signed for line trimmer use only. Use of any other accessories with line trim- mer attachment will increase the risk of injury.
- Page 5 • Look for and replace damaged loose parts before each use. Look for and repair fuel leaks before use. Keep in good working condition. • Replace trimmer head parts that are chipped, cracked, broken, or dam- aged in any other way before using the unit.
- Page 6 (rocks, broken glass, nails, wire, etc.) which can be thrown by or become entangled in line. Hard ob- jects can damage the trimmer head and be thrown causing serious injury. • Only use the trimmer attachment trimming, scalping, mowing and sweeping.
- Page 7 Remove ob- jects (rocks, broken glass, nails, wire, etc.) which can be thrown or become entangled in the blade or trimmer line. • Throw away and replace blades that are bent, warped, cracked, or damaged in any other way.
- Page 8 • Always wear gloves when s ervicing orcleaning the tines. The tines be- come v ery sharp f rom use. • Donot r un unit a thigh speed u nless cultivating. HEDGE TRIMMER SAFETY DANGER: RiSK OF CUT; KEEP HANDS AWAY FROM BLADE - Blade...
- Page 9 • Donot o perate the unit f aster than the speed n eeded toprune. Donot run the unit a thigh speed w hen n ot pruning. • Always stop the unit w hen w ork is delayed orwhen w alking from one cutting location toanother.
- Page 10 CARTON CONTENTS Check carton c ontents against the fol- lowing list. Model 358.791031 • Powerhead • Trimmer attachment • Shield • Wing nut (screwed onto shield) • Container of oil Examine parts for damage. Do not use damaged parts. NOTE: If you need assistance...
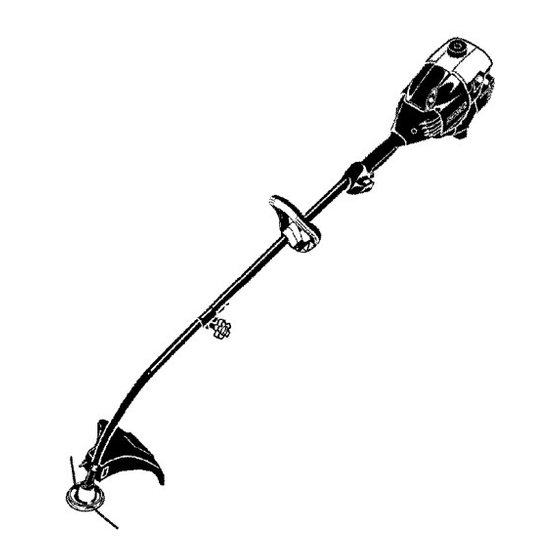
- Page 11 PIVOT Bracket Line Limiter Blade Wing KNOW YOUR TRIMMER READ THiS OPERATOR'S MANUAL AND SAFETY RULES BEFORE OPERATING YOUR UNIT. Compare the illustrations with your unit to familiarize yourself with the location of the various controls and adjustments. Coupler Shaft...
- Page 12 40:1. A 40:1 ratio is obtained by mixing 3.2 ounces of oil with 1 gallon of unleaded gasoline. Included with this trimmer is a 3.2 ounce container of oil. Pour the entire contents of this container into 1 gallon of gasoline to achieve the proper fuel mixture.
- Page 13 If the unit still doesn't start, refer to the TROUBLESHOOTING TABLE or call 1-800-235-5878. CRAFTSMAN ® CONVERTIBLE FEATURE This model is equipped with a coupler which enables optional attachments be installed.
- Page 14 • Operate the engine at full throttle. • Hold the trimmer head parallel to and above the grassy area. • Tap the bottom of the trimmer head lightly on the ground one time. Ap- proximately 2 inches (5 cm) of line will be advanced with each tap.
- Page 15 Inspect and clean unit and labels Clean air filter Inspect muffler and spark arresting Replace spark plug trimmer head about 3 in. (8 cm) above the ground and at an angle. Allow the tip of the line to strike the ground around trees, posts, monuments,...
- Page 16 GENERAL RECOMMENDATIONS The warranty on this unit does not cover items that have been subjected to operator abuse or negligence. receive full value from the warranty, the operator must maintain unit as instructed in this manual. Various ad- justments will need to be made peri- odically to properly maintain your unit.
- Page 17 Clean entire surface of hub and spool. Replace with a pre-wound spool (#71-85819), or cut two lengths of 12-1/2 feet (3.8 meters) of 0.080" (2 mm) diameter Craftsman _R_brand line. _.WARNING: Never use wire, rope, string, etc., which can break off and become a dangerous missile.
- Page 18 Follow the mix instructions found on stabilizer container. Run engine at least 3 min- utes after adding stabilizer. Craftsman 40:1,2-cycle engine oil (air cooled) is already blended with fuel stabilizer. If you do not use this Sears oil, you can add a fuel stabilizer your fuel tank.
- Page 19 TROUBLESHOOTING TABLE WARNING: Always stop unit and disconnect ing all of the recommended remedies unit to be operating. CAUSE TROUBLE 1. Engine flooded. Engine will not start. 2. Fuel tank empty. 3. Spark plug not firing. 4. Fuel not reaching carburetor.
- Page 20 YOUR WARRANTY RIGHTS OBLIGATIONS: The U.S. Environ- mental Protection Agency/California Air Resources Board and Sears, Roe- buck and Co., U.S.A., are pleased to explain the emissions control system warranty on your year 2007 and later small off-road engine. In California, small off-road engines must be de- signed,...
- Page 21 nearest authorized service center or call Sears at 1-800-469-4663. WHERE TO GET WARRANTY SER- VICE: Warranty services or repairs shall be provided at all Sears Service Centers. Call 1-800-469-4663. MAINTENANCE, REPLACEMENT AND REPAIR OF EMISSION LATED PARTS: Any Sears approved replacement part used in the perfor- mance of any warranty maintenance...
-
Page 22: Repair Parts
Shaft (Incl 14) 530016344 Screw 530071788 Kit- Lower Shaft 530052286 Line UmJter 530015814 Screw- Line UmJter 530071802 Kit- Shield Assy (tncl 16,17,19,20) TRIMMER MODEL 358.791031 All repairs, maintenance the Operator's service personnel performed _--14 --15 Part No. Ref. Description 530015820 Bolt 530016152... - Page 23 Kit-Carb (C1U-W19 I (E\_o_e:Hepa_r KIts are not available for this carburetor / 530059246 Air Box 530016429 Screw 530036575 Foam-Air Filter 530057545 Cover-Air MODEL 358.791031 Part No. Part No. Description Ref. 530039229 ignition Module 530032125 530016357 Screw 530012579 545054801 Assy-Wh'e 530071750...
- Page 24 GASOLINA WEEDWACKER ® DE CRAFTSMAN Si este producto falla por un defecto en el material o de mano de obra dentro del a_io a partir de la fecha de compra y este se ha utilizado y mantenido de acuerdo al manu-...
- Page 25 Zona d epeligro perobjetos arrojados • Lalinea decorte a rroja o bjetos violentamente. • Los objetos arrojados austed y aterceros. • Mantenga (50 pies) alejados delazona d etrabajo. El mango auxiliar debe colocarse debajo de la flecha. No permita que los niSos usen este aparato. Guarde el aparato al abrigo de la intemperie, desen- chufado, en un lugar alto, seco y fuera del alcance de los niSos.
- Page 26 Utilice gasolina sin plomo y aceite para motores de dos tiempos mezclado Los accesorios usados en combinaci6n ban sido evaluados con la standard Desbrozadoras - Requisitos de Seguridad". Cabeza de motor con el accesorio del cortadora Accesorio opcional del cortadora de malezas Los accesorios usados en combinaci6n...
- Page 27 • Mantenga alejadas alas dem_.s per- sonas siempre que haga ajustes al carburador. • Use exclusivamente los accesorios y repuestos Craftsman recomendados. • Todo servicio y mantinimiento plicado en este manual deber_t set efectuado por un Centro de Servicio Sears. SEGURIDAD CON EL COMBUSTIBLE •...
- Page 28 • AImacene siempre combustible un recipiente aprobado para los liquidos inflamables. TRANSPORTE Y ALMACENAMIENTO • Antes de proceder a su transporte, detenga el aparato. • Espere que el motor se enfrie y fije bien el aparato antes de quardarlo de transportarlo en un vehiculo.
- Page 29 SEGURIDAD AL CORTAR BORDES _ADVERTENCIA: Inspeccione &rea a ser cortada antes de cada uso. Retire los objetos (piedras, vicrio roto, clavos, alambre, hilo, etc.) que puedan set arrojados por la cuchilla o que pue- dan enroscarse en el eje. • La cuchilla continOa girando por un instante despues de que se suelte el...
- Page 30 A___________ dt_ADVERTENCIA: Lacuchilla si- gue girando incluso despues desoltar elacelerador odeapagar elmotor. In- cluso c uando est& girando libremente, lacuchilla puede d espedir objetos o causar cortes profundos sisetoca ac- cidentalmente. Detenga lacuchilla po- niendo encontacto ellade derecho de lamisma con material yacortado. Para detener lacuchilta cuando...
- Page 31 bujia desconectado, ylacuchilla deteni- daantes deremover elmaterial que se haya a tascado enlacuchilla. No sos- tenga o agarre elaparato por l acuchilla. La cuchilla conti- Permita que las cuchillas se de- nuar_, girando mo- ment_,neamente tengan antes de remover las del Oltar el gatiflo _IADVERTENClA: Inspeccione...
- Page 32 CONTENIDO DE LA CAJA Use la siguiente lista para verificar que todas la piezas hayan sido incluidas: Modelo 358.791031 • Cabeza de Motor • Accesorio del Cortadora • Protector • Tuerca Mariposa (atornillada...
- Page 33 encuentre correctamente armado y que todos l os fijadores seencuentren bien ajustados. INSTALACION DE LAACCESORIO DEL CORTADORA PRECAUCION: AIinstalar las acceso- riodel c ortadora, ponga elaparato en una superficie plana p ara e stabilidad. 1. Afloje e lacoplador dando vuelta a laperilla alaizquierda.
- Page 34 AJUSTE DEL MANGO _ADVERTENCIA: AI ajustar la manija auxiliar, aseg_rese que 6ste se mantenga sobre la etiqueta de seguri- dad y debajo la marca o la flecha en el eje. CONOZCA SU APARATO LEA ESTE MANUAL DEL USUARIO Y LAS REGLAS DE SEGURIDAD ANTES DE PONER ELAPARATO EN MAROHA.
- Page 35 2 tiempos enfriados a aire. Recomendamos el aceite de sint@tico de la marca Craftsman. Mezcle la gasolina con el aceite en la proporci6n 40:1. Se obtiene una proporci6n de 40:1 mezclando 3,2 onzas de aceite con cada gal6n de gasolina sin plomo.
- Page 36 Si el aparato sigue sin ponerse en marcha, vea la TABLA DIAGNOSTICA o Ilame al nOmero 1-800-235-5878. FUNCION DE CRAFTSMAN ® CONVERTIBLE Este modelo ester equipado con un acoplador, el cual permite la instala- ci6n de accesorios opcionales.
- Page 37 INSTALACION DEL ACCESORIOS OPCIONAL 1. Retire la tapa de eje del accesorio (si presente). Coloque el bot6n de conexi6n/des- conexi6n del accesorio inferior en el agujero de la guia del acoplador. Empuje el accesorio inferior en el acoplador hasta que el bot6n de conexi6n/desconexi6n se encaje en el primer agujero.
- Page 38 AVANCE DE LA LJNEA DE CORTE La linea de carte avanza aproximada- mente 5 cm (2 pulgadas) cada vez que se toca el cabezal contra el suelo con el motor acelerado a fondo. El largo m&s eficiente de la linea es el largo m&ximo permitido pot el limitador de linea.
- Page 39 Para Escalpar PARA CORTAR CESPED - Este parato es ideal para cortar c6eped en lugares donde las cortadoras convencionalee Ilegan. En poeicidn de cottar c6sped, mantenga la linea paralela al suelo. Evite presionar el cabezal contra el sue- Io, ya que de haceflo podria escalpar vegetacidn y da_ar el aparato.
- Page 40 Reemplace la bobina por una pre- viamente enrollada (#71-85819), corte dos pedazos de 3,8 metros (12-1/2 pies) de largo de linea de 2 mm (0,080 de pulgada) de la marca Craftsman. INSPECCIONE EL SILENCIADOR LA REJILLA ANTICHISPAS ADVERTENCIA: El silenciador...
- Page 41 Enrolle la linea en la bobina de for- ma pareja y ajustada. Enrolle la linea en la direcci6n en que apunta la flecha que se encuentra en la bobina. Introduzca la linea dentro de la muescas, dejando de 7 a 12 cm (3 a 5 pulgadas) sin enrollar.
- Page 42 Pon- ga el motor en marcha y d@jelo en marcha per unos 3 minutos despu@s de haberle puesto estabilizador. El aceite Craftsman 40:1 para motores a 2 tiempos (enfriados a aire) viene mezclado con estabilizador de com- bustible.
- Page 43 TABLA DIAGNOSTICA ADVERTENCIA: Siempre apague el aparato y desconecte de hacer cualquiera de las reparaciones no requieran el aparato funcionar. SINTOMA CAUSA EI motor no 1. El motor esta ahogado. arranoa. 2. El tanque de combustible est& vacio. 3. La bujia no estA haciendo chispa.
- Page 44 SUS DERECHOS Y OBLIGACIONES DE GARANTIA: La Agencia de Pro- tecci6n Ambiental de los Estados Uni- dos, la Junta de Recursos Ambien- tales de California y Sears, Roebuck and Co., U.S.A., se complacen en ex- plicar la garantia con la que cuenta el sistema de control de emisi6n en su motor pequeSo, modelo 2007 y m&s adelante,...
- Page 45 Cualquier pieza g arantizada que est6 programada para ser reemplazada como p arte d e] m antenimiento requeri- dodeberb, estar garantizada por e l periodo detiempo que comienza enla fecha d ecompra inicial hasta l afecha del p rimer reemplazo programado para dicha p ieza.
- Page 48 For expert troubleshooting www.rnanagemyhome.com For repair - in your home - of all major brand appliances, lawn and garden equipment, or heating and cooling systems, no matter who made it, no matter who sold it! For the replacement parts, accessories and owner's manuals that you need to do-it-yourself.
Need help?
Do you have a question about the GASOLINE WEEDWACKER 358.791031 and is the answer not in the manual?
Questions and answers