Table of Contents
Advertisement
Quick Links
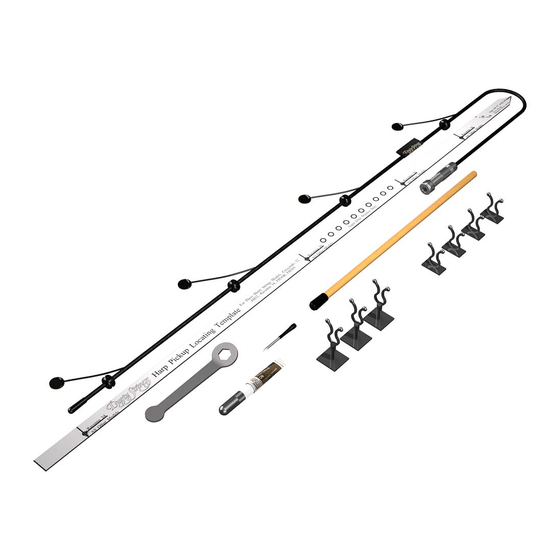
Installation Kit Contents and Diagram of Pickup
A.
Pickup Element
B.
Grommet
C.
Pickup Harness
D.
Jack
E.
Pickup Locating Template
F.
Harness Clips
G.
Super Glue
H.
12mm Wrench
I.
Jack-Tightening Pin
J.
Pressure Stick/Ruler
K.
Lead Wire
Thank you for choosing the Dusty Harp Pickup! While we developed the pickups and instructions specificially for Dusty
Strings harps, they have been successfully installed in numerous other makes and models with great success. Before you
begin, please read the instructions all the way through and pay special attention to the principles outlined below. This
will ensure a smooth installation process and optimal pickup performance, and will be especially helpful if installing the
pickup in a non-Dusty harp, where some of our more specific placement instructions may not apply.
•
Anything that is not securely attached can create a buzz, and any hard surface that is lightly touching another hard
surface can cause a rattle.
•
Make sure the harness clips are not touching any part of the harp except where they are stuck on. Don't put them
close enough to buzz against the soundboard or braces. Don't attach them to the soundboard if at all possible.
•
Make sure the lead wires are not resting on the soundboard.
•
Regardless of how you install the jack, make sure all the internal and external nuts are snug, and make sure the jack is
either securely attached to the harp or at the very least cushioned so it can't buzz against the harp body.
•
Clean the surface of the harp at every adhesive attachment point, even if it doesn't look dirty. A little bit of dust can
interfere with the adhesive bond, resulting in loose components later on.
•
While we recommend testing pickup placement with double-stick tape on non-Dusty harps, it's not a great long-
term solution. Tape can come loose, and also weakens the signal, resulting in less-than-optimal tone and volume.
P10 Dusty Harp Pickup
for 24-30 string lever harps
A
B
K
E
H
Read This Before You Start!
C
D
I
G
1
F
J
Tools Required:
•
Awl
•
Pencil
•
Damp Cloth
•
Masking Tape
Optional:
•
Drill
•
1/2" Brad Point Drill Bit
(available from Dusty Strings)
rev. 9/21/23
Advertisement
Table of Contents

Related Manuals for Dusty Strings P10


Summary of Contents for Dusty Strings P10
- Page 1 P10 Dusty Harp Pickup for 24-30 string lever harps Installation Kit Contents and Diagram of Pickup Pickup Element Grommet Pickup Harness Jack Pickup Locating Template Harness Clips Super Glue 12mm Wrench Jack-Tightening Pin Pressure Stick/Ruler Tools Required: Lead Wire •...
- Page 2 It can also help to ensure that the hole doesn’t get “wowed out” as Brad-point Standard drill bit drill bit you drill. If needed, 1/2" brad-point bits are available from Dusty Strings. Figure 3 – Drill bits...
- Page 3 Testing Placement in a Non-Dusty Harp Before gluing the pickup elements to the soundboard of a non-Dusty Strings harp, we advise using double-stick tape to temporarily place the elements on the outside of the soundboard, using the template so you can find the same locations when you permanently install the pickup inside.
- Page 4 Step 4: Mark Harness Clip Locations If you have a Dusty Strings double-strung harp with circular holes drilled in the body braces, see page 7 and follow steps 4A- 6A instead. 1. or Dusty Strings FH26, Allegro or Ravenna 26: Mark an ‘X’ on the soundboard lining approximately 1” toward the base of the harp from each element location (see figure 4, previous page).
- Page 5 Practice controlling glue ed vibration. Find the super glue practice dots located on the For all Dusty Strings harp models, the pickup ele- Pickup Locating Template. ment lead wire will bend upward, toward the top of Touch the tip of the tube to the paper and squeeze the harp (see figure 7).
- Page 6 24 hours. The tone and signal strength will improve over the next day as the super glue cures to full hardness. Congratulations! Now the installation process is complete. Please call us with any questions. Dusty Strings • 3450 16th Ave W, Seattle, WA 98119 • 206-634-1656 • www.dustystrings.com...
- Page 7 Double-Strung Harps More recent Dusty Strings double-strung harps may have round holes drilled in the span braces (see figure 10) to enable a quick and easy harness installation. If your harp has this feature, we suggest following steps 4A through 6A. If your harp does not have these holes, go back to page 4 and follow the standard harness installation steps (step 4 to the end).
Need help?
Do you have a question about the P10 and is the answer not in the manual?
Questions and answers