Advertisement
Quick Links
Advertisement

Related Manuals for Hunter SP-NODE-BT


Summary of Contents for Hunter SP-NODE-BT
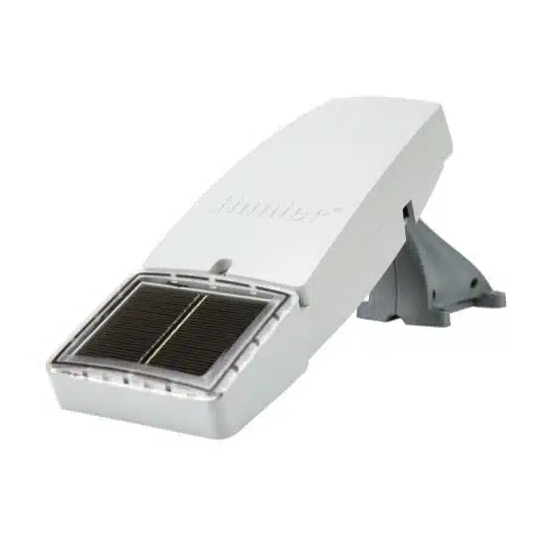
- Page 1 NODE-BT SOLAR PANEL INSTALLATION GUIDE SP-NODE-BT NODE-BT Solar Panel...
-
Page 2: Table Of Contents
Components Table of Contents Solar Panel 40' (12 m) Cable and NODE-BT Solar End Cap Connection Components Solar Panel Ball Mount Installing the Solar Panel 4. Wall-Mount Hardware NODE-BT App Updates Notices Troubleshooting ➊ ➋ ➌ ➍... -
Page 3: Components
Components Solarpanel 1. Güneş Paneli 12 m (40') Kabel und NODE-BT Solar-Anschlusskappe 2. 40' (12 m) Kablo ve NODE-BT Güneş Paneli Alt Kapağı Bağlantısı Solarpanel Montagegelenk 3. Güneş Paneli Küresel Montajı 4. Zubehör zur Wandmontage 4. Duvara Montaj Donanımı Panel Solar Panel Słoneczny Cable de 40' (12 m) y conexión de tapa de solar del NODE-BT Kabel 12 m (40') i nakładka NODE-BT Solar... -
Page 4: Installing The Solar Panel
2. Pase todo el mazo de cables del panel solar a través de la contratuerca de la tapa. 3. Instale la tapa del SP-NODE-BT en el cuerpo del NODE-BT y apriete la contratuerca para asegurarla en su lugar. 1. Retirez l'écrou autobloquant, le capuchon d'extrémité et les piles 9 V du programmateur NODE-BT. - Page 5 2. Passe todo o feixe de fios do painel solar pela contraporca da tampa. 3. Instale a tampa SP-NODE-BT no corpo do NODE-BT e aperte a contraporca para prendê-la no lugar. 1. Kilit somununu, alt kapağı ve 9 V pilleri; mevcut NODE-BT Kontrol Ünitesinden çıkarın.
- Page 6 Installing the Solar Panel 1. Feed the red and black wires up through the Solar Panel ball mount. 2. Install the ball mount where the Solar Panel will be located. The Solar Panel ball mount can be installed in multiple ways: Use the four included screws and anchors for drilling into a wall or flat surface.
- Page 7 Installing the Solar Panel 1. Faites passer les fils rouge et noir par la fixation articulée du 1. Kırmızı ve siyah kabloları Güneş Paneli küresel Panneau Solaire. montajından geçirin. 2. Installez la fixation articulée à l'endroit où se trouvera le 2.
- Page 8 Installing the Solar Panel 1. Öffnen Sie die Solarpanel-Abdeckung und befestigen Sie das Panel auf dem Montagegelenk. Stellen Sie sicher, dass die roten und schwarzen Drähte durch das Montagegelenk in das Gehäuse des Solarmoduls führen und ausreichend Spielraum haben, um die (+) und (–) Anschlüsse zu erreichen. 2.
- Page 9 Installing the Solar Panel 3. Passe os fios pelo anel impermeável e conecte o fio vermelho 1. Ouvrez le couvercle du Panneau Solaire et fixez le panneau do cabo ao parafuso do terminal vermelho (+) e o fio preto ao solaire sur la fixation articulée.
-
Page 10: Node-Bt App Updates
NODE-BT App Updates Um das Solarpanel mit einem vorhandenen NODE-BT Steuergerät zu verwenden, aktualisieren Sie zunächst die NODE-BT Bluetooth- App auf Version 5.1.0 oder höher. Öffnen Sie die App nach der Aktualisierung und stellen eine Verbindung zu Ihrem NODE-BT her. Möglicherweise werden Sie aufgefordert, die Firmware des Steuergeräts zu aktualisieren. - Page 11 NODE-BT App Updates 1. Détectez le programmateur et connectez-vous-y. Güneş Panelini mevcut bir NODE-BT Kontrol Ünitesi ile kullanmak 2. Sélectionnez l'icône Plus. için önce NODE-BT Bluetooth Uygulamasını güncelleyin. Güneş Panelini kullanmak için uygulama sürümü 5.1.0 veya üzerine 3. Sélectionnez Paramètres du programmateur. sahip olmanız gerekir.
-
Page 12: Notices
Notices Batteries should be recycled or disposed of separately from household waste and according to local environmental laws and guidelines. Batterien müssen getrennt vom Hausmüll und gemäß den örtlichen Umweltgesetzen und -richtlinien recycelt oder entsorgt werden. Las pilas deben reciclarse o eliminarse por separado de los residuos domésticos y de acuerdo con las leyes y directrices medioambientales locales. -
Page 13: Troubleshooting
Troubleshooting SCAN Scan to access helpful information about your product, including installation tips, for help controller programming, and more. hunter.help/NODEBT... - Page 14 Notes...
- Page 15 Notes...
- Page 16 Landscape Irrigation and Outdoor Lighting HUNTER INDUSTRIES | Built on Innovation® 1940 Diamond Street, San Marcos, CA 92078 USA © 2023 Hunter Industries Inc. Hunter, the Hunter logo, and other marks are trademarks of Hunter Industries Inc., registered in the hunterindustries.com U.S.
Need help?
Do you have a question about the SP-NODE-BT and is the answer not in the manual?
Questions and answers