Table of Contents
Advertisement
Available languages
Available languages
Quick Links
BULB HEATER & BULB HEATER/FANS
READ AND SAVE THESE INSTRUCTIONS
IMPORTANT INSTRUCTIONS
READ ALL INSTRUCTIONS BEFORE
INSTALLING OR USING THIS HEATER.
1. Use this unit only in the manner intended by the manufacturer.
If you have questions, contact the manufacturer at the address
or telephone number listed in the warranty.
2. Before servicing or cleaning unit, switch power off at service
panel and lock the service disconnecting means to prevent
power from being switched on accidentally. When the service
disconnecting means cannot be locked, securely fasten a
prominent warning device, such as a tag, to the service panel.
3. Installation work and electrical wiring must be done by a
qualified person(s) in accordance with all applicable codes
and standards, including fire-rated construction codes and
standards.
4. When cutting or drilling into wall or ceiling, do not damage
electrical wiring and other hidden utilities.
5. This heater is hot when in use. To avoid burns, do not let bare
skin touch hot surfaces. Keep combustible materials, such as
furniture, pillows, bedding, papers, clothes, etc. and curtains at
least 3 feet (0.9 m) from the front of the heater.
6. Extreme caution is necessary when any heater is used by
or near children or invalids and whenever the heater is left
operating and unattended.
7. Do not operate any heater after it malfunctions. Disconnect
power at service panel and have heater inspected by a
reputable electrician before reusing.
8. Do not use outdoors.
9. To disconnect heater, turn controls to off, and turn off power
to heater circuit at main disconnect panel (or operate internal
disconnect switch, if provided).
10. Do not insert or allow foreign objects to enter any ventilation or
exhaust opening, as this may cause an electric shock or fire, or
damage the heater.
11. To prevent a possible fire, do not block air intakes or exhaust in
any manner.
12. A heater has hot and arcing or sparking parts inside. Do not
use it in areas where gasoline, paint, or flammable vapors or
liquids are used or stored.
13. Use this heater only as described in this manual. Any other use
not recommended by the manufacturer may cause fire, electric
shock, or injury to persons.
14. This product must be grounded.
15. Do not install heater in a tub or shower enclosure.
16. This product is designed for installation in flat ceilings only. DO
NOT MOUNT THIS PRODUCT IN A WALL.
17. Install heater at least 6 inches from floor or any adjacent wall.
For supply connections, use wire suitable for 75
not install insulation within 3 inches of top of sides of housing.
18. Do not connect heater to dimmer switch or speed control.
SAVE THESE INSTRUCTIONS
PLANNING
Choose the location for your heater. Refer to Warnings and Cautions.
MODELS 162M & 164 ONLY – The unit will operate most efficiently
when located where the shortest possible duct run and minimum
number of elbows will be needed. Units are designed for use with
standard 4" round duct.
Note that the two-bulb unit (164) can be fitted with one infrared bulb
(for heat) and one reflector bulb (for light). Dual or multi-controls can
be used for separate control of bulbs and/or exhaust fan. Purchase
controls separately.
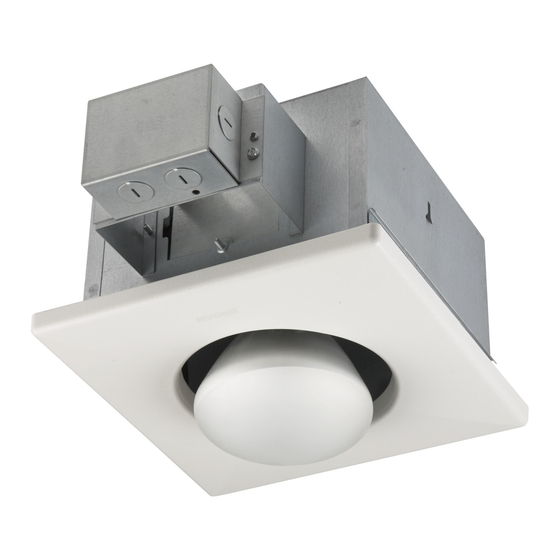
Refer to FIGURE 1
Follow these basic steps when installing this unit:
1.
Nail unit to joists.
2. Attach ductwork (Models 162M & 164 only).
3. Connect power cable.
4. Fasten grille to housing.
PREPARATION
1.
Remove the unit from carton. Save carton for use as plaster
shield in rough-in installations.
Refer to FIGURE 2
2. Slide adjustable mounting brackets into bracket channels on
housing.
DAMPER/DUCT
CONNECTOR
CEILING
JOIST
CEILING MATERIAL
C minimum. Do
0
BULB HEATER & BULB HEATER / FANS
MODELS 161M • 162M • 164
POWER CABLE
HOUSING
BULB(S)
Page 1
MOUNTING
BRACKET
GRILLE
FIGURE 1
FIGURE 2
Advertisement
Table of Contents

Related Manuals for Broan 161M


Summary of Contents for Broan 161M
- Page 1 BULB HEATER & BULB HEATER / FANS MODELS 161M • 162M • 164 Page 1 BULB HEATER & BULB HEATER/FANS READ AND SAVE THESE INSTRUCTIONS PLANNING IMPORTANT INSTRUCTIONS READ ALL INSTRUCTIONS BEFORE Choose the location for your heater. Refer to Warnings and Cautions.
-
Page 2: Installation
BULB HEATER & BULB HEATER / FANS MODELS 161M • 162M • 164 Page 2 INSTALLATION WARNING: To reduce the risk of fire, do not store or use gasoline or other flammable vapors and liquids in the vicinity of the heater. - Page 3 BULB HEATER & BULB HEATER / FANS MODELS 161M • 162M • 164 Page 3 WHITE to WHITE BLACK to BLACK GROUND WHITE to WHITE BLACK SWITCH OR TIMER GROUND BLACK 120 VAC LINE IN MODEL 161M BLACK to WHITE to...
-
Page 4: Operation
BULB HEATER & BULB HEATER / FANS MODELS 161M • 162M • 164 Page 4 OPERATION Before using heater, make sure heater has been properly installed according to installation steps beginning with the “PLANNING” section on page 1. MODELS 162M & 164 OPERATION NOTE: These units are de- signed with a thermostat which senses excess heat and may start the blower automatically. -
Page 5: Maintenance
BULB HEATER & BULB HEATER / FANS MODELS 161M • 162M • 164 Page 5 MAINTENANCE The following maintenance and cleaning tasks can be performed by the user. All other servicing must be performed by an authorized technician If you have any questions, please consult with our cus- tomer service department at: 800-558-1711. -
Page 6: Service Parts
MERCHANTABILITY OR FITNESS FOR A PARTICULAR PURPOSE. During this one-year period, Broan-NuTone will, at its option, repair or replace, without charge, any product or part which is found to be defective under normal use and service. THIS WARRANTY DOES NOT EXTEND TO FLUORESCENT LAMP STARTERS AND TUBES. This warranty does not cover (a) normal maintenance and service or (b) any products or parts which have been subject to misuse, negligence, accident, improper maintenance or repair (other than by Broan-NuTone), faulty installation or installation contrary to recommended installation instructions. -
Page 7: Instructions Importantes
VENTILATEURS À LAMPE CHAUFFANTE ET À ÉCLAIRAGE MODÈLES 161M • 162M • 164 Page 7 VENTILATEURS À LAMPE CHAUFFANTE ET À ÉCLAIRAGE LISEZ ET CONSERVEZ CES INSTRUCTIONS INSTRUCTIONS IMPORTANTES PLANIFICATION Choisissez l’emplacement du ventilateur. Consultez les avertisse- LIRE TOUTES LES INSTRUCTIONS AVANT D’INSTALLER OU ments et mises en garde ci-dessus. -
Page 8: Assemblage Final
VENTILATEURS À LAMPE CHAUFFANTE ET À ÉCLAIRAGE MODÈLES 161M • 162M • 164 Page 8 INSTALLATION AVERTISSEMENT : Pour réduire les risques d’incendie, n’entreposez pas et n’utilisez pas de l’essence ni des liquides ou vapeurs inflam- mables à proximité de la chaufferette. - Page 9 VENTILATEURS À LAMPE CHAUFFANTE ET À ÉCLAIRAGE MODÈLES 161M • 162M • 164 Page 9 BLANC au BLANC NOIR au NOIR TERRE BLANC au BLANC NOIR INTERRUPTEUR ou MINUTERIE TERRE NOIR ENTRÉE 120 VCA MODÈLE 161M ROUGE au BLANC au...
- Page 10 VENTILATEURS À LAMPE CHAUFFANTE ET À ÉCLAIRAGE MODÈLES 161M • 162M • 164 Page 10 FONCTIONNEMENT Avant d’utiliser la chaufferette, assurez-vous qu’elle est correctement installée selon les directives indiquées à la section « PLANIFICATION » à la page 1. FONCTIONNEMENT DU MODÈLES 162M ET 164: Ce modèle com- porte un thermostat pour détecter les excès de chaleur et actionner...
- Page 11 VENTILATEURS À LAMPE CHAUFFANTE ET À ÉCLAIRAGE MODÈLES 161M • 162M • 164 Page 11 MAINTENANCE L’utilisateur peut effectuer les tâches d’entretien et de nettoyage suiv- antes. Tous les autres travaux doivent être confiés à un technicien agréé. Pour toute question, veuillez vous adresser au service à la clientèle au : 800-558- 1711.
-
Page 12: Liste Des Pièces
GARANTIE LIMITÉE D’UN AN BROAN-NUTONE Broan-NuTone garantit à l’acheteur original que ses produits sont exempts de tout défaut de matériel ou de fabrication pour une période d’un an à compter de leur date d’achat initiale. IL N’Y A PAS D’ A UTRES GARANTIES EXPRESSES OU IMPLICITES, Y COMPRIS, NOTAMMENT, LES GARANTIES IMPLICITES DE QUALITÉ MARCHANDE OU D’...
Need help?
Do you have a question about the 161M and is the answer not in the manual?
Questions and answers