Advertisement
To ensure that you can fully enjoy BUYDEEM's all-around support, read this manual and related illustrations carefully and completely before operating this product.
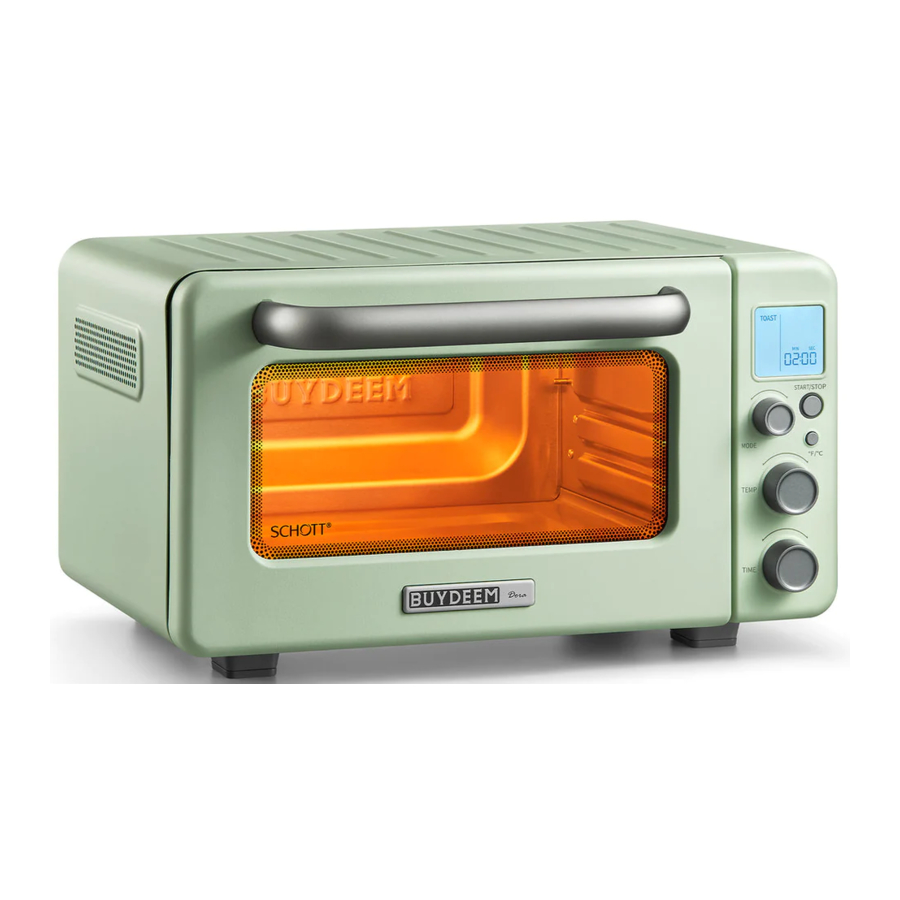
PRODUCT SPECIFICATIONS
Specifications
| Name | Mini Toaster Oven | Model | T103 | ||
| Maximum Capacity | 11.5L | Power | 1600W | Voltage | 120V- 60Hz |
| Size | 15.7x12.1x9.a inches | Net Weight | 5.6kg | ||
| Material | These materials comply with FDA standards: Schott glass, SUS430 stainless steel (cavity), SUS304 stainless steel (baking tray/wire rack), Whitford waterborne ceramic non-stick coating (coating of the base plate of the cavity), and carbon fiber heat pipe. | ||||
OPERATION GUIDE
Products and Accessories

- Power On/Off button: at the back of the oven body for controlling the on/off of the oven.
- Control panel: used to control the oven (refer to Control Panel Description for details).
- Shelf: built-in integrated shelf with two upper and lower levels.
- Hidden ceramic non-stick base plate (heat pipes hidden in the lower part of the base plate): for easy cleaning of the bottom of the oven.
- Oven door handle: wider design, easy to grip.
- Side vent port holes: proper heat dissipation to ensure normal operation of control components.
- SUS430 stainless steel cavity: strong and durable, easy to clean.
- Oven door: ensure that the oven door is shut before baking.

- Wire rack (cooling rack):
- The up and down sides of the wire rack make different space heights on the same level of the grill.
- When using the TOAST/BAGEL function, place the wire rack on the lower level to achieve the best baking results.
- Stainless steel baking tray:
- The baking tray adopts food-grade SUS304 stainless steel, which is safe and durable.
- When baking food with potential food residue or grease dropping, use the baking tray to prevent high-temperature carbonization of residue or grease from dripping down to the bottom of the cavity, which is difficult to clean.
Control Panel

- Start/Stop button
- Press the "Start/Stop" button to start the oven; press it again to stop the oven and leave it into standby mode.
- When the "Start/Stop" button light circle is on, the oven is working; when the "Start/Stop" button light circle is flashing, the oven is in the mode of selecting; when the '"Start/Stop" button light circle is off, the oven is in standby mode or off.
- Mode knob
Turn the knob to select the function: TOAST/BAGEL/BAKE/BROIL/PIZZA/ROAST/REHEAT. - ºF/ºC switch button
Press to switch the temperature unit. - Temperature knob
Turn the knob to select the temperature.
It is not selectable for TOAST/BAGEL function. - Time knob
Turn the knob to select the time. - LCD screen
![]()
- Display oven functions, temperature, time, temperature units, and operating status; if no operation is performed on the oven within 5 minutes, the oven will enter standby mode: the backlight of the LCD screen goes out. Wake up and light the oven by any knob button.
- Display seven functions: TOAST/BAGEL/BAKE/BROIL/PIZZA/ROAST/REHEAT.
- Display additional functions: ºF/ºC unit switching.
- Display baking temperature.
- Display baking time.
- Operation Phase Progress Bar: the progress bar lights up and flows linearly during oven operation.

Operation for the First Use
- After removing the oven and accessories from the box, please properly remove and dispose of the plastic bags covering the oven and accessories.
- The standard accessories of the oven include a stainless steel baking tray, a wire rack, and an instruction manual (including recipes).
- The product is recommended to be placed 36 inches above the ground. 4 inches at least between the oven and the left/right/back walls must be ensured. Do not place any objects above the oven. A space of 8 inches or more must be provided above the oven for heat dissipation.
- After placing the oven in place, read the sticker on the oven door carefully and remove it after reading.
- Use a separate socket rated at 13.3A or above and 120V— 60Hz AC to turn on the power.
- Locate the Power On/Off button at the back of the oven and select Power On.
- After power on, remove the wire rack and baking tray, rotate the mode knob to the BAKE function, and set the baking temperature to 350ºF and baking time to 30 minutes. The "Start/Stop" button light circle flashes. Press the "Start/Stop" button to bake the oven empty to remove the odor.
- Smoke and odors are normal because they are from the heat evaporation of protection oil of components and the cavity.
- After baking the oven empty, and the oven has cooled completely, wipe the inside with a soft and slightly and dry the oven completely before use,
- Wash all accessories (the wire rack and baking tray) in warm water and dry them for use.
Rack Height Position

Upper layer height:
- For REHEAT function, place the wire rack or baking tray on the upper layer.

Lower layer height:
- For TOAST/BAGEL/BAKE/PIZZA function, place the wire rack or baking tray on the lower layer for even coloring result.
- For ROAST function, the proper height of rack depends on the size of the food. Make sure the food is at the central point of the cavity for better result.

Special use for BROIL:
- For BROIL function, place the wire rack upside down on the upper layer with food on. Then place the baking tray on the lower layer to catch the grease and drippings for better food result.
- Food should be placed in the middle of the rack to avoid grease dripping over the baking tray onto the bottom of cavity, which may damage the coating.
FUNCTION AND USAGE INSTRUCTIONS
Function Overview
| Mode | Introduction | Recommended layer height | Initial temperature/ time |
| TOAST | For baking toast slices and other bread to produce a crispy crust quickly | Lower layer | 3min |
| BAGEL | For baking bagels to quickly make a crispy crust | Lower layer | 4min30s |
| BAKE | For baking cakes, muffins, and other baking ingredients, or delicate food like salmon | Lower layer | 320ºF/30min |
| BROIL | For baking small/thin pieces of meat, poultry, fish, sausage, and vegetables or for coloring food with cheese on the top | Upper layer | 430ºF/15min |
| PIZZA | For baking pizza with crispy bottom | Lower layer | 430ºF/15min |
| ROAST | For baking meat and poultry for a crispy exterior and tender interior, or for baking solid vegetables such as potatoes | Lower layer | 350ºF/1h |
| REHEAT | For heating leftovers and avoiding overheating | Upper layer | 320ºF/15min |
TOAST/BAGEL
This function is used to browns and crisps toast slices, bagels, and other bread quickly.
| Mode | Time adjusting range | Time adjusting interval |
| TOAST | 10s-10min | 10s |
| BAGEL | 10s-15min | 10s |
Use instructions:
STEP1: The default TOAST function is displayed when the power is on, you can also select the desired function by rotating the "mode" knob.
STEP2: Rotate the "Time" knob to select the desired time.
STEP3: Press the "Start/Stop" button to start toasting.
Function instructions:
- Under the TOAST/BAGEL function, you can adjust the time at any time, but the total heating time of toasting should not be more than 10min for TOAST, or 15min for BAGEL.
- The temperature of the two function is default setting and unadjustable.
- When baking is finished, the beep sounds and the LCD screen goes off and enters the standby mode.
Time recommendations:
The baking time required for different bread types, sugar and fat content, water content, thickness, and size of bread varies and needs to be adjusted according to preference:
- For the first time, use the default time and observe the coloring in the last heating stage to adjust the time.
- For frozen bread, it is recommended to use time slightly longer than usual.
- For fresh bread or whole wheat bread, use time slightly longer than usual.
- For bread stored long or dry bread, use time slightly shorter than usual.
- For thick-cut slices, it is recommended to use time slightly longer than usual.
Note:
- When toasting bread, please place the wire rack/baking tray on the lower layer to achieve an even baking color. When toasting bread with cheese or filling easily flowing out, use the baking tray to prevent cheese or filling from dripping down to the bottom of the cavity and damaging the coating after high-temperature carbonization.
- Preheating is not needed as the oven heats up rapidly.
Other Functions
| Mode | Temperature adjusting range | Temperature adjusting interval | Time adjusting range | Time adjusting interval |
| BAKE | 140ºF-450ºF | 10ºF | 1 min-2h | 1min |
| BROIL | 300ºF-450ºF | 10ºF | 1-20min | 1min |
| PIZZA | 300ºF-450ºF | 10ºF | 1min-2р | 1min |
| ROAST | 140ºF-370ºF | 10ºF | 1min-2h | 1min |
| REHEAT | 140ºF-370ºF | 10ºF | 1min-2h | 1min |
Use instructions:
STEP1: Rotate the "Mode" knob to select the function.
STEP2: Rotate the "Temperature" knob to set the temperature.
STEP3: Rotate the "Time" knob to set the time.
STEP4: Press the "Start/Stop" button to start baking.
Function instructions:
- During the function operation, you can adjust the baking temperature and baking time at any time.
- When baking is finished, the beep sounds and the LCD screen goes off and enters the standby mode.
Note:
- When using the BROIL function, put the wire rack on the upper layer to hold the food and put the baking tray on the lower layer to receive the residue to produce better food result.
- Preheating is not needed as the oven heats up rapidly.
ºF/ºC Switch
Function instructions:
- Press this button to switch the temperature unit between ºF/ºC except for the TOAST/BAGEL function (temperature is not adjustable).
- The temperature unit can be switched in any state when the oven is woken up.
CLEANING AND MAINTENANCE
Cleaning the oven
- Disconnect the power plug before cleaning the oven and make sure the oven is completely cool before cleaning.
- Instructions for the use and maintenance of the non-stick bottom plate of the cavity:
- Use a soft cloth, neutral cleaners, and warm water for cleaning. Do not use abrasive cleaners.
- Do not rub or strike the surface coating with hard objects.
- When baking food high in oil or sugar, use the baking tray. Do not drip stains on the bottom plate of the cavity, which may damage the coating.
- After baking, clean the oven cavity in time after the oven has cooled to avoid carbonization of the residual material on the bottom plate.
- Cleaning the exterior surface and oven door: use a damp soft sponge to wipe the exterior surface. Use a non-abrasive cleaner to remove stains. Do not use abrasive cleaners or metal tools
![]() to prevent scratching the surface of the glass door or damaging the Low-e coating of the glass.
to prevent scratching the surface of the glass door or damaging the Low-e coating of the glass. - Cleaning the backing tray/wire rack:
- When baking food high in oil or sugar, put greaseproof paper or tinfoil on the baking tray for easy cleaning.
- Dip all accessories into a warm neutral cleaner. Wipe with a soft damp sponge. Rinse and wipe it dry.
- Stainless steel baking tray will have yellowing marks under high temperature baking because of material characteristics.
Pay attention to the operating environment
- Applicable temperature range 14ºF- 104ºF (-10º C- 40º C).
- The relative humidity of the air is below 95% (when the temperature is 75º F/25º C).
- The surrounding air should be free from flammable, corrosive gases or conductive dust.
Tips for removing grease marks
- Use a soft cloth, neutral cleaners, and warm water for cleaning. Do not use abrasive cleaners.
- After baking food high in oil or sugar and the oven is completely cool, clean the cavity immediately to avoid the accumulation of stains that can make the oven difficult to clean.
- For stubborn stains, dissolve baking soda in warm water until it reaches thick consistency. Fully cover the paste on the stains and lay a damp cloth on it. Let it stand for 24 hr or overnight then clean with a scrub sponge until stains are fully removed.
BASIC TROUBLESHOOTING
| Problem | Solution |
| Oven will not turn on | Ensure the main switch at the back of the oven is turned ON. |
| Ensure the plug is firmly inserted into the socket. | |
| Insert the plug into a separate socket. | |
| Check if the socket is working. | |
| If necessary, reset the circuit breaker. | |
| Oven smokes | Smoke is normal when the oven bakes empty for the first time, |
| Check if the smoke is caused by water vapor. It is normal for the air inside the cavity to heat up rapidly during baking and condense into mist when it escapes from the cavity. | |
| Check if the baking temperature or time is not set correctly, which causes burnt food, and adjust the setting next time. | |
| Water on the oven door glass | It is normal for the air inside the cavity to condense into water droplets when it meets the oven door glass. |
| How to restore default settings | To restore default settings for the oven, turn off the On/Off button at the back of the oven and restart the oven, or remove the plug from the socket and plug it in again after 5 seconds. |
RECIPES
Marinated London Broil
Mode: Broil Temp: 400ºF Time: 10 min
INGREDIENTS
1/2 1b top round roast, shoulder roast, or ribeye steak-thickly sliced
Marinade
1 cup beef/chicken/vegetable broth
2-3 diced shallots
1-2 tbsp dark brown sugar (to taste)
1-2 cloves garlic
2 tbsp light soy sauce
1 fresh chili (optional)
1 tbsp balsamic vinegar
1-2 large pinches of thyme, rosemary and oregano (dried)
1/2 cup orange juice (freshly squeezed)
1/2 tsp ground cloves
1-2 tsp orange zest
1/2 tbsp olive oil
1/2 diced onion
salt and black pepper (to taste, freshly ground)
STEPS
- Marinate beef in refrigerator for 1-4 hr.
- On upper level, broil steaks on rack-each side 5 min at 400ºF, for medium rare.
- While broiling, filter marinade into sauce pan and reduce liquid at low heat until reached desired consistency.
- Once beef is finished on both sides, remove and let rest for at least 5 min.
- Slice and slather with reduced marinade.
- Enjoy with green beans or asparagus and a good red wine!
Roast Tomato
Mode: Roast Temp: 410ºF Time: 25-30 min
INGREDIENTS
1-4 whole tomatoes
Bunch of bread crumbs
1-2 clove garlic (to taste)
parmesan cheese (to taste)
pinch of salt and pepper
drizzle of olive oil
STEPS
- With a paring knife, remove the stem and core plus a little more from the middle of the tomato. Try to make the opening slightly wide.
- In the opening of the tomato, add:
- One pinch of salt and pepper (freshly ground)
- A drizzle of olive oil
- A touch of pressed garlic
- A pinch of bread crumbs
- A dash of parmesan cheese (freshly grated)
- Make sure you have filled the hole completely to the top with these ingredients.
- On lower level, roast at 410ºF for 25-30 min or until tomatoes are slightly soft and mostly cooked
![]()
Napoleon Pan-Pizza
Mode: Pizza Temp: 410ºF Time: 15 min
INGREDIENTS (Makes two 8 in pizzas)
Dough (65% Hydration)
150g high gluten bread flour
2g salt
2g dry yeast
98ml water
Sauce
3 whole ripe tomatoes
1 tbsp olive oil
several fresh basil leaves
1 clove garlic
salt and pepper (to taste)
Toppings
150g mozzarella cheese (for 1 pizza)
bunch of fresh basil
1/3 tsp olive oil
STEPS
- Place flour, salt and yeast in a mixing bowl and mix together.
- Add water, mix.
- Knead until smooth and the dough is slightly stretchy.
- Cover and let rise until double in size (can put in fridge overnight for better flavor).
- Skin tomatoes, cut into pieces.
- Heat Olive oil in a thick bottom pot, add tomatoes.
- Cook tomatoes until soft, add tomatoes, fresh basil, garlic, salt and pepper to blender, blend until smooth.
- Pour back into pot, low heat until slightly thickened or has reached preferred consistency (not too watery).
- Once dough has doubled, flatten and separate into two balls.
- Cover and let rise slightly again.
- Remove one ball, and form out onto an oiled 8 in pan.
- Apply tomato sauce evenly, add cheese and a touch of olive oil.
- On lower level, place into oven on PIZZA setting.
- Cook at 410ºF for 15 min around depending on preferred texture.
![]()
- Add a couple fresh basil leaves and serve!
Tacos de Carnitas
Mode: Roast Temp: 350ºF Time: 2 hr
INGREDIENTS
1 lb pork shoulder
tacos, guacamole, salsa (to serve, optional)
Marinade
3-4 cloves pressed garlic
2-3 tsp cumin
5-6 tsp salt (to taste)
1-2 tsp cinnamon
2-3 tsp black pepper
2-3 tsp coriander seeds
2-3 tsp oregano
2-3 tsp chili powder
2-3 tsp thyme
Relish
1 orange
2 bay leaves
1 cup water or stock
STEPS
- Cut pork into chunks.
- Add garlic, salt, pepper, oregano, thyme, cumin, cinnamon, coriander seeds, chili powder.
![]()
- Marinate at least 4 hr, best overnight.
- In a frying pan, begin to sear each piece of meat. Do not overcrowd the pan.
- Once all pieces have a bit of color, put all of them into a Buydeem Food Container (or a similar pot).
- Add the juice of 1 orange, the peel of 1 orange, 1 cup of water or stock and the bay leaves.
- On lower level, put the Buydeem Food Container covering with aluminum foil in the oven.
- Roast at 350ºF for 2 hr or until meat is completely tender and easy to pull apart.
- Remove most of the liquid (can save, reduce, and add to tacos for amazing flavor), place on oven tray and pull apart with two forks.
- (optional) Place tray back in oven at 400ºF for 5-10 min. Create a char on the top of the meat.
- Serve with tacos, guacamole, salsa and any other topping of your choice!
The Chocolate Cookies
Mode: Bake Temp: 350ºF Time: 12 min
INGREDIENTS
1 cup bread flour
2 tsp vanilla essence
3/4 cup all-purpose flour
1 egg
2 tsp kosher salt
1 egg yolk
1 tsp baking soda
1/2 cup semi-sweet chocolate chips
1 cup butter
1 tsp espresso powder
1 cup dark brown sugar
5 oz dark chocolate chunks
1/2 cup white sugar
STEPS
- Add all flour, salt and baking soda into a bowl.
- Melt butter in pot until slightly brown and nutty, stir as heating.
- Pour into measuring cup then cool to room temperature. If butter has reduced to less than 1 cup, add water to meet the 1 cup measure.
- In another bowl, add both sugars, vanilla and espresso powder.
- Add cooled butter to sugar mixture. Beat together.
- Add egg and egg yolk, mix.
- Then add flour mixture, bit by bit while mixing.
- Add chocolate chips and chunks, fold together.
- Make balls on baking tray and refrigerate 2-12 hr.
- Bake at 350ºF on lower layer for 12 min.
IMPORTANT SAFEGUARDS
When using electrical appliances, basic safety precautions should always be followed including the following:
- Read all instructions.
![]()
To ensure continued protection against risk of electric shock, connect to properly grounded outlets only.- Do not touch hot surfaces. Use handles or knobs.
- To protect against electrical shock do not immerse cord, plugs, or any parts of the oven in water or other liquid.
- Close supervision is necessary when any appliance is used by or near children.
- Unplug from outlet when not in use and before cleaning. Allow to cool before putting on or taking off parts.
- Do not operate any appliance with a damaged cord or plug or after the appliance malfunctions or has been damaged in any manner. Return appliance to the nearest authorized service facility for examination, repair, or adjustment.
- The use of accessory attachments not recommended by the appliance manufacturer may cause injuries.
- Do not use outdoors.
- Do not let cord hang over edge of table or counter, or touch hot surfaces.
- Do not place on or near a hot gas or electric burner, or in a heated oven.
- Extreme caution must be used when moving an appliance containing hot oil or other hot liquids.
- Always attach plug to appliance first, then plug cord into the wall outlet. To disconnect, turn any control to "off' then remove plug from wall outlet.
- Do not use appliance for other than intended use. For example, drying cloth, paper, spices, wood or other flammable items. They could be fire hazards.
- Sort Cord Instruction:
- A short power-supply cord (or detachable power-supply cord) should be used to reduce the risk resulting from becoming entangled in or tripping over a longer cord.
- Longer detachable power-supply cords or extension cords are available and may be used if care is exercised in their use.
- If a longer detachable power-supply cord or extension cord is used:
- The marked electrical rating of the cord set or extension cord should be at least as great as the electrical rating of the appliance; and
- The cord should be arranged so that it will not drape over the countertop or tabletop where it can be pulled on by children or tripped over unintentionally; If the appliance is of the grounded type, the cord set or extension cord should be a grounding-type 3-wire cord.
- Use extreme caution when removing tray or disposing of hot grease,
- Do not clean with metal scouring pads. Pieces can break off the pad and touch electrical parts, creating a risk of electric shock,
- Oversize foods or metal utensils must not be inserted in a toaster-oven as they may create a fire or risk of electric shock.
- A fire may occur if the toaster-oven is covered or touching flammable material, including curtains, draperies, walls, and the like, when in operation. Do not store any item on top of the appliance when in operation.
- Extreme caution should be exercised when using containers constructed of other than metal or glass.
- Do not store any materials, other than manufacturers recommended accessories, in this oven when not in use.
- Do not place any of the following materials in the oven: cardboard, plastic, paper, or other
![]() flammable materials.
flammable materials. - Do not cover any part of the oven with metal foil. This will cause overheating of the oven.
- To turn the oven ON/OFF, flip the main switch at the back of the oven.
Household use only.
Save these Instructions.

- Do not heat or use flammable items in/near the oven to reduce the risk of fire or explosion.
- If smoke or a fire in the oven is observed, disconnect the power plug and keep the door closed to stifle the spread of the flame.
- Do not immerse the power cord or plug in water and avoid contact of the power cord with hot surfaces to reduce the risk of electric shock, fire, or other accidents.

- Verify that the voltage shown on the product specification label matches the mains voltage,
- Always place the electric oven on a flat, stable, and heat-resistant work surface.
- Do not touch the product, its power cord, or plug with wet hands or feet when the power is on.
- Do not pull or push containers on the door when it is open. The load on the door should not exceed 2.2 pounds.
- If the door is damaged, do not use it again until it has been repaired by qualified maintenance personnel.
- If the power cord is damaged, it must be replaced by a professional from the manufacturer, its service department, or a similar department to avoid danger.
![]()
- During the operation of the electric oven, avoid contact with the heating elements in the oven.
- Keep children away from the oven because accessible parts may become hot during use.
- Do not use abrasive cleaners, gritty cleaning products, or sharp metal scrapers to clean the glass of the oven door. Abrasion of the glass surface can cause broken glass.
- Do not use steam cleaners to clean the oven.

Instructions before use
- Please use a separate power socket with a rated current of 13.3A or more and 120V- 60Hz AC to avoid overcurrent in the socket, which may cause abnormal heat, fire and other dangers.
- Do not use the oven if the door or cabinet is deformed, damaged, or cracked.
- Remove and properly dispose of all packaging materials, stickers, and plastic bags from the oven to avoid the risk when children contact them.
- Read the sticker on the oven door glass carefully before using the oven and remove it after reading.
- For the first use, please use the 350ºF BAKE function to bake the empty oven for 30 minutes, Smoke and odors are normal because they are from the heat evaporation of protection oil of components and the cavity.
- After baking the oven empty for the first time, wipe the inside with a soft and slightly damp sponge and dry the oven completely before use.
- Take out the baking tray and wire rack from the box, wash all accessories with warm water, and dry them before use.
- Before placing utensils made of different materials, verify the temperature of the oven is set within the using temperature of utensils used.
- It is not recommended to use utensils with lids in the oven as the increased pressure inside may cause hot steam and food to spray out or break the utensils.
- The oven cannot be operated with an external timer or a separate remote control system.
![]()
- This product is not designed for persons who are physically or mentally incapacitated or who have insufficient experience and knowledge (including children) unless their use is supervised or directed by a person responsible for their safety.
- The manufacturer warranty is only for manufacturing defects and domestic situations. Damage caused by failure to follow instructions is not covered by the warranty. All products are strictly controlled in accordance with quality procedures, which include actual use testing of randomly selected products, and any signs of use of the product will be explained.
Instructions in use
- Please do not disconnect the power plug by pulling the power cord.
- Do not use metal tools such as knives to remove food residue from the heat pipes, which may damage them and even cause electric shock.
- The slight rhythmic sound of the oven during operation is the sound of the temperature control device working normally.
- During operation, when stirring/turning food or picking up food at the end of baking, use insulated gloves or clamps and stay away from the oven door (especially your face) to avoid burns because of the high temperature of utensils and food.
- When baking food high in oil or sugar, use tinfoil, a baking tray, and other tools. Do not drip stains on the bottom plate of the cavity, which may damage the coating.
- It is normal for the light to flash during operation, as the heaters are switching on and off to control the temperature.
- If there is "white smoke" from the side of the oven door when the oven is heating, it is because the oven heats up quickly in most cases, The air inside the cavity heats up rapidly during baking and condenses into mist when it escapes from the cavity. It is normal.
- Do not move the oven during use.
- When the oven cools completely (to avoid burns) after baking food, clean the cavity immediately to avoid the accumulation of stains, which may make the oven difficult to clean or yellow,
Product installation cautions
- Ask the professional to check the electric meter, electric wire, socket, and fuse box used during installation, which should meet the requirements. The power specification is 120V- 60Hz.
- The product must be grounded for use. In case of leakage, the grounding wire can provide a power circuit to avoid electric shock. The power plug must be plugged into a single-phase two-pole grounded socket.
- The product is recommended to be placed 36 inches above the ground. Air circulation around the product must be ensured during normal use.
- The top of the product should be kept open and free of blockage. A space of 8 inches or more must be provided above the oven for heat dissipation. Allow at least 4 inches between the left and right walls and back panel. Do not block vents. Keep the environment clean and prevent cockroaches and other crawling insects from entering the product.
- The product should be placed flat and not be close to curtains or other flammable materials.
- Do not place the product near a wet place like a sink.
Shenzhen Buydeem Technology Co., Ltd.
Room 3801, Building A, Tanglangcheng West, No. 3333 Liuxian Boulevard, Nanshan District, Shenzhen, China.
Please refer to the real product in case of any change

Documents / ResourcesDownload manual
Here you can download full pdf version of manual, it may contain additional safety instructions, warranty information, FCC rules, etc.
Download Buydeem T103 - 12 QT Mini Toaster Oven Manual with Recipes
Advertisement
Need help?
Do you have a question about the T103 and is the answer not in the manual?
Questions and answers