Advertisement
Quick Start Guide -
Getting to Know Your Sound System
Make note of the location of the speakers in your classroom. Ensure that you have unpacked and charged your battery-powered
microphones.
Keep this guide handy for future reference.
STEP 1. CHARGING THE MICROPHONES
STEP 2. SETTING UP THE MICROPHONES
1. Power the amp ON by pressing the
power button. The power button LED will
illuminate solid blue when powered ON.
2. Set the MIC A and MIC B volume
controls to the 12 o'clock position.
1
6. Once connected, have another person
move around the room while you are talking
to verify the volume level is
sufficient in each student seating
location.
STEP 3. USING THE HANDHELD MICROPHONE
1. ON/OFF Button
• Tap to turn on, press and hold 3 sec. to turn off
2. Status Indicator LED
• Solid Blue: ON and Connected
• No Light: OFF
• Blinking Blue: Push to Talk Mode ON
• Yellow: Unpaired
3. Push to Talk (PTT) ON/ OFF Switch
4. USB-C Charging Port
TM
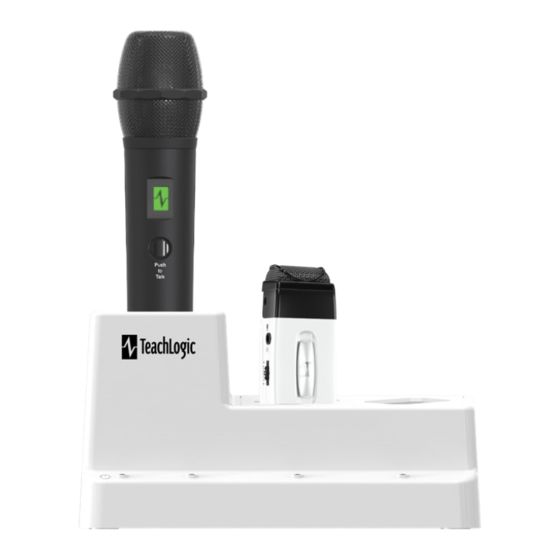
Ovation
(DECT System)
Microphone Logo Light:
• Blinking Green: = Charging
• Solid Green = Charged
• Charging takes approx. 6-8 hrs.
• Battery typically lasts 8-9 hrs.
• Do not force mics into the cradle. Ensure
microphones are aligned in the same direction facing
the front as shown above.
• OC-20 is not for TeachLogic Infrared microphones,
only Ovation.
3. Pendant Mic: Connect the
lanyard to the metal clip and place
around neck. Adjust lanyard so the
top of the mic sits on your collar
bone. Set the gain switch on the side:
• If room is noisy: set at "Normal"
• If room is quiet: set at "Quieter"
7. Have the other person give you a thumbs up or
down and adjust the amplifier volume level
accordingly until you reach the ideal level.
8. While talking, walk around the room to ensure
Volume is not set so high as to produce feedback
(howling) anywhere.
5. Push to Talk (PTT) Button
• PTT mode mutes the mic when enabled. When PTT mode is ON, the button pictured must be
held down for sound to transmit over the speakers. When PTT mode is OFF, mic will not require
a button press to talk.
OC-20 Charging Base Lights
•
Light: Solid Blue = Power ON
• Mic Dock Lights: Solid Blue = Power Supplied to Mic
• Note: Mic Dock lights and charging power will turn off after 16
hours.
WHEN REPLACING BATTERIES IN THE HANDHELD MIC,
ONLY USE RECHARGEABLE LITHIUM BATTERIES from
4. Turn "ON" the Pendant Mic via
the front button; tap once to turn
on. Press and hold front button and
side switch for 3 sec. to put in
pairing mode. Mic LED will fast blink
green when in paring mode.
9. Handheld Mic: Repeat this process using the MIC B channel
to set the ideal volume level. Turn "ON" the handheld mic by
tapping the power button once. To enter pairing mode, press
and hold the Push to Talk (PTT) button and Power button at
the same time for 3 seconds. When in pairing mode, mic will
begin to fast blink green. Continue from Step 5 above.
2
5
TeachLogic!
5. On the amp, press and hold MIC A
pairing button for 3 seconds to enter
paring mode. LED will fast blink green
when in paring mode. Once
connected, mic LED will turn solid blue
and MIC A LED on amp will turn solid
green.
LED & Paring Button
Requires simultaneous press and
hold for 3 seconds to enter pairing
3
1
Bottom View
4
2023.10.03
(1)
Advertisement
Table of Contents

Related Manuals for TeachLogic Ovation

Summary of Contents for TeachLogic Ovation
- Page 1 ONLY USE RECHARGEABLE LITHIUM BATTERIES from the front as shown above. TeachLogic! • OC-20 is not for TeachLogic Infrared microphones, only Ovation. STEP 2. SETTING UP THE MICROPHONES 4. Turn “ON” the Pendant Mic via 5.
- Page 2 STEP 4. USING THE OVATION™ PENDANT MICROPHONE 1. Status Indicator LED • Blinking Blue: Mute • No Light: OFF • Solid Red: 10% Battery Remaining • Solid Blue: ON and Connected • Blinking Red: 5% Battery Remaining • Solid Yellow: ON and Unpaired •...
Need help?
Do you have a question about the Ovation and is the answer not in the manual?
Questions and answers