Advertisement
Quick Links
Advertisement

Related Manuals for Qubo QBOOK Smart Cam 360 Ultra


Summary of Contents for Qubo QBOOK Smart Cam 360 Ultra
- Page 1 The QBOOK Smart Cam 360 Ultra Connected Smart Devices from...
-
Page 2: Table Of Contents
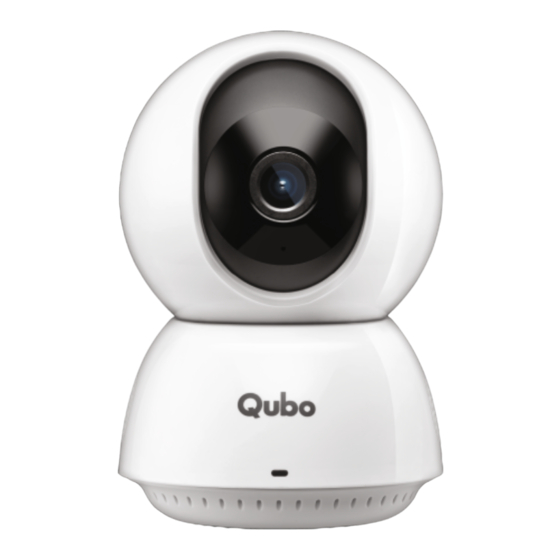
Contents 1 Let's take a closer look 2 Meet Qubo Smart Cam 360 ULTRA 3 What's in the box? 4 What will you need? 5 Let's get started 6 Choose a Location 7 Do’s and Don’ts 8 Mount your Smart Cam 360 ULTRA... - Page 3 Let's take LOOK a closer 1 Camera 2 Mic 3 SD Card Slot 4 Speaker 5 Multicolor LED 6 Back of Device 7 Reset Button 8 Ethernet Port 9 Power Port...
- Page 4 LED States LED blinking rapidly: Ready for Setup LED continuous: Not connected to WiFi 3. Turn Green : Wi-Fi connected and working fine Green LED continuous: 2-Way Talk begins/ recording is ongoing...
- Page 5 Meet QUBO Smart Cam 360 ULTRA Qubo Smart Cam 360 ULTRA can remotely connect you with your home through Live Remote Monitoring & Two Way Communication. With smart features like Person Detection, Motion Tracking and Motion Detection, it gives you Full Colour in Low Light (Night Vision).
-
Page 6: What's In The Box
What's in BOX? 1 Smart Cam 360 ULTRA 2 Power Adapter 3 Cable 4 Wall Anchors (2 units) Smart Cam 360 ULTRA 5 Wall Screws (2 units) 6 Qbook 7 Location Label 8 Warranty Card Power Adapter... -
Page 7: What Will You Need
What will you NEED? Wi-Fi Network • 2.4 GHz Wi-Fi (802.11 b/g/n) network • Greater than 2 Mbps network upload speed Cable • iOS 11 or higher Android Wall Screws • Android 8.1 or higher Rating: 5V/1A • SD Card: Maximum 256 GB Wall Anchors * SD card is not included in the package. - Page 8 Remotely Pan and Tilt for All Round Coverage Wide 360° Vertical Horizontal Range Range...
-
Page 9: Let's Get Started
Let's get STARTED Step 1 Plug in your Qubo Smart Cam 360 ULTRA: Connect the power cable that comes with Camera to a power source via the power adaptor. Step 2 Download the Qubo App from Google Play or Apple App Store by scanning the QR Code below. - Page 10 Choose a Location Avoid direct sunlight & rain The camera is designed to operate between - 0° to 45°C. If it gets hotter or colder, image quality may be affected.
- Page 11 Keep it in range of your router Make sure that you choose a place within range of your network. Thick or insulated walls can greatly reduce the strength of your Wi-Fi signal, even if your router is close by, so you should try streaming video before you mount the device.
- Page 12 Place it up high. We find that 2-3 meters above the ground is Consider the best. Check live footage surroundings. on the Qubo App to Is a pole, plant or make sure you have clear view. porch light blocking the view? It might...
- Page 13 Mount your Camera Drill two holes on the wall/ceiling with the help of marking label template given with the product. It is recommended that you mark the locations of the holes with a pencil before drilling. Insert the two plastic anchors into the holes. Install screws into the plastic anchors so that you can place your camera on to it.
-
Page 14: Attach The Camera
Attach the Camera Put/Place the Camera onto the screws and aim it wherever you like. Use the video stream in the QUBO app to fine-tune your camera’s position. - Page 15 Installing a MicroSD card Make sure that the power supply to the Smart Cam 360 ULTRA is already disconnected. Adjust the camera lens upward until the MicroSD slot is visible, insert the MicroSD card into the slot (the side with contact points must be facing down).
-
Page 16: Factory Reset
Factory Reset Reset button Press and hold the Reset button to restore your device to factory settings. Data stored on the MicroSD card is not erased. - Page 17 WARRANTY CARD Limited Warranty Statement Thank you for selecting the Qubo Smart Cam 360 by Hero Electronix. NOTE: This is a simplified and concatenated version of the standard warranty terms and conditions. For the complete warranty terms and conditions, please refer to the website link given at the end of the document.
- Page 18 During this warranty period, if any defect arises in the Device, HERO Electronix will, at its sole discretion, either (i) repair the device free of cost with either new or refurbished parts, or (ii) replace the Device with a new or refurbished Device that is equivalent to the Device to be replaced.
- Page 19 This limited warranty does not cover the following (Collectively Ineligible Products) (i) If the warranty seal on the Device is broken. (ii) Devices that have been subjected to: (a) modifications, alterations, tampering or improper maintenance and repair (b) handling, storage, installation, testing or use not in accordance with any User guide, Placement guidelines, other instructions provided by HERO Electronix (c) abuse or misuse of...
- Page 20 Correct disposal of the product In case you need to dispose of this device at any time in the future, please contact our toll-free helpline. To facilitate effective utilisation of resources, we will arrange the disposal of this device as per the prevailing laws. Please note that electrical products should not be disposed of with household waste.
Need help?
Do you have a question about the QBOOK Smart Cam 360 Ultra and is the answer not in the manual?
Questions and answers