Page 3
INSTRUCTIONS FOR USE SAFETY INFORMATION BEFORE USING THE WASHING MACHINE PRECAUTIONS AND GENERAL RECOMMENDATIONS DESCRIPTION OF THE WASHING MACHINE EMERGENCY DOOR OPENING BEFORE THE FIRST WASH CYCLE PREPARATION OF THE WASHING DETERGENTS AND ADDITIVES CARE AND MAINTENANCE TROUBLESHOOTING GUIDE TRANSPORT / HANDLING ELECTRICAL CONNECTION INSTALLATION GUIDE...
SAFETY INFORMATION The manufacturer reserves the right for any modifications on the product which might be deemed necessary or useful without informing about it in this IFU. Before operating your new washing machine, please read this instruction carefully, and keep it for future reference. If you have lost it accidentally, ask customer service for e- copy or hard copy.
Page 5
For appliances with ventilation openings in the base, that a carpet must not obstruct the openings. Children of less than 3 years should be kept away unless continuously supervised. The maximum permissible inlet water pressure, 1 MPa, for appliances intended to be connected to the water mains. The minimum permissible inlet water pressure, 0.1 MPa, if this is necessary for the correct operation of the appliance.
BEFORE USING THE WASHING MACHINE Removing the packaging and inspection After unpacking, ensure that the washing machine is undamaged. If in doubt, do not use the washing machine. Contact After-Sales Service or your local retailer. Check that the accessories and supplied parts are all present. Keep the packaging materials (plastic bags, polystyrene parts, etc.) out of reach of children, as they are potentially dangerous.
Page 7
Drain Connect the drain hose to the siphon or hook it over the edge of a sink by means of the “U” bend supplied. If the washing machine is connected to an integrated drainage system, ensure that the latter is equipped with a vent to avoid simultaneous loading and draining of water (siphoning effect).
PRECAUTIONS AND GENERAL RECOMMENDATIONS Packaging The packaging material is entirely recyclable, and marked with the recycling symbol Adhere to current local regulations when disposing of packaging material. Disposing of packaging and scrapping old washing machines The washing machine is built from reusable materials. It must be disposed of in compliance with current local waste disposal regulations.
Clean the outside of the washing machine with a damp cloth. Do not use abrasive detergents. Never open the door forcibly or use it as a step. DESCRIPTION OF THE WASHING MACHINE 1 Worktop 2 Control panel 3 Detergent dispenser 4 Door 5 Plinth covering pump access 6 Adjustable feet...
BEFORE THE FIRST WASH CYCLE To remove any residual water used during testing by the manufacture r, we recommend that you carry out a short wash cycle without laundry. 1 Open the tap. 2 Close the door. 3 Pour a little detergent (about 30 ml) into the main wash chamber of the deter- gent dispenser .
To remove red wine, coffee, tea, grass and fruit stains etc. add a stain remover to the main wash chamber of the detergent dispenser. Pre-treat heavily-soiled areas with stain remover if necessary. 5. Loading the laundry Open the door. Load the articles one at a time loosely into the drum, without overfilling. Observe the load sizes given in the quick reference guide.
Page 12
degree and type of soiling size of wash follow the detergent manufacturer’s instructions for a full load; half load: 3/4 the amount used for a full load; minimum load (about 1 kg): 1/2 the amount used for a full load; water hardness in your area (ask for information from your water company).
Page 13
Notes: Keep detergents and additives in a safe, dry place out of the reach of children. Liquid detergents can be used for programmes with prewash. However, in this case a powder detergent must be used for the main wash. Do not use liquid detergents when activating the “Start Delay” function (if available on your washing machine).
CARE AND MAINTENANCE Appliance exterior and control panel Can be washed down with a soft, damp cloth. A little neutral detergent (non abrasive) can also be used. Dry with a soft cloth. Door seal Clean with a damp cloth when necessary. Check the condition of the door seal periodically.
Put a flat container under filter door and then drain with emergency drain pipe Then, loosen filter anticlockwise and completely unscrew and remove the filter. Clean the filter and the filter chamber. Check that the pump rotor moves freely. Re-insert the filter and screwit in clockwise as far as it will go. Reinstall the plinth.
Page 16
Mesh filter for water connection Check and clean regularly. For washing machines with an inlet hose as shown on pictures “G”. 1 Close the tap and loosen the inlet hose on the tap. 2 Clean the internal mesh filter and screw the water inlet hose back onto the tap.
Page 17
TROUBLESHOOTING GUIDE Depending on the model, your washing machine is equipped with various automatic safety functions. This enables faults to be detected in good time and the safety system can then react appropriately. These faults are frequently so minor that they can be resolved within a few minutes. The washing machine will not start, no indicator lamps are on.
Page 18
clean (see “Care And Maintenance”); sufficient water is entering. The mesh filters of the water supply could be blocked (see “Care and Maintenance
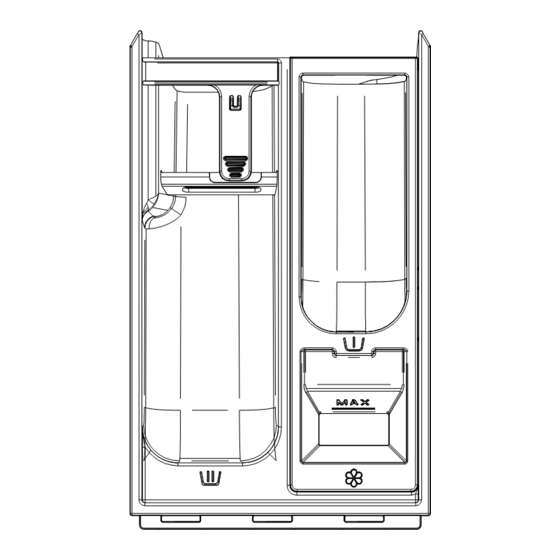
”); the position of the separator in the main wash chamber is adapted to the use of powder or liquid detergent (see “Detergent and Additives”). Machine vibrates during spin cycle.
Page 19
Hot / Cold fill fault - For Models with Dual Inlets If you wish to connect hot and cold water supply (Fig.1): 1. Fix the red marked inlet hose to the hot water tap and to the inlet valve with the red filter on the rear side of machine.
Page 20
Fault Code List Displayed on Display Window Fault Description “F01” Water inflow fault “F03” Drainage fault “F13” Door lock fault “F14” Door unlock fault “F24” Overflow or too much foam. else fault code, “F04-F98” Electronic module fault. “Unb” Unbalance alarm a.
Page 21
c. Fault code The washer stops when the program is running. The display window shows fault code “F13”, “F14”, “F24”, else fault codes from “F04” to “F98” or “Unb”. If fault code “F13” is shown Door lock is abnormal. Start program for 20 sec and unlock the washer door (PTC) to check whether the door is closed.
TRANSPORT/HANDING Never lift the appliance by the worktop when transporting. 1 Pull out the mains plug. 2 Turn off the tap. 3 Disconnect the inlet and drain hoses. 4 Eliminate all water from the hoses and from the appliance (see “Removing the Filter”, “Draining Residual Water”) 5 Fit the transport bolts (obligatory) 6 The machine is over 55 kg in weight, two persons are needed to move it.
Page 23
PARTS SUPPLIED Package with small items Instruction for use, installation guide, warranty card (depends on model) 4 plastic caps Wrench Inlet hose (inside the machine or already installed) Cold inlet hose Hot inlet hose (if available, depending on models) “ ”-bend (inside the machine or already installed) Bottom cover(depends on model)
Page 24
BEFORE USING THE WASHER, PLEASE REMOVE TRANSPORT BOLTS! Important: Transport bolts which are not removed can cause damage to the appliance. Screw off all transportation bolts for approx. 30mm with wrench following the direction of arrow shown (not fully screw it off). Push four transportation bolts on horizontal direction inward and loose transportation bolt.
Page 25
ADJUSTMENT OF THE FEET The appliance must be installed on a solid and level floor surface (if necessry use a spirit level). If the appliance is to be installed on a wooden floor, distribute the weight by placing it on a 60x60cm sheet of plywood at least 3cm in thickness and secure it to the floor.
Page 26
INSTALL BOTTOM COVER To realize quieter operation, a bottom cover is supplied with the unit (only applies to some of the washers). After installing the cover at the bottom of the washer, the noise level will be greatly reduced. Please ask for advice from specialists before installing the cover, nevertheless, the machine can be used without the bottom cover.
Page 27
CONNECT THE DRAIN HOSE In case the drain hose is installed as shown below: Unhook it only from the right clip (see arrow) Connect the drain hose to the Drain or hook it over the edge of a sink by means of the "U"...
Page 28
Teknix appliance comes with a 2 year parts and labour guarantee Please REGISTER your appliance online at www.teknixwarranty.co.uk To register your appliance or extend your warranty Please call 01759487823...
Need help?
Do you have a question about the TKW10142HW and is the answer not in the manual?
Questions and answers