Table of Contents
Advertisement
Advertisement
Table of Contents

Summary of Contents for Avantia BPM-80
- Page 1 Blood Pressure Monitor BPM-80 Instruction Manual Model: 107-934...
-
Page 2: Table Of Contents
CONTENTS IMPORTANT INFORMATION .................1 • White Coat Syndrome ABOUT BLOOD PRESSURE .................3 • Blood Pressure Standard • What are systolic and diastolic pressure? • Blood Pressure Fluctuation MEASUREMENT TIPS ...................5 YOUR BP MONITOR..................6 • LCD Layout • Arm Cuff • Your Monitor POWER OPTIONS ..................8 SELECTING MEMORY ZONE AND SETTING DATE, TIME &... -
Page 3: Important Information
IMPORTANT INFORMATION Readings taken by the Avantia BPM-80 blood pressure monitor are equivalent to those obtained by a trained observer using the cuff and stethoscope auscultation method. This manual contains important safety and care information, and provides step by step instruction for using the product. Read this manual thoroughly before using the monitor. - Page 4 IMPORTANT INFORMATION ATTENTION • This Blood Pressure Monitor does not replace examination by a physician. As your doctor is the one person best qualified to interpret your results, we recommend that you keep a blood pressure journal to bring to your visits to your healthcare professional. • This device is intended for use by adults only. •...
-
Page 5: About Blood Pressure
ABOUT BLOOD PRESSURE Blood Pressure Standard The Joint National Committee on prevention, detection, evaluation, and treatment of high blood pressure has developed a blood pressure standard, according to which areas of low and high risk blood pressure are identified. This standard is a guideline as blood pressure varies among different people and different age groups. -
Page 6: What Are Systolic And Diastolic Pressure
ABOUT BLOOD PRESSURE What are systolic and diastolic pressure? When your heart beats, it Diastolic Systolic contracts and pushes blood blood entering blood discharging through the arteries to the vein artery rest of your body. This force creates pressure on the arteries. press relax This is called systolic pressure. -
Page 7: Measurement Tips
MEASUREMENT TIPS IMPORTANT NOTES Here are a few helpful tips to help you obtain more accurate readings: • Blood pressure changes with every heartbeat and is in constant fluctuation throughout the day. • Blood pressure readings can be affected by the position of the user, his or her physiological condition and other factors. For more accurate results, wait one hour after exercising, bathing, eating, drinking beverages with alcohol or caffeine, or smoking to measure blood pressure. • Before measurement, it’s suggested that you sit quietly for 15 minutes as measurement taken during a relaxed state will have greater accuracy. You should not be physically tired or exhausted while taking a measurement. • During measurement, do not talk or move your arm or hand muscles. • Take your blood pressure at normal body temperature. If you are feeling cold or hot, wait a while before taking a measurement. -
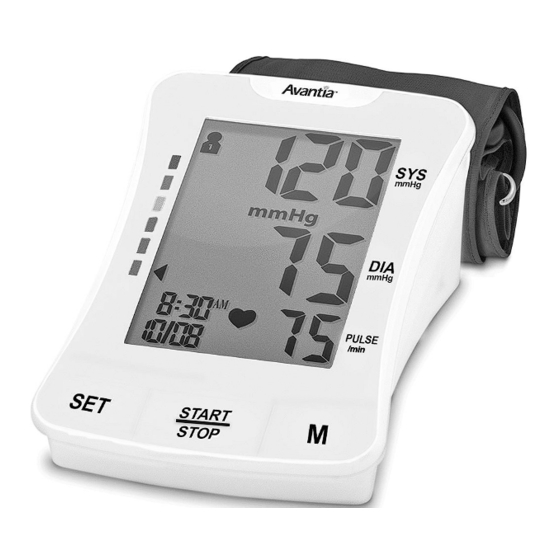
Page 8: Your Bp Monitor
YOUR BP MONITOR LCD Layout MEMORY ZONE SYSTOLIC LOW BATTERY BLOOD PRESSURE INDICATOR CUFF IS INFLATING mmHg CUFF IS DEFLATING DIASTOLIC LAST 3 RESULTS AVERAGE BLOOD PRESSURE IRREGULAR HEARTBEAT INDICATOR TIME PULSE RATE DATE BLOOD PRESSURE CLASSIFICATION INDICATOR MEMORY NUMBER INDICATOR Arm Cuff ARM CUFF AIR PLUG... -
Page 9: Your Monitor
YOUR BP MONITOR Your Monitor BLOOD PRESSURE CLASSIFICATION INDICATOR AIR JACK SET BUTTON START/STOP MEMORY BUTTON BUTTON BATTERY COVER... -
Page 10: Power Options
POWER OPTIONS 1. Batteries: 4 x AA alkaline. 2. Power Adapter: DC6.0 V, 1000mA AC adapter can be used with this device (not included). Adapter socket pictured at right. CAUTION Do not use any other type of battery or adapter as it may harm the unit. Installing and replacing batteries 1. -
Page 11: Selecting Memory Zone And Setting Date, Time & Unit Of Measurement
BEFORE YOU START Selecting memory zone and setting date, time & unit of measurement It is important to set the clock before using your blood pressure monitor, so that a time stamp can be assigned to each reading that is stored in memory. 1. - Page 12 BEFORE YOU START 3. Using the “M” button, set the YEAR, then press “SET”. Repeat to set the MONTH, DAY, HOUR and MINUTE, then press“SET” to automatically move on to the next step. 4. Using the “M” button, set the TIME DISPLAY: European (EU) or U.S (US) then press “START/STOP”...
-
Page 13: Measurement
MEASUREMENT Prepare the cuff 1. Firmly insert air plug into opening located on left side of the monitor. 2. Wrap the cuff around your upper left arm. The tube should be aligned to point toward your little finger, as illustrated. - Page 14 MEASUREMENT 3. The cuff should be snug but not too tight. ~1” (You should be able to insert one finger between the cuff and your arm). Keep a space of ± 1” between the cuff edge and the bend of your elbow. 4.
- Page 15 MEASUREMENT Start the measurement 1. Press and hold the START/STOP button until you hear a beep. The LCD will light up for one second as the unit performs a quick diagnosis. A long tone indicates the device is ready for testing. NOTE: Unit will not function if residual air from previous testing is present in cuff.
- Page 16 MEASUREMENT 3. Once inflated, the cuff will slowly deflate and measure your blood pressure. A flashing “ ” will appear simultaneously on screen signaling heart beat detection. 4. When testing is complete the monitor will sound three short beeps. The screen will display your systolic and diastolic blood pressure.
- Page 17 MEASUREMENT 5. To measure again, press START/STOP to return to testing mode. NOTE It is recommended to wait at least 5 minutes between measurements for accurate results. Irregular Heartbeat Indicator If an irregular heart beat is detected at least twice during measurement, the symbol will appear with the results.
-
Page 18: Using The Memory
USING THE MEMORY To recall previous readings 1. With the power off, press and hold the “M” button to recall the most recent reading stored in memory. 2. Then, press the “M” button to scroll through all readings stored in memory. NOTE Past readings will only be displayed from the most recently used memory zone. - Page 19 USING THE MEMORY To delete all records from memory 1. With the power off, press and hold the “M” button to recall reading stored in memory. 2. Press and hold the “SET” button for approximately 3 seconds to delete all records.
-
Page 20: Last 3 Tests Average
USING THE MEMORY Last 3 Tests Average 1. With the power off, press the “M” button to activate screen display. 2. After the unit performs a self diagnosis, the screen will display the average test results from the last 3 readings of the last group used. The “AVG”... -
Page 21: Tips For Taking Accurate Readings
TIPS FOR ACCURATE READINGS Wait at least 1 hour after Avoid taking readings immediately eating or drinking before after having tea, coffee taking a measurement. or smoking. Wait at least 20 minutes Avoid talking or moving after taking a bath before your fingers when taking taking a measurement. -
Page 22: Maintenance
MAINTENANCE How to clean and care for your BP monitor. Store in a dry place and avoid exposing to Avoid contact with water. direct sunshine. Wipe away any moisture with a dry cloth. Avoid intense shaking or collisions. Avoid storing the unit in dusty or unstable temperature environments. -
Page 23: Troubleshooting
TROUBLESHOOTING The table below indicates how to solve common problems that you may encounter when using this monitor. PROBLEM CAUSE SOLUTION Blood pressure Cuff is too tight or not properly Firmly reposition cuff approximately results are not positioned 1-2" above the elbow joint. within typical on the arm. -
Page 24: Specifications
SPECIFICATIONS Product Description Arm-type Fully Automatic Blood Pressure Monitor Model 107-934 Display LCD Digital Display. Size: 102.1 mm x 68.9 mm (4.02" x 2.71”) Measurement Method Oscillometric method Measurement Range Pressure: 0 mmHg ~ 300 mmHg Pulse: 30 to 180 beats/minute Measurement Accuracy Pressure: ±... -
Page 25: Warranty Information
Any alterations, abuse, misuse or accidental damage voids this warranty. For replacement or repair under warranty, please call: 1-800-363-2381 (Monday to Friday, 8:30 am to 5 pm EST) For more information on this, or any other Avantia product, visit: www.amgmedical.com CONTACT INFORMATION... - Page 26 Blood Pressure Monitor BPM-80 Authorised Representative in the European Community M. Devices Group / E. C. REP Ltd, 5 Fitzwilliam Square East, Dublin 2 D02 R744, Ireland Tel: +353 1 2 544 944 option 1 Email: info@ecrep.ie Manufactured and printed in China for: A.M.G. Medical Inc.
Need help?
Do you have a question about the BPM-80 and is the answer not in the manual?
Questions and answers