Advertisement
- 1 Introduction
- 2 Overview
- 3 Check Smart Thermostat Software
- 4 Install ZigBee Module
- 5 Install Smart Plug Into Outlet
- 6 Set Up ZigBee Network
- 7 Adding Smart Plug to Network
- 8 Accessing Plugs From Smart Thermostat
- 9 Managing Your Smart Plug Energy Usage
- 10 Accessing Plugs From Personal Web Portal
- 11 Identifying or Renaming a Smart Plug
- 12 On/Off Switch
- 13 Plugs During Vacation Event
- 14 Product Specification
- 15 Documents / Resources
Introduction
At ecobee, we're not just all about thermostats – we're about energy solutions. That's why we've created Smart Plugs, WiFi-enabled electrical outlets that you can monitor and control from your existing Smart Thermostat and ecobee® Web Portal.
Overview

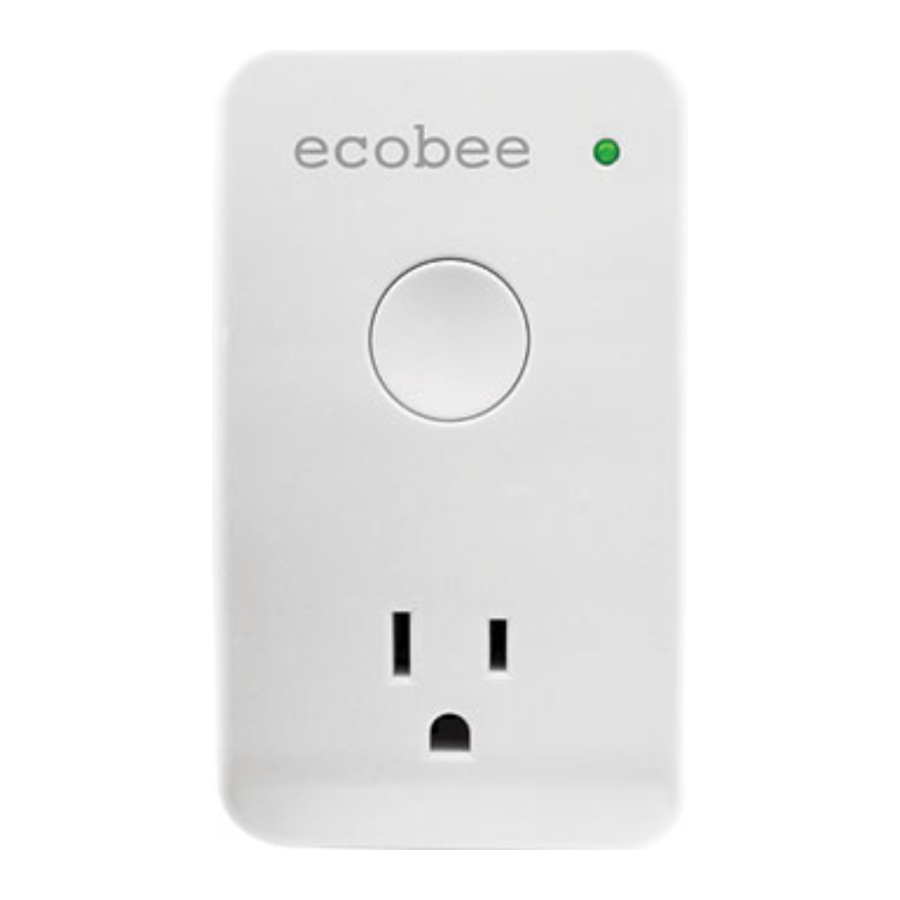
Status LED
Smart Plug Solid Green − Communicating with network
Flashing Green − Searching for network to join
Red − No communication with joined network
ON/OFF Switch
- Press to quickly power on/off the receptacle
- Press and hold for 6 seconds to join network
Check Smart Thermostat Software
To use Smart Plugs, your Smart Thermostat needs to be running software version 2.4.0.298 or later. Software updates occur automatically when the Smart Thermostat is connected to the Internet. If you are running an earlier software version, contact ecobee customer service (email support@ecobee.com or call 877-932-6233) to receive a free upgrade.
To verify the software version you are running:
- From the Smart Thermostat Home screen, press More.
![]()
- Press Settings, select About, then select Version.
![]()


Install ZigBee® Module
To use Smart Plugs, you need to install a ZigBee Module in your Smart Thermostat. You only need one module per thermostat – it can be connected to an unlimited number of Smart Plugs. If you already have installed a ZigBee Module, you can skip this step.
To install the ZigBee Module:

 This equipment is sensitive to electrostatic discharge (ESD). Before starting, discharge your body of static electricity by touching a grounded metal object. Always hold the devices by their edges and do not touch any of the internal components.
- Use a at-head screwdriver to gently remove the Smart Thermostat faceplate
![]() from the gray backplate attached to the wall. Once removed, lay the Smart Thermostat on a at surface, with the internal components facing up.
from the gray backplate attached to the wall. Once removed, lay the Smart Thermostat on a at surface, with the internal components facing up. - Insert the plastic stand-off
![]() that comes with the ZigBee Module
that comes with the ZigBee Module ![]() into the round hole in the thermostat circuit board, just above the battery.
into the round hole in the thermostat circuit board, just above the battery. - Align the connector of the ZigBee Module to the connector on the Smart Thermostat and gently push into place. The stand-o will secure the module and ensure it does not move.
- Make sure the top of the plastic stand-o snaps through the ZigBee module, as shown in the illustration on the right.
- Attach the Smart Thermostat back onto the backplate on the wall.

 from
from 
Install Smart Plug Into Outlet
Plug the Smart Plug into a standard household electrical outlet, then plug in a light or appliance. Ensure that the switch on the actual light or appliance is left in the ON position. The Status LED should start flashing (indicating that the Smart Plug is looking for a network to join). If the Status LED does not start flashing, press and hold the switch for 10 seconds.
Set Up ZigBee Network
If this is your rst Smart Plug you will need to set up a ZigBee Home Automation network with your ecobee Smart Thermostat. You can skip this step if you previously connected any ZigBee devices.
To setup the ZigBee Home Automation network:
- From the Home screen, press More.
![]()
- Press Settings and select ZigBeeModule(Internal). Follow the prompts to con gure Home Automation. You may choose to add your smart plug at this time, as per the prompts or add the plug once the setup is complete.
![]()
Adding Smart Plug to Network
After you have set up your ZigBee network (step 4), you connect your Smart Plug to the Smart thermostat. The ecobee Smart Thermostat will scan the network and automatically detect any unconnected Smart Plugs. The default name is the last 4 digits of the Smart Plug's MAC address (a unique number printed on the back of each device). You can give it an easier to remember name (like "Living Room Light"). Providing your own custom name makes it easier to identify the plug, especially if you have mulitple plugs installed.
To add a Smart Plug:
- From the Home screen, press More.
![]()
- Press Settings and select Home Automation.
![]()
- Press Add.
![]()
- Press and hold the On/O switch on the Smart Plug for 6 seconds. The Status LED will start ashing green.
- On the Smart Thermostat, press Next. The Smart Thermostat will search for the Smart Plug.
![]()
- Press Done. Your Smart Plug is now joined with the network.
![]()


Accessing Plugs From Smart Thermostat
Congratulations! You are now ready to use and program your plugs.
To access your plugs:
- From the Home screen, press More.
![]()
- Press the Plugs button. The screen shows if the plug is currently on or off and how much electricity is being consumed.
![]()
- Press the image of the plug to manually turn it on/off and to determine how long you would like it to stay in this new state.

Managing Your Smart Plug Energy Usage
You can monitor and reduce your energy usage by using the Smart Thermostat's energy management functions.
To access energy management functions:
- From the Home screen, press More.
![]()
- Press the Plugs button.
![]()
- Select More beside the plug you want to manage.
- Select an option:
Program — You can program the plugs to turn on or off based on specific times and days of the week. You can also program a plug to follow your thermostat schedule. If you choose to follow the thermostat schedule, you only need to determine if you want the plug to be on or off during those chosen periods. If you change your thermostat schedule, the plugs will follow suit.
Reports — You can view the hourly, daily and weekly electricity consumption of each plug.
Settings — You can rename the plug, change the default temporary override duration and decide if you want this plug to turn off when your Utility issues a demand response event (note that you must be registered as part of a Utility program to receive demand response events).
Removing a Smart Plug From Your Network
- From the Home screen, press More.
![]()
- Press Settings, Home Automation and select the device you wish
![]()
- If you want to use the Smart Plug with a different Smart Thermostat, perform a factory reset first by plugging it into an outlet and pressing the switch for 10 seconds.
Accessing Plugs From Personal Web Portal
You can control your Smart Plugs from your ecobee personal Web Portal. When you log into your web portal you will see a new Smart Plugs tab at the top. It has 4 widgets: Plug Reports, Status, Preferences and Program.
With these widgets, you have total control of your Smart Plug from anywhere with an Internet connection. If you have any questions, click the ? mark in the top right hand corner of the widget.
Identifying or Renaming a Smart Plug
By default, the name of a Smart Plug includes the last 4-digits of its MAC address. The Smart Plug's MAC address is printed on the back of the plug. You may want to give your Smart Plug a more descriptive name (such as "Living Room") in order to make it easier to identify.
You can rename a Smart Plug from its Settings menu on the Smart Thermostat or from the Preferences widget in your ecobee personal Web Portal.
Note: There is a special name, "$router", that optimizes the Smart Plug to work with an Internet router. If the Smart Thermostat cannot communicate with the ecobee web servers for over 1 hour, it will automatically turn the Smart Plug off for 20 seconds and then turn it back on. This feature can be used to automatically reboot a router in order to fix connectivity issues.
On/Off Switch
On the front face of the Smart Plug there is an on/off override switch. Press this switch if you want to turn on or off the device connected to this plug. The plug will stay in this condition for the specified time or action (customizable under Settings).
Plugs During Vacation Event
When you schedule a vacation event on your ecobee Smart Thermostat, you can also determine how specific plugs to perform. You can simply continue to run the program, so that lights come on at the usual time, or program them to stay on or off for the duration of the vacation event. Once the vacation is over the plugs will return their regular program.
Product Specification
Electrical
Operating Voltage: 110–240 VAC
Max. Load Current: 15A @ 120VAC / 10A @ 240VAC
Environmental
For Indoor Use only
Temperature: 32°F-122°F (0-50°C)
Humidity: 5-85%RH (non-condensing)
Dimensions: 2.5" H x 4.2" L x 2.2" W (64mm W x 109mm L x 57mm H)
Wireless
Frequency: 2.4GHz
Maximum Transmit Power: 100mW
Maximum Range: 100ft (30m)
Contains module FCC ID DI2CT EM2506

Documents / ResourcesDownload manual
Here you can download full pdf version of manual, it may contain additional safety instructions, warranty information, FCC rules, etc.
Advertisement


Need help?
Do you have a question about the Smart Plug and is the answer not in the manual?
Questions and answers