
Related Manuals for Aquasound WMA30

Summary of Contents for Aquasound WMA30
- Page 1 Instellen + Installeren Setup + Installation • WMA30 WiFi-Audio versterker WiFi-Audio amplifier...
-
Page 2: Table Of Contents
Checklist alle onderdelen Instellen: • WiFi-Audio versterker toevoegen aan uw huisnetwerk (2.4 GHz) • WiFi-Audio versterker via LAN toevoegen aan uw huisnetwerk Aansluiten externe bron (AUX) Resetten WiFi-Audio versterker Welke App’s kunt u gebruiken Installeren van de WiFi-Audio versterker www.aquasound.eu info@aquasound.eu... -
Page 3: Checklist Alle Onderdelen
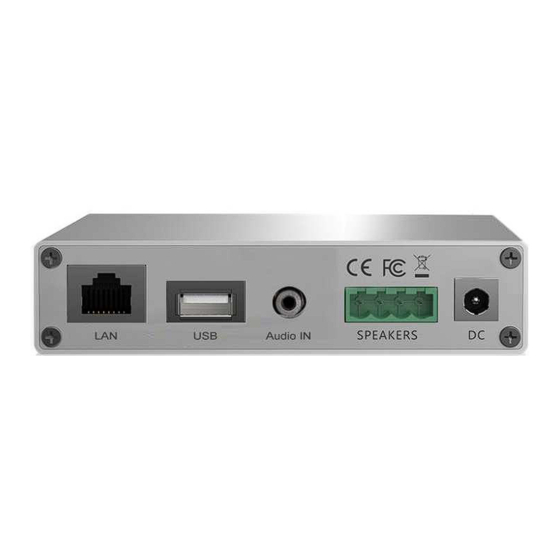
Checklist onderdelen Dank u wel voor de aankoop van dit AquaSound product. De WiFi-Audio versterker is een geavanceerd (draadloos) Wi-Fi audio systeem voor keuken, badkamer of elke andere ruimte in huis. De onderstaande onderdelen vindt u in de verpakking: Digitale WiFi-Audio versterker/ontvanger (1x) -
Page 4: Wifi-Audio Versterker Toevoegen Aan Uw Huisnetwerk (2.4 Ghz)
WiFi-Audio versterker toevoegen aan uw huisnetwerk WiFi-Audio versterker toevoegen aan uw draadloze huisnetwerk (2.4 GHz) Onderstaande stappen dient u eenmaal uit te voeren. De WiFi-Audio versterker is dan permanent met uw huisnetwerk verbonden. • Zorg ervoor dat de WiFi-Audio versterker op een locatie staat waar een goede Wi-Fi verbinding gewaarborgd is. - Page 5 Nu verschijnt er een lijst met Wi-Fi netwerken (Routers). Kies dat netwerk waarmee u de WiFi-Audio versterker wenst te koppelen. Toets het Password in van uw huisnetwerk, kies volgende. Als de koppeling is gelukt ziet u het scherm ‘Verbonden’ en u hoort u de stem zeggen ‘Connected to your Wi-Fi network’...
- Page 6 Nu kunt u een naam kiezen uit de lijst van bechikbare namen, of kies ‘Personaliseren’ en bedenk zelf een naam. Druk nu rechtsboven ‘>’ (pijltje naar rechts) om de instellingen te bevestigen. U komt nu in de apparaatlijst, het instellen is klaar. •...
- Page 7 Stream via de Muzo APP op uw mobiele telefoon. • Stream rechtstreeks vanuit Spotify (Spotify Premium account vereist). AquaSound N-Joy gebruikers: • Stream vanuit de N-Joy controller rechtstreeks naar de WiFi-Audio versterker. Zorg ervoor dat de WiFi-Audio versterker op een locatie staat waar een goede Wi-Fi verbinding...
-
Page 8: Wifi-Audio Versterker Via Lan Toevoegen Aan Uw Huisnetwerk
WiFi-Audio versterker via LAN toevoegen aan uw huisnetwerk Het is ook mogelijk om de versterker met een LAN-kabel (niet meegeleverd) in uw huisnetwerk op te nemen. In dit geval zijn er verder geen instellingen nodig en kunt u de WiFi-Audio versterker direct gebruiken met de Muzo Player App of middels de Airplay functie van Apple. -
Page 9: Aansluiten Externe Bron (Aux)
Aansluiten externe bron: Op de versterker is een Aux-In (Line In / Audio In) voorzien. Hier kunt u bijvoorbeeld een TV op aansluiten. Het geluid van de TV zal dan te horen zijn via de speakers die zijn aangesloten op deze versterker. -
Page 10: Resetten Wifi-Audio Versterker
Welke App’s kunt u gebruiken: Er zijn meerdere App’s beschikbaar via Google Play of Apple’s App-store. Kies de App waar u het prettigst mee kunt werken. • Muzo Player • Smart Sonix • 4Stream Resetten van de WiFi-Audio versterker: Om de WiFi-Audio versterker te resetten, houdt u de WPS-toets minimaal 10 seconde in. Na zo’n 10 seconde hoort u de stem bevestigen dat de reset is geslaagd, u hoort ‘restore to factory settings’. -
Page 11: Installeren Van De Wifi-Audio Versterker
Installeren van de WiFi-Audio versterker en speakers: Als het apparaat correct is toegevoegd aan uw huisnetwerk dan kunt u ‘m inbouwen. Houd rekening met de volgende punten om de versterker juist te plaatsen: • De WiFi-Audio versterker mag achter het verlaagde plafond geplaatst worden (via het speakergat), mits er voldoende Wi-Fi bereik is. - Page 12 • Add the WiFi-Audio amplifier to your home network (2.4 GHz) • Add the WiFi-Audio amplifier via LAN to your home network Connecting external source (AUX) Reset WiFi-Audio amplifier Which apps can you use? Installing the WiFi-Audio amplifier www.aquasound.eu info@aquasound.eu...
-
Page 13: Checklist All Parts
Checklist all parts Thank you for purchasing this AquaSound product. The WiFi-Audio amplifier is an advanced (wireless) Wi-Fi audio system for kitchen, bathroom or any other room in the house. You will find the following parts in the package: Digital WiFi-Audio amplifier/receiver (1x) -
Page 14: Add The Wifi-Audio Amplifier To Your Home Network (2.4 Ghz)
Add the WiFi-Audio amplifier to your home network Add WiFi-Audio amplifier to your home network (2.4 GHz) You need to complete the steps below only once. The WiFi-Audio amplifier is then permanently connected to your home network. • Make sure that the WiFi-Audio amplifier is in a location where a good Wi-Fi connection is guaranteed. - Page 15 A list of Wi-Fi networks (Routers) now appears. Choose the network with which you want to connect the WiFi-Audio amplifier. Enter the password of your home network, then choose next. If the connection is successful, you will see the "Connected" screen and you will hear a voice say ‘Connected to your Wi-Fi network’...
- Page 16 Now you can choose a name from the list of available names in the list or choose “Personalize” and create a new name yourself. Now press ">" in the top right of the screen (the arrow to the right) to confirm the settings. You are now in the device list, the set-up is complete.
- Page 17 Stream via the Muzo App on your mobile phone or tablet. • Stream directly from Spotify (Spotify Premium account required). AquaSound N-Joy users: • Stream directly from the N-Joy controller to the WiFi-Audio amplifier. Make sure the WiFi-Audio amplifier is in a location where a good Wi-Fi connection is...
- Page 18 Add the WiFi-Audio amplifier to your home network via LAN It is also possible to add the amplifier to your home network with a LAN cable (not included). In this case, no further settings are required and you can use the WiFi-Audio amplifier directly with the Muzo Player app or through Apple's Airplay function.
-
Page 19: Connecting External Source (Aux)
Connecting an external source: An Aux-In (Line In) is provided on the amplifier. You can connect a to TV, for example. The sound from the TV will then be heard through the speakers connected with this amplifier. The AUX-In can be activated in 2 ways. -
Page 20: Reset Wifi-Audio Amplifier
Which apps can you use: There are several apps available through Google Play or Apple’s App Store. Choose the app that works best for you. • Muzo Player • Smart Sonix • 4Stream Resetting the WiFi-Audio amplifier: To reset the WiFi-Audio amplifier, hold the WPS key for at least 10 seconds. After about 10 seconds you hear a voice confirming that the reset was successful, you will hear ‘restore to factory settings’. -
Page 21: Installing The Wifi-Audio Amplifier
Installing the WiFi-Audio amplifier and speakers: If the device has been correctly added to your home network, you can install it. Keep the following points in mind to position the amplifier correctly: • The WiFi-Audio amplifier can be placed behind the suspended ceiling (via the speaker hole), provided there is sufficient Wi-Fi range. - Page 24 info@aquasound.eu...
Need help?
Do you have a question about the WMA30 and is the answer not in the manual?
Questions and answers