Advertisement
CARE AND MAINTENANCE
Never use abrasive or acid-based cleaners on the shelf rack.
Clean shelves and rods with a solution of mild detergent and water. Use a soft cloth or sponge to wipe
parts. Rinse and dry thoroughly. Keep surfaces dry and clean for a longer lasting finish.
NOTICE
Please read and understand these instructions before attempting to assemble, operate or install the product.
- Two adults required for a assembly.
- Do not allow children to climb or play in or around the shelves.
- Each shelf holds up to 600 lbs. when items are evenly distributed.
- Assemble on a soft surface, such as carpeting to avoid scratching the finish.
Part
Description
A
Shelves
Upper Pole
B
(with Joiner)
C
Spacers
Lower Pole
D
(with leveler)
E
Caster
PREPARATION
1.Before beginning assembly of product, make sure all parts are present. Compare parts with package contents
list and hardware contents . If any part is missing or damaged, do not attempt to assemble the product.
2.Estimated Assembly Time: Approximately 15 - 20 minutes.
3.Helpful Tools (not included):Rubber Mallet.
4.No Tools Required for Assembly.
A
C
B
D
E
Picture
Quantity
5
4
22
4
4
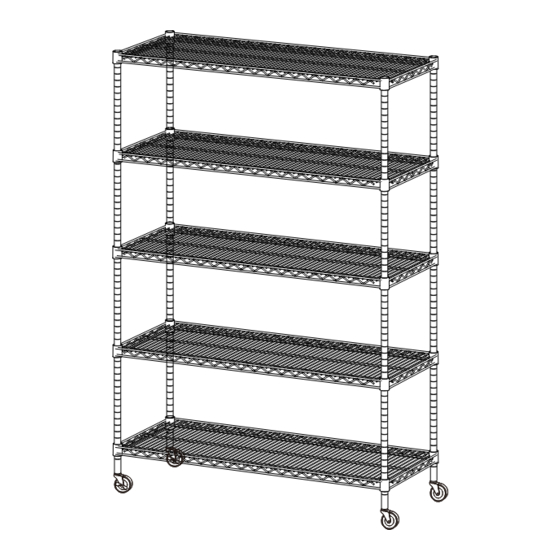
Model# HAC2004A
48 in W x 18 in D x 72 in H
Advertisement
Table of Contents

Related Manuals for Safavieh happimess HAC2004A


Summary of Contents for Safavieh happimess HAC2004A
- Page 1 CARE AND MAINTENANCE Never use abrasive or acid-based cleaners on the shelf rack. Clean shelves and rods with a solution of mild detergent and water. Use a soft cloth or sponge to wipe parts. Rinse and dry thoroughly. Keep surfaces dry and clean for a longer lasting finish. NOTICE Please read and understand these instructions before attempting to assemble, operate or install the product.
- Page 2 A ssem b l n st r u ct i ons Screw the casters (D) onto the threaded ends of the lower Use a pen to mark the height on the 4 Lower Poles (D). Be sure Attach 2 Spacers (C) at the pen marks on the 4 Lower Poles (D). pole (D).
Need help?
Do you have a question about the happimess HAC2004A and is the answer not in the manual?
Questions and answers