Table of Contents
Advertisement
Available languages
Available languages
Quick Links
Owner's Manual
ICRRFTSMAN+I
6.75 HORSEPOWER
2500 PSI
2.5 GPM
PRESSURE
WASHER
CLEANING
SYSTEM
Model No. 580.767451
HOURS:
Mon. - FrL 8 a.m. to 5 p.m. (CT)
CAUTION:
Before using this product,
read this manual
and follow all Safety
Rules and Operating
Instructions,
SEARS,
ROEBUCK
and CO,,
Hoffman
Estates,
IL 60179
Visit our Craftsman website: www.sears.com/craftsman
Past No. 193946GS
Dral)
0 (10/17/2003)
U.S.A.
• Safety
• Assembly
• Operation
• Maintenance
• Parts
• Espafiol
Advertisement
Table of Contents

Related Manuals for Craftsman 580.767451


Summary of Contents for Craftsman 580.767451
- Page 1 CAUTION: Before using this product, read this manual and follow all Safety Rules and Operating Instructions, SEARS, ROEBUCK and CO,, Visit our Craftsman website: www.sears.com/craftsman Past No. 193946GS Dral) 0 (10/17/2003) WASHER Hoffman Estates, IL 60179 • Safety • Assembly •...
-
Page 2: Pressure Washer
SPECIFICATIONS LIMITED WARRANTY For one year from the date of purchase, when this Craftsman pressure washer is maintained and operated according to the instructions in the owner's manual, Sears will repair, free of charge, any defect in material and workmanship. - Page 3 Firmly grasp spray gun with both hands when using high pressure spray to avoid injury if gun kicks back. WHEN ADDING FUEL Turn pressure washer OFF and let it cool at least 2 minutes before removing gas cap. contains Fill fuel tank outdoors.
- Page 4 CAUTION • D0 NOT tamper with g0vemed • DO NOT operate pressure washer above rated pressure; CAUTION • DO NOT secure spray gun in Open position. • DO NOT leave spray gun unattended while machine is running.
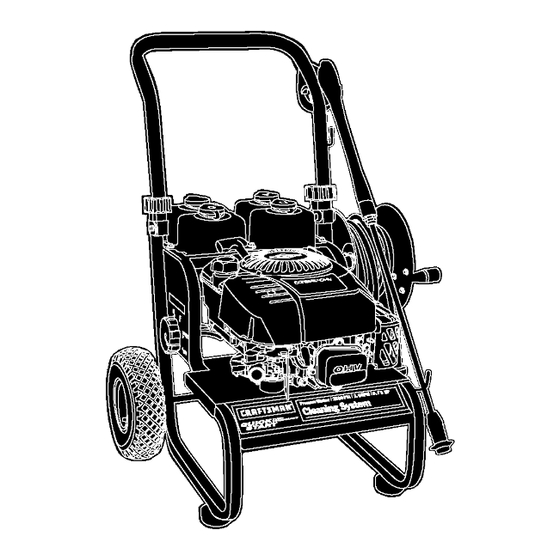
- Page 5 KNOW YOUR PRESSURE Read this owner's manual and safety rules before operating your cleaning system. Compare the illustrations with your cleaning system to familiarize yourself with the locations of various controls and adjustments. Save this manual for future reference. Dial-A-Cleaner Selector Knob Recoil Starter Air Filter...
- Page 6 5. If any parts are missing or damaged, call the pressure washer helpline at 1-800-222-3136. ASSEMBLING Your Craftsman cleaning system will need assembly before operation: Attach hose reel. Add oil to engine crankcase. Add fuel to fuel tank.
- Page 7 If using SAE 30 oil in temperatures (4°C), it will result in hard starting and possible engine bore damage due to inadequate lubrication. Place pressure washer on a level surface. Clean area around oil fill. Remove oil fill cap and dipstick.
-
Page 8: Checklist Before Starting Engine
2. Remove anddiscard shipping capsfrompumpinlet andoutlet. 3. Attach other end of high pressure hose to high pressure outlet on pump. Tighten by hand. Before connecting garden hose to water inlet, inspect inlet screen. Clean screen if it contains debris or have it replaced if damaged. Refer to section =O-Ring Maintenance"... - Page 9 This information also applies whenever you start the engine after you have let the pressure washer sit idle for at least a day. Place pressure washer near an outside water source capable of supplying water at a flow rate greater than 3.5 gallons per minute and no less...
- Page 10 OFF position to prevent chemical leakage. Adjustable To Use Now that you know how to START and STOP your pressure washer, the information in this section will tell you how to adjust the spray pattern and apply detergent or other cleaning chemicals. CAUTION •...
- Page 11 Always store the cleaning system with the Dial-A- Cleaner Automatic (Thermal If you run the engine on your pressure washer for 3-5 minutes without pressing the trigger on the spray gun, circulating water in the pump can reach temperatures cool the pump by discharging the warm water onto...
-
Page 12: Specifications
50 hours thereafter Change every 25 hours when operating under dirty or GENERAL The pressure washer's warranty does not cover items that have been subjected to operator abuse or negligence, To receive full value from the warranty,... -
Page 13: Before Each Use
Check high pressure hose for leaks. Check chemical tanks and filters for damage. Check spray gun and nozzle extension assembly for leaks. Purge pump of air and contaminants. PRESSURE WASHER MAINTENANCE Check Clean Inlet Screen Examine garden hose inlet screen, Clean if it is clogged or replace if it is torn. -
Page 14: Pump Maintenance
Drain engine oil and fuel from pressure washer. Use a 8mm allen wrench to remove black pump oil cap between high pressure outlet and garden hose inlet. Tilt pressure washer to drain oil into an approved container until it drips slowly from pump. Oil Cap... -
Page 15: Engine Maintenance
Tilt pressure washer in opposite direction and empty premeasured pump oil bottle into same opening (a small funnel may be helpful). Install black pump oil cap and tighten firmly. Set pressure washer in upright position. Add fuel and engine oil, ENGINE MAINTENANCE Checking... - Page 16 Service Spark Plug Service the spark plug every 100 hours of operation or yearly, whichever occurs first. WARNING wire where itcannot contact spar_ plug_ Clean area around spark plug. Remove and inspect spark plug. Replace spark plug if the electrodes are worn, or if the insulator is cracked or chipped.
-
Page 17: After Each Use
"freeze" pump action. Follow these procedures after every use: Flush chemical system by selecting system rinse tank and run pressure washer with nozzle in low pressure mode. Flush for one minute or until chemical is cleared from system. -
Page 18: Long Term Storage
LONG TERM STORAGE If you do not plan to use the pressure washer for more than 30 days, you must prepare the engine for long term storage. It is important to prevent gum deposits from forming in essential fuel system parts such as the carburetor, fuel... - Page 19 Pump has following problems: failure to produce pressure, erratic pressure, chattering, loss of pressure, low water volume. t0. Pump is faulty Detergent fails to mix with spray. Engine runs good at no-load Engine speed is too slow but "bogs" when load is added, Engine will not start;...
- Page 20 CRAFTSMAN 2500 PSI Cleaning System 580,767451 Main Unit -- Exploded View...
- Page 21 Pump Saver House Wash Concentrate (makes 4 gallons) 7t 74300GS 7t 74301GS Deck Wash Concentrate (makes 2 gallons) Vehicle/Boat Wash Concentrate (makes 4 gallons) 7t 74302GS 7t 74303GS Degreaser Concentrate (makes 4 gallons) Mold/Mildew Concentrate (makes 2 gallons) 7174307GS System 580.767451...
- Page 22 CRAFTSMAN 2500 PSI Cleaning System 580.767451 Pump -- Exploded View...
- Page 23 KIT, INLET CHECK 190593GS KIT, CHEMICAL INJECTION 193807GS KIT, SEAL SET 189971GS KIT, CHEMICAL HOSE 193971GS KIT, PIPE FITTING 193972GS KIT, UNLOADER SEAT NOTE: Item letters A - L are service kits and include all parts shown within the box, System 580.767451...
- Page 24 ENGINE, 6.75 HP, Briggs and Stratton, 886_ 238 _ _ 1029 227_ 615_ 1095 VALVE GASKET SET 883 _ 868_163_ 128612 - Exploded 914_ 1022 1022 View 10%) 619_ 24 [_ 1102 0...
-
Page 25: Gasket Set
ENGINE, 6.75 HP, Briggs and Stratton, 128612 - Exploded View 833A @ _°_ _o_ CARBURETOR GASKET 6330 633A@ 524_... - Page 26 ENGINE, 6.75 HP, Briggs and Stratton, 128612 - Exploded View 65_ 58 121 CARBURETOR OVERHAUL KIT 276_ 104< 459 _l 689 © 127_ 1210 163_ 137_ 3o5_ 592 ® ENGINE GASKETSET 15!A...
- Page 27 ENGINE, 6.75 HP, Briggs and Stratton, item Part # Description 692670 C_(linder Assembly 399269 Kit-Bushing/Seal 299819 Seal-Oil (Magneto Side) 498983 Sump-Engine 695276 Head-Cyhnder 695166 Gasket-Cylinder 495786 Breather Assembly 272481 Gasket-Breather 691125 Screw (Breather Assembly) 691260 Tube-Breather 692232 Gasket-Crankcase 691137 Screw (Cylinder Head) 691680 Plug-Oil Drain 691457...
- Page 29 Sears, Roebuck and Co. the United States Emission (Owner's EMISSION CONTROL WARRANTY COVERAGE iS APPLICABLE TO CERTIFIED ENGINES PURCHASED CALIFORNIA IN 1995 AND THEREAFTER USED iN CALIFORNIA, AND TO CERTIFIED MODEL YEAR 1997 AND LATER ENGINES WHICH ARE PURCHASED AND USED ELSEWHERE STATES (AND AFTER JANUARY 1, 2001 IN CANADA).
- Page 30 Durente un atto a partir de la fecha de compre, Sears reparer& sin cargo alguno, cualquier defecto en material y mano de obre, siempre y cuando esta maquina lavadore a presi6n Craftsman haya sido mantenida y puesta en funcionamier_o de...
- Page 31 :_n el estado de California es obligatorio, seg0n la lay, el usa _e apagachispas (Secci6n 4442 del C6digo de Recurses _0blicos de California). Otros estades pueden tenet leyes _imiJares. Las leyes federales se aplican en tierras 'ederales. Si equipa el silenciador con un apagachispas, _ste deber_ set mantenido en buenas condiciones de :rabajo.
- Page 32 ADVERTENCIA • Ate para arnba el pololargo y quite la joyeria. ADVERTENCIA no pueda entrar en contacts con la bujia ADVERTENCIA • Siempre Use protecc_bn pars _os ojos cuando usHce este equips o cuando este ceres de donde se est#_usando el equips. PRECAUCION presiSn superior a su clssificaciSn de presibn PRECAUCION...
- Page 33 CONOZCA SU MAQUINA Lea el manual del propietario y las reglas de seguridad antes de porter en marcha su sistema de limpieza. Compare {as ilustraciones con su sistema de limpieza para familiarizarse ajustes. Guarde este manual para referencias futuras. F'eri}la selectora DiaI-A-C{eaherT_ Taia de Filtro de Aire...
- Page 34 MONTAJE DEL SISTEMA LIMPIEZA resultar,_ La gran mayoria de su sistema de limpieza de presi6n Craftsman ha sido ensamblado usted deber& Ilevar a cabo los siguientes procedimientos antes de poner en funcionamiento Conecte el carrete de la manguera. Deposite aceite en la caja del cig(;_er_al d el motor.
- Page 35 NOTA: Puede h aber a lguna f erreterfa incluida c oneljuego decarrete d emanga q uenoseusaeneste modelo. IMPORTANTE: NOuselam,_.quina lavadora a presi6n teniendo lamanguera enrellada enel carrete. Elcarrete e s Onicamente para sualmacenamiento. Agregue Aceite de Motor IMPORTANTE: Cualquier intento de hacer girar o arrancar el motor antes de que se haya depositado el aceite recomendado puede resultar en falla del motor.
- Page 36 Conecte la Manguera y el Suministro Agua a la Bomba IMPORTANTE: Usted deber_ armar la extensi6n para boquil{as y conectar todas las mangueras antes de darle arranque al motor. La bomba resultar_ daflada si arranca el motor sin tener todas las mangueras conectadas y el suministro agua abierto.
- Page 37 COMO USAR SU SISTEMA LIMPIEZA Si tiene problemas sen el funoionamiente lavadera a presi6n, per favor Ilame a la Iinea de ayuda de la m_quina lavadera a presi6n al 1-800-222-3136. Para Poner en Marcha el Sistema Limpieza Para darle arranque a su sistema de limpieza mevido a motor per primera vez, siga estas instrucciones paso.
- Page 38 Cemo Detener su Sistema Mueva la palanca de la v_lvula de regulacien a la posicien "Stop s ('ParadeS). Apriete el gatillo de la pistota de rociado pare eliminar la presibn de la manguera, NOTA: Observera una pequefia car_idad de ague cuande elimine la presien.
- Page 39 siguiendo los instrucdones del fabdcante del quimico. Llene el recJpiente(s) del quTmico con la soiuci6n preparada. Gire la perilla selectora Dial-A-Cleaner la letra que corresponda al recipiente que desea usar. Mueva la boquilla ajustable hacia adelar_e para obtener el modo de baja presi6n. El detergente no puede set aplicado si tiene la boquilla en Ia posici6n de alto presi6n, Conecte la manguara de jardTn a la antrada del agua,...
- Page 40 RESPONSABILIDADES Siga el programa de mantenimiento seg_n el nOmere de horas a segOn el calendario, Io qua suceda primere. Se requiere de servicia con mayor frecuencia cuando opera la unidad en }as condicianes adversas descritas a continuaci6n HORARIO DE MANTENIMIENTO COLOQUE LAS FECHAS A MEDIDA QUE VA COMPLETANDO EL SERVIOlO REGULAR TAREA...
-
Page 41: Antes De Cada Uso
ANTES DE CADA USO Revise el hive{ de ese{te de{ motor. Revise sf exdsten de_os en el coledor de la entrade de egua. Revise si existen fugas en le manguepa de elta presi6n. Revise si existen daftos en los filtros y tanquse de quimicos. Revise si existen fugas en el conjunto de la extensf6n para boquillas y pistola. -
Page 42: Mantenimiento
3. Quite el en el filtre de la Iinea del otro fin de la extensi6n de boquilla. 4. Usa el alambre incluido en el juego (o un pequefio sujeta papeles) para liberar cualquier matedal extrafie que este tapande la bequilla. 5. - Page 43 Cambio de Aceite Cambie el aceite del motor despues de los primeres 5 horas y coda 50 horas, o anualmente, a partir de ese momento. Si esta utilizando su maquina lavadora a presi6n bajo condiciones de extrema suciedad o polvo, o en un clima demasiado caliente, haga el cambio de acoite coda 25 horas.
- Page 44 {a misma pueden ocasienar fuges y p_rdida de presi6n. Si encuentra elgQn defoe, remplaca le manguera. NO intente reparer una manguere daCtada. Remplaca le manguera con la porte Craftsman genuine. Desconecte {a manguere de la pistela y {a tome de cite presi6n de le bombe.
- Page 45 ALMACENAMIENTO PROLONGADO Si usted no planee usar la m,_quina lavadera a presi6n per m,_s de 30 dias, deber_ preparar el motor para un almacenamiento prolongado. Es importante evitar la formaci6n de dep6sitos de gema en las partes esenciales del sisteme del combustible tales come carburader, filtro del combustible, manguera o tanque del combustible durante el almacenamiento.
- Page 46 3:Suministr0 La bomba presenta los & siguientes problemas: no produce presibn, prodUCe una presi6n errada, traqueteo_ & p6rdida de presibn_ bajo volumen de agua. 10, Bombadefectuosa El detergente no se mezc|a con el rociado, La velocidad del motor es demasiado El motor funciona bien lento.
- Page 47 Sears, Roebuck and Co., U.S.A. (Sears), California Air Resources Board (Consejo de Recursos sobre el Airs de California, CARB, pot sus siglas en ingles) y United States Environmental Ambiental de EE.UU., Declaracibn de garantia del sistema de control de emisiones (derechos y obligaciones LA COBERTURA DE LA GARANTIA DE CONTROL DE EMISIONES SE APLICA A LOS MOTORES CERTIFICADOS ADQUIRIDOS EN...
- Page 48 For repair - in your home - of all major brand appliances, lawn and garden equipment, or heating and cooling systems, no matter who made it, no matter who sold itt For the replacement parts, accessories and owner's manuals that you need to do-it-yourself. For Sears professional installation of home appliances and items like garage door openers and water heaters.
Need help?
Do you have a question about the 580.767451 and is the answer not in the manual?
Questions and answers
HOW MUCH OIL IS NEEDED TO REFILL