
Related Manuals for Farnell MarMonix MSL-765

Summary of Contents for Farnell MarMonix MSL-765
- Page 1 SOUND LEVEL METER Product Code: MSL-765 User Manual R E C F A S T A / C WWW.MARMONIX.CO...
-
Page 2: Safety Information
SAFETY INFORMATION Read the following safety information carefully before attempting to operate or service the meter. Use the meter only as specified in this manual: Environment conditions ① Altitude lower than 2000 meters ② Relatively humidity ≤90%RH ③ Operation Ambient 0 ~ 40°C ... -
Page 3: Specification
FAST & SLOW response Analog AC/DC outputs for connection to frequency analyzer or X-Y shaft recorder 3. SPECIFICATION Standard applied: IEC61672 -1 CLASS2 Accuracy:±1.4dB Frequency range:31.5HZ ~ 8KHZ Dynamic range:50dB Memory:32700 Level ranges: LO:30dB~80dB Med:50dB~100dB Hi:80dB~130dB Auto:30dB~130dB Frequency weighting: A/C Time weighting: FAST ( 125ms ), SLOW ( 1s ) Microphone: 1/2 inch electret condenser microphone Display: 4 digits LCD display with a resolution of 0.1dB... -
Page 4: Name And Functions
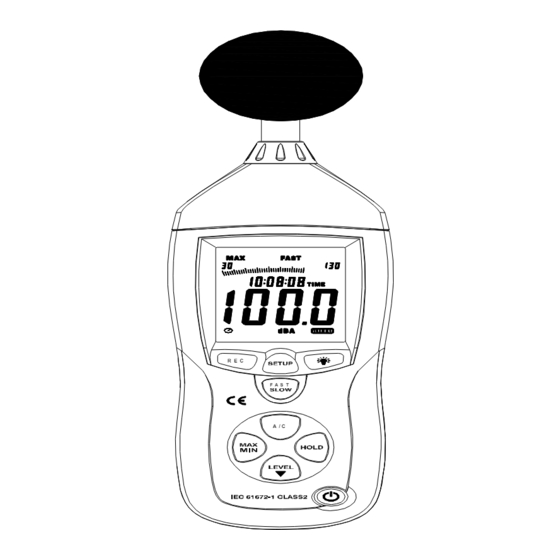
Auto power off:Meter automatically shuts down after approx. 15 minutes of inactivity. Power supply: One 9V battery, 006P or NEDA1604 or IEC 6F22. Power life: About 30hours Operation temperature and humidity: 0°C~40°C,10%RH~90%RH Storage temperature and temperature: -10°C ~+60°C,10%RH~75%RH Dimension: 278 (L) x 76 (W) x 50(H) mm Weight : 350g Accessories : Instruction manual, battery, screwdriver, ¢3.5mm earphone plug, windscreen,... - Page 5 SYMBOL FUNCTION 4 digits Maximum hold Minimum hold OVER over range UNDER under range FAST Fast response SLOW Slow response A-Weighting(responseto human sense) C-Weighting(response to machine monitor) 30—130 Range indicate Recording data into computer AUTO Auto level range selection FULL Memory full HOLD Data hold function...
- Page 6 3.0 DATALOGGER function Press “REC” button after it power on, the display will show “REC” to start Data Recording,press the button again to exit the record (Note: In order to avoid data error, please don’t power it off under REC condition, when the REC function is deleted then it can power off).
- Page 7 show the date as following: Press the ‘SETUP’ button second time, the display showing: The display showing “minute” adjustment mode, press ‘LEVEL’ to make the adjustment,press ‘HOLD’ to keep the setup; Press the‘SETUP’button third time, the display showing: The display showing “hour” adjustment mode, press (h-P=P.M,h-A=A.M) ‘LEVEL’...
- Page 8 The display showing “date” adjustment mode, press ‘LEVEL’ to make the adjustment,press’HOLD’to keep the setup; Press the ‘SETUP’button fifth time, the display showing: The display showing “month” adjustment mode, press ‘LEVEL’ to make the adjustment,press ‘HOLD’ to keep the setup; Press the ‘SETUP’...
- Page 9 4.1. USB communications setting: Turn on the meter, connect the meter with the computer correctly, choose the software COM3(COM4),hen press ‘ETUP’ , ‘ ‘ disappears from the display to indicate and disable auto power off, that the USB data is transmitting. ⑤...
- Page 10 ⑧ Backlight button 8.0.Turn the backlight on/off 8.1.DATALOGGER response setting; press the button continuously until‘INT’symbol appears after the meter turn on, press‘LEVEL’to set up the data memory response, then press‘HOLD’to keep the setting. ⑨ Frequency weighting select button A:A-Weighting C:C-Weighting ⑩...
- Page 11 USB interface USB signal output is a 9600 bps serial interface. ⒁ AC/DC signal output earphone outlet OUTPUT OUTPUT GROUND AC: Output voltage: 1Vrms corresponding to each range step. Output impedance: 100Ω DC: Output voltage: 10mV/dB Output impedance: 1kΩ ⒂ Calibration potentiometer(CALL) For external standard level calibration adjustments.
-
Page 12: Calibration Procedures
CALIBRATION PROCEDURES ① Make the following switch settings: Frequency weighting: A-weighting Time weighting: FAST Level range: 50 ~100dB ② Insert the microphone housing carefully into the 1/2 inch insertion hole of the calibrator(94dB @ 1kHZ). ③ Turn on the switch of calibrator and adjust the CALL potentiometer of the unit 94.0dB is displayed. -
Page 13: Operating Procedure
7. OPERATING PROCEDURE ① Power on the meter. ② Press ‘LEVEL’ button to select desired level, base on ‘UNDER’ or ‘OVER’ do not appear on LCD. ③ Select ‘dBA’ for general noise sound level and ‘dBC’ or measuring sound level of acoustic material. ④... - Page 14 10. Installing the software 1.0 Start windows 1.1 Insert the CD into the CD-drive. Run SETUP.EXE installation program in file DISK1, install it to the referred directory 1.3 Install CP210X drive software: Connecting the meter with the computer by USB interface, install CP2102 drive software in my computer property:\hardware\facility management\...
- Page 15 1.5 Enter the menu REAL TIME \‘SETUP’to set the monitoring data (data volume, response, monitoring time) 1.6 DATALOGGER menu: The computer read the memory data in the meter when REC not appear on the display and the onnection is in order.
Need help?
Do you have a question about the MarMonix MSL-765 and is the answer not in the manual?
Questions and answers