Advertisement
IMPORTANT SAFEGUARDS
When operating this electric appliance, basic safety instructions should always be followed. Refer to the following for these instructions.
- READ ALL SAFETY & USAGE INSTRUCTIONS BEFORE USING this Flatbread Maker.
![]()
EXERCISE EXTREME CAUTION: Do not touch hot surfaces while baking. Do not stand or sit near escaping steam when Lid is opened. Scalds and/or burns may occur.![shock hazard]() AVOID ELECTRICAL SHOCK. DO NOT immerse cord, plug or the Flatbread Maker in water or other liquid.
AVOID ELECTRICAL SHOCK. DO NOT immerse cord, plug or the Flatbread Maker in water or other liquid. - Use pot holders or oven mitts when handling the hot foods from the Flatbread Maker.
- UNPLUG Flatbread Maker from outlet when not in use or before cleaning. DO NOT add or remove parts or accessories while HOT. Do not let cord hang over edge of table or counter or touch hot surfaces, including the Flatbread Maker.
- Children should not use Flatbread Maker unsupervised; close supervision is required when appliance is used near or with children.
![]()
Never touch, cover or obstruct the Top Air Vents during or after operation. Hot air may cause burns. Keep children away from Vents.- Operate the Flatbread Maker on a level surface well away from any hot gas or electrical burner, heat source, combustible spray cans or pressurized items.
- Do not operate the Flatbread Maker outdoors.
- Never operate the Flatbread Maker with a damaged cord or plug or one that has malfunctioned or been damaged in any way. Immediately contact Customer Service for analysis.
![burn hazard]()
![shock hazard]()
DO NOT add unauthorized accessory attachments. Such use may result in electric shock, injury or fire.- Use only factory cord supplied; NEVER add extension cords.
- When done using, turn the Easy Temperature Control Dial to "OFF", then unplug from the wall outlet.
- Do not use the Flatbread Maker for any use other than intended. Do not use on or near a stovetop or other heat source.

 AVOID ELECTRICAL SHOCK. DO NOT immerse cord, plug or the Flatbread Maker in water or other liquid.
SAVE THESE INSTRUCTIONS
FOR HOUSEHOLD USE ONLY
3-Conductor Cord Set: This Flatbread Maker is equipped with a 3-conductor cord set that has a 3 prong groundingtype plug. It should be properly connected to a grounding-type outlet. The plug is designed to fit ONLY a 3-grounding outlet unit, and as such, the grounding prong should never be removed. If needed, purchase a 2-prong adaptor and ground it to the outlet. Consult a qualified electrician if in doubt. Do not use an adaptor unless you are confident it is grounded. Do not modify this plug. If the plug does not fit the outlet securely, call a qualified electrician for assistance.


This product contains a chemical known to the State of Caifornoa to cause cancer.
This product contains a chemical known to the State of California to cause birth defects or other reproductive harm.
FEATURES & FUNCTIONS

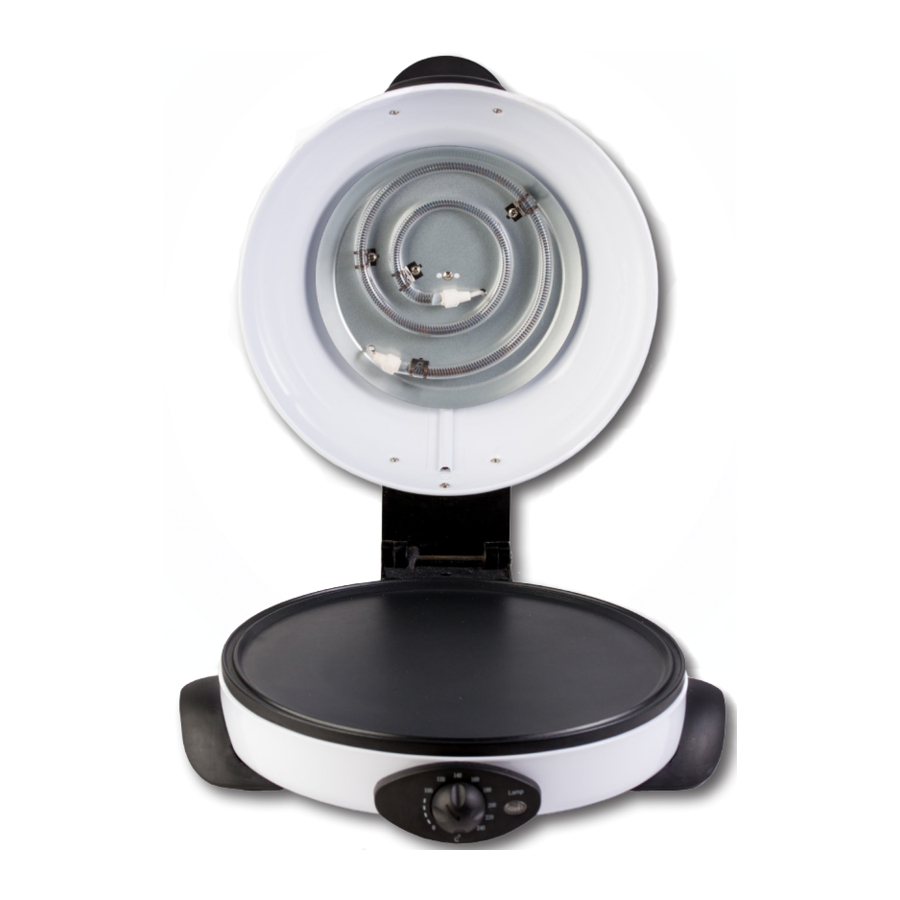
- Flatbread Maker Base- The Base for the Flatbread Maker holds the oversized Nonstick Baking Plate and the Base Heating Element. The Plate gets hot almost immediately in response to the Heating Element, offering a super-fast preheating time.
The Base also holds the Temperature Control Dial that can easily be adjusted up to "465°F" for a full range of temperature settings to suit your every baking need. - Vented Dome Lid with CoolTouch Handle- The Vented Dome Lid holds the second of two Heating Elements, which creates super-crisp exteriors on your flatbreads by directly heating the top of the bread. It can be easily opened by using the CoolTouch Handle. The Domed Lid contains vents for steam to escape; avoid standing near the steam while operating the Flatbread Maker.
- Nonstick Baking Plate- The generous 12-inch nonstick Baking Plate easily holds thin, unleavened flatbreads and a variety of other baked goods. Because the surface is nonstick, use only heat-resistant plastic or wooden utensils to avoid marring the surface.
Before first use, condition the Plate by coating lightly with a layer of vegetable shortening. Following that treatment, always lightly coat the Baking Plate with cooking spray before adding food to the Plate. If, over time, foods begin to stick, re-condition with a second application of vegetable shortening. - Easy Temperature Control Dial- With the ease of the Control Dial, you can quickly set the temperature for your baked goods by turning the Dial to the heat setting you prefer. Allow the Flatbread Maker to preheat for 10 minutes before adding foods to bake.
BEFORE FIRST USE
- Place the Flatbread Maker on a level, flat surface that is clean and dry.
- Ensure that the Flatbread Maker is several inches away from obstructions, such as walls, cabinets, doors, and other appliances. Allow enough room above the Flatbread Maker so the Dome Lid can be fully opened.
- Use a soft damp cloth to clean the exterior of the Flatbread Maker, Nonstick Baking Plate and Domed Lid. Dry with a paper towel or soft cloth.
- Plug the unit into the wall outlet and turn the Control Dial to 325°F. Heat Flatbread Maker for a few minutes to prepare the Nonstick Baking Plate for cooking. When done, turn the Control Dial OFF and unplug. Allow to cool completely. Wipe the Nonstick Baking Plate again with a damp cloth and dry.
- Before using for the first time, use a small amount of vegetable shortening to condition or "season" the Nonstick Baking Plate. Spread a very thin layer of the shortening over all the surface of the Plate. Wipe gently with a paper towel. Preheat as recipe directs.
ASSEMBLY
- Ensure the Temperature Control Dial is set to OFF.
- Plug the Flatbread Maker into the wall outlet.
- The Power Indicator Light will illuminate and will stay lit until the Flatbread Maker is unplugged.
- Use only heat-resistant plastic or wooden utensils on the Nonstick Baking Plate.
STEP-BY-STEP INSTRUCTIONS
- Lightly coat the Nonstick Baking Plate with cooking spray.
- Set the temperature desired by turning the Control Dial.
- Preheat the Flatbread Maker for 10 minutes before adding food.
- If adding thin bread dough, use a wooden peel or other wooden or plastic heat-resistant utensil to help arrange the dough on the Plate.
- If food spreads over the edge of the Plate, clean with a dry paper towel, when completely cool, use a damp, soapy cloth to clean. Dry well.
- Check foods while cooking to determine if the food is done in the middle. Use a thin wooden cake tester or wooden pick. If any batter or crumbs remain on the stick, continue baking until done in the center.
- When done, remove bread or other foods to a wire baking rack to cool slightly before serving.
- Always turn the Control Dial to OFF when done baking. Unplug the unit and allow to cool before cleaning.
FLATBREAD RECIPES
Blistered Tomato & Mozzarella Foccacia
Cut thin slices of this hearty, fresh tomato and cheese appetizer or game-time snack.
| 1t. | Sugar |
| 2 1/2 T. | Active Dry Yeast |
| 1/3 c. | Warm Water (110˚F) |
| 2 c. | White All-Purpose Flour |
| 2 T. | Olive Oil |
| 1/4 t. | Kosher Salt |
| 1 c. | Small Heirloom or Cherry Tomatoes, rinsed and dried |
| 1/2 c. | Mozzarella Cheese, shredded |
Instructions:
In a small bowl, combine the sugar and yeast with the warm water. Let stand 5 minutes until foamy. In a large bowl, combine the flour, oil, salt and yeast mixture. Stir with a wooden spoon until well-mixed. Prepare a floured board and add the dough. Lightly sprinkle the dough with flour and knead for 5 to 10 minutes. If the dough remains sticky, add one tablespoon flour, as needed.
Cover the dough and let stand in a warm area until it has doubled in size, about 1 hour. Prepare a floured board and form the dough into a large oval or round to a ½-inch thickness overall. Use fingertips to make dents over the top of the dough and add the tomatoes, pressing each deeply into the dough. Scatter the shredded cheese over the top of the focaccia.
Lightly coat the Nonstick Baking Plate with cooking spray. Preheat the Flatbread Maker to 425°F for five minutes. Transfer the focaccia bread to the Nonstick Baking Plate and close the Lid. Bake for 20-25 minutes, until bread is lightly browned and cooked through. Remove with a heat-resistant plastic or wooden spatula and let stand for 10 minutes to cool. Cut into wedges or slices and serve while warm. Serves 2-4.
Classic Pizza Crust
A delightfully thick and chewy crust, just waiting for your favorite toppings!
| 3/4 T. | Sugar |
| 3/4 T. | Active Dry Yeast |
| 4 1/2 oz. | Warm Water (110˚-115˚F) |
| 7 1/2 oz. | Bread Flour |
| 3/4 t. | Kosher Salt |
| 3 T. | Olive Oil |
Instructions:
In a small bowl, combine the sugar and yeast with the warm water. Let stand 5 minutes until foamy. In a large bowl, combine the flour, salt, oil and yeast mixture. Stir with a wooden spoon until well-mixed. Prepare a floured board and add the dough. Lightly sprinkle the dough with flour and knead for 5 to 10 minutes until smooth. If the dough remains sticky, add one tablespoon flour, as needed.
Cover the dough and let stand in a warm place until doubled in size, about 1 hour. Lightly coat the Nonstick Baking Plate with cooking spray. Preheat the Flatbread Maker to 425°F for five minutes.
Prepare toppings for the crust. Lightly flour a board and roll the crust to a onefourth inch thickness. Transfer the crust to the Nonstick Baking Plate. If needed, carefully re-form the dough to a circular shape.
Add sauce and toppings as desired and close the Lid. Bake for 10-15 minutes, until pizza is golden on top and cooked through. Remove with a heat-resistant plastic or wooden spatula and let stand for 5 minutes to cool. Cut into wedges and serve while warm. Makes 1 12-inch crust, enough for 2-4 servings.
Homemade Pita Bread
Fresh and warm from the oven, tear this delicious bread into pieces to accompany main dishes or cut into wedges and serve with hummus.
| 1 T. | Active Dry Yeast |
| 1 t. | Sugar |
| 1 c. | Warm Water (110˚-115˚F) |
| 6 oz. | Bread Flour |
| 6 oz. | Whole Wheat Flour |
| 1 t. | Kosher Salt |
| 2 T. | Olive Oil |
Instructions:
In a large bowl, combine the sugar and yeast with the warm water. Let stand 5 minutes until foamy. Add the bread flour, stir with a wooden spoon and let stand for 5 minutes, or until slightly bubbly.
Add the remaining ingredients and stir until well-mixed. Prepare a floured board and add the dough. Lightly sprinkle the dough with flour and knead for 5 to 10 minutes until smooth. If the dough remains sticky, add one tablespoon flour, as needed.
Cover the dough and let stand in a warm place until doubled in size, about 1 hour. Divide dough into 8 equal pieces and roll each to a circle, approximately 1/8-inch thickness, on a floured board.
Lightly coat the Nonstick Baking Plate with cooking spray. Preheat the Flatbread Maker to 425°F for five minutes.
Arrange one Pita bread on the Nonstick Baking Plate. Close the Lid and bake for 3-4 minutes, or until cooked through. Remove with a heat-resistant plastic or wooden spatula and cool on a wire rack. Repeat with the remaining Pita breads, allowing 1-2 minutes between each Pita to reheat the Flatbread Maker. Serve while warm. Serves 4-8.
MAINTENANCE & SERVICE
ALWAYS allow the Flatbread Maker to cool completely before cleaning.
Unplug the Flatbread Maker before cleaning.
After each use, use a damp cloth to clean the Flatbread Maker Base, Nonstick Baking Plate and handle, if needed. DO NOT immerse the Flatbread Maker in water. Use non-abrasive cleaners or soft soap only.
Do not place any parts of this appliance in the dishwasher.
WARRANTY & SERVICE
This Limited Warranty is for one full year from the date of purchase. It is applicable to the original purchaser only and is not transferable to a third party user. Repair or replacement of defective parts is solely at the seller's discretion. In the event that repair isn't possible, the seller will replace the product/part. If product repair/replacement won't suffice, the seller has the option of refunding the cash value of the product or component returned.
Product defects not covered under the Warranty provisions include normal wear and damage incurred from use or accidental negligence, misuse of instruction specifications or repair by unauthorized parties. The manufacturing company is not liable for any incidental or consequential damages incurred by such circumstances.
For Customer Service or Questions, Please call: 888-552-0033
www.gourmia.com
© 2016 Gourmia
www.Gourmia.com
The Steelstone Group
Brooklyn, NY
All rights reserved. No portion of this manual may be reproduced by any means whatsoever without written permission from The Steelstone Group, except for the inclusion of quotations in a media review.

Documents / Resources
References
Download manual
Here you can download full pdf version of manual, it may contain additional safety instructions, warranty information, FCC rules, etc.
Advertisement


Need help?
Do you have a question about the GBM3400 and is the answer not in the manual?
Questions and answers