Advertisement
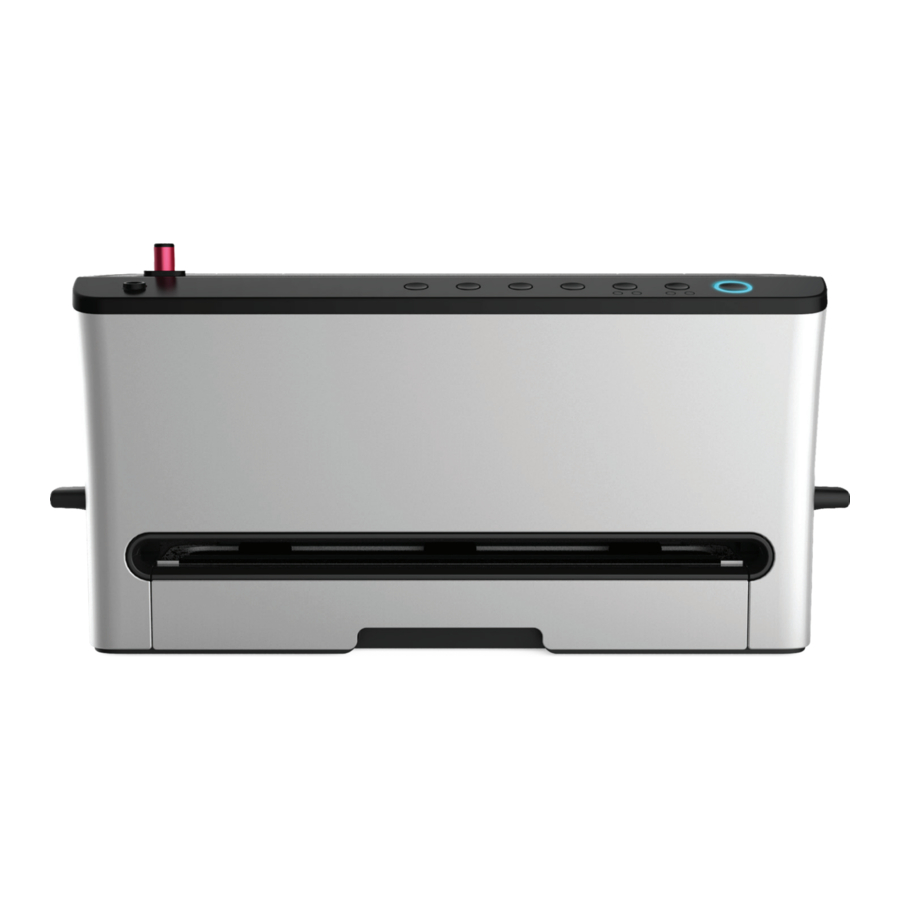
FEATURES & FUNCTIONS

- Vacuum Seal button: Press this botton to vacuum and seal bag (intervals of 40 seconds is recommended before repeating.)
- Food button has two settings (Dry and Moist). The default mode is Dry, when you press the button, it changes to Moist mode. You can choose the mode according to the food type.
- Mode button has two settings (Normal and Gentle). The default mode is Normal. When vacuum sealing food that is delicate or easily crushed, you can press this button, and the vacuum mode switches to Gentle. You can manually control the amount of vacuum by pressing the Seal button at any time, the bag will seal automatically. (Note: if the power is interrupted, the setting will revert to standard mode).
- Seal button (with LED) begins sealing bag (intervals of 40 seconds is recommended before repeating.)
- Pickling button (with LED) marinates the food by concentrating liquids. You get great flavor in the shortest amount of timetime.
(![information]() Note: This function is usedwith the canister/container).
Note: This function is usedwith the canister/container). - Canister button (with LED) is the button to press to begin the vacuum packaging using the canister.
(![warning]() Note: This function can only be used with compatible canisters).
Note: This function can only be used with compatible canisters). - Stop button allows you to stop precesses at anytime.
 Note: This function is usedwith the canister/container).
- Cutter button cuts the bag to any length you want.
- Roll Lid holds the bag roll inside the chamber.
- Latches, one on each side, are pressed down at same time, a click sound indicates the hooks are locked correctly.
- Release Buttons, one on each side, are pressed down at same time to open unlock.
- Air vacuum openning is used when you vacuum package using canisters or other accessories. One end of the hose fits into this opening. Do not ever block this hole.
- Drawer pulls out for easy cleaning and component exchange.
- Liquids Box is used when air is vacuumed out, liquids will be suctioned out and flow into the Liquids Box. Please clean this box after each use.
- Rubber Lip
- Gasket
VACUUM BAGS FROM ROLL
- Open the Roll Lid, pull out the desired length of bag. FIG. 1
![]()
FIG. 1 - Close the Roll Lid. Push the Cutter from left to right to choose the length of the bag you need.
(![warning]() Note: You do not need the cutter if you are using a vacuum bag.) FIG. 2
Note: You do not need the cutter if you are using a vacuum bag.) FIG. 2
![]()
FIG. 2 - Insert the opening of the bag into the vacuum chamber evenly. FIG 3
![]()
FIG. 3 - Insert about 3cm in, then press down on the latches on both sides until it clicks into to the position, the bag is now ready for vacuum sealing process. FIG. 4
![]()
FIG. 4


SEAL VACUUM BAGS AND VACUUM CANISTER
SEAL PLASTIC BAGS
- Plug the appliance in and switch it on.
- Insert the open end of the bag into the vacuum chamber.
- Press down the latches on both sides at the same time until two clicking sounds are heard.
- Press the Seal button until the LED light comes on. When the LED light turns off, the seal is complete.
- Press the Release button to open and take out the sealed bag.
PACKING WITH VACUUM BAG
- Plug in the appliance and switch it on.
- Put the items inside the bag.
- Clean and straighten the open side of the bag, make sure there are no wrinkles, moisture or dust on the edge.
- Insert the open end of the bag into the vacuum chamber.
- Press down the 2 latches on the sides at the same time until two click sounds are heard.
- Press the Vacuum Seal button until the LED turns on, the vacuum and seal process will begin automatically. When the LED light turns offs, the process is complete.
- Press the Release buttons on the two sides, then take out the sealed items.
 Note: If the food is wet, please choose the Moist mode.
PACKING WITH VACUUM CANISTERS
- Put the items inside the canister and cover it with the lid. Insert one end of the hose into the Vacuum Air Hole, and insert the other end into the hole on top of the canister lid.
- Press the Canister button and it will begin to draw the air from the canister and create a tight seal. You can press the Stop button to cancel at anytime. When the vacuum process is completed, the appliance will automatically stop.
- Pull one end of the hose from the canister first, then pull the other end from the appliance.
- When the stored items are expired or need to be removed from the canister, simply press down on the button in the center of the canister lid to release the seal, then open the canister after a few seconds.
TIPS ON USING CANISTER
Please remove the lid before you putting the canister in a microwave oven.
Place the canister in refrigerator for longer freshness time.
HELPFUL HINTS
- Do not overfull the bags, leave enough length at the opening of the bag so that it can be placed in the vacuum chamber easily. Make sure to leave at least 2.5cm (1 inch) space between objects and top of bag.
- Ensure that the opening the bag is not wet. A wet bag may be difficult to melt and seal tightly.
- Vacuum sealing cannot completely replace refrigeration and freezing. Perishable foods still need to be refrigerated or frozen.
- Make sure the opening of plastic bag is clean and flat, otherwise it will cause leakage during the seal.
- To prevent wrinkles in a seal when vacuum sealing bulky items, gently stretch bag flat while inserting into the vacuum chamber and hold it until the pump starts up.
- When you are vacuum sealing items with sharp edges (dry spaghetti, silverware etc.), protect the bag from punctures by wrapping item in soft cushioning material, such as tissue paper, you may need to use a canister or container instead of a bag.
- When using accessories, remember to leave 2.5cm (1 inch) of space at top of canister or container.
- Pre-freeze fruits and blanch vegetables before vacuum sealing for the best results.
- Cool down intervals of 40 seconds after seal or vacuum is recommended.
- If you are unsure whether the bag is sealed properly, repeat reseal process.
- For best results, please use quality bags, canisters, containers and accessories.
- Wipe the edge of the jar, container or bottle to make sure it is clean and dry.
FOOD STORAGE GUIDELINES
| CLASSIFICATION | FOOD ITEMS | TEMP. | NORMAL STORAGE | VACUUM STORAGE |
| REFRIGERATED | Fresh Raw Meat | 5±3°C | 2-3 days | 8-9 days |
| Fresh Fish/ Sea Food | 5±3°C | 1-3 days | 4-5 days | |
| Cooked Meat | 5±3°C | 4-6 days | 10-14 days | |
| Vegetables | 5±3°C | 3-5 days | 7-10 days | |
| Fruit | 5±3°C | 5-7 days | 14-20 days | |
| Eggs | 5±3°C | 10-15 days | 30-50 days | |
| FROZEN | Meat | -16~ – 20°C | 3-5 months | >1 year |
| Fish | -16~ – 20°C | 3-5 months | >1 year | |
| Sea Food | -16~ – 20°C | 3-5 months | >1 year | |
| ROOM TEMPERATURE | Bread | 25±2°C | 1-2 days | 8-10 days |
| Biscuit | 25±2°C | 4-6 months | >1 year | |
| Rice/ Flour | 25±2°C | 3-5 months | >1 year | |
| Peanut/Legume | 25±2°C | 3-6 months | >1 year | |
| Medical Material | 25±2°C | 3-6 months | >1 year | |
| Tea | 25±2°C | 5-6 months | >1 year |
CLEANING THE VACUUM SEALER
- Always unplug the unit before cleaning.
- Don't immerse the appliance in water or other liquid for cleaning.
![]()
- Do not use abrasive cleaners to clean, because it is easy to scratch the surface of the appliance.
- Wipe the outside of the appliance with a damp cloth or sponge with mild soap if necessary.
- To clean the vacuum chamber, wipe away any food or liquid.
- Dry thoroughly before using again.
- Clean the Drawer. Be sure to pull out the drawer smoothly. FIG. 1
![]()
FIG. 1
Then take out the Liquid Box and clean it. FIG. 2
![]()
FIG. 2


To avoid possible illness, do not reuse bags after storing raw meats, raw fish or greasy foods. Do not reuse bags that have been microwaved or boiled.
Storing Your Vacuum Sealer:
Keep the unit in a flat and safe place, out of the reach of children. Damage or distortion can cause leakage.
TROUBLE SHOOTING
In the unlikely event that you experience a problem with your device, please take a couple of minutes to check these possible causes prior to contacting customer support:
| PROBLEM | POSSIBLE CAUSE | SOLUTION |
| Vacuuming but Is not sealing automatically | Lower gasket is deformed | Replace it and try again |
| Edge of bag is covering the suction hole | Place the bag in the correct position | |
| Bag is overfilled and may be preventing the cover from locking | Take out some food and clean the bag edges, try again | |
| The bag is broken or leaking | Use a new bag and try again | |
| Sealing OK but not vacuuming | The bag is not placed correctly in the vacuum chamber | Place the edge of the bag into the vacuum chamber |
| The bag is covering suction hole | Place the bags in the correct position | |
| The edge of the bag has dirt, dust or crumbs | Clean the edge of bag and try again | |
| Edge of bag has wrinkles | Smooth the bag and try again | |
| Contents have sharp edges | Use the food safety paper pack before putting into the vacuum bag | |
| Bag is inflating/expanding after vacuum sealing | The food is highly corrosive | Freeze or refrigerate after vacuuming to prolong it's shelf life |
| The food packed is fresh vegetables, fruit or seeds | They are not suited to storage at room temperature. They have photosynthesis and respiration. Keep refrigerated |
PRODUCT SPECS
Product Size: 410 x 130 x 203mm
Vacuum bsg roll: Gourmia vacuum bag/roll(max width 30cm)
Voltage: 110V-120V AC 50-60Hz
Power: 110 W
Seal Way: Heat wire heating
Vacuum Degree: 0.8 bar MAX
Mode: Normal/Gentle
Food: Dry/Moist
Canister: Available
Net Weight: 2.73 kg
Package Size: 490 x 160 x 265mm
IMPORTANT SAFEGUARDS
When operating this electric appliance, basic safety instructions should always be followed. Refer to the following for these instructions
- READ ALL SAFETY & USAGE INSTRUCTIONS BEFORE USING.
- Do not use appliance on wet or hot surfaces, or near a heat source.
- To protect against electric shock, do not immerse any part of appliance, power cord or plug in water or other liquid. Unplug from outlet when not in use and before cleaning.
- To disconnect, unplug power cord from electrical outlet. Do not disconnect by pulling on cord.
- Do not operate appliance with a damaged power cord or plug. Do not operate appliance if it malfunctions or is in any way damaged. For details, contact Consumer Services.
- Use appliance only for its intended use.
- Closely supervise children when using any electrical appliance. Do not allow appliance to be used as a toy.
- The appliance has a polarized plug (one blade is wider than the other). To reduce risk of electrical shock, this plug is intended to fit in a polarized outlet only one way. If plug does not fit fully in the outlet, reverse plug. If it still does not fit, contact a qualified electrician. Do not modify plug in any way.
![]()
A short power cord is provided to reduce risks from entanglement or tripping over a longer cord. An extension cord may be used when marked electrical rating is no less than electrical rating of this appliance. All cords should not drape over counter or tabletop where cords can be tripped over or pulled on unintentionally, especially by children.- Do not place on or near a hot gas or electric burner, or heated oven. Extremecaution must be used when moving products containing hot liquids.
- Wait at least 20 seconds between seals to allow appliance to cool.
- For Household Use Only.

SAVE THESE INSTRUCTIONS
FOR HOUSEHOLD USE ONLY
Electrical 3-conductor Cord Set

Appliance is equipped with a 3-conductor cord set that has a 3 prong grounding-type plug. It should be properly connected to a grounding-type a 3-grounding outlet unit, and as such, the grounding prong should never be removed. If needed, purchase a 2-prong adapter and ground it to the outlet. Do not use an adapter unless you are for assistance.
WARRANTY & SERVICE
This Limited Warranty is for one full year from the date of purchase. It is applicable to the original purchaser only and is not transferable to a third party user. Repair or replacement of defective parts is solely at the seller's discretion. In the event that repair isn't possible, the seller will replace the product/part. If product repair/replacement won't suffice, the seller has the option of refunding the cash value of the product or component returned.
Product defects not covered under the Warranty provisions include normal wear and damage incurred from use or accidental negligence, misuse of instruction specifications or repair by unauthorized parties. The manufacturing company is not liable for any incidental or consequential damages incurred by such circumstances.
For Customer Service or Questions, Please call: 888-552-0033
DISPOSAL OF THE DEVICE

PROTECTION OF THE ENVIRONMENT
At the end of the life of your product, it should go to a specially adapted waste-recycling center.
ENVIRONMENT PROTECTION FIRST
![]()
The symbol on the product or on its packaging indicates that this product may not be treated as household waste. Instead it should be handed over to the applicable. Collection point for the recycling of electrical and electronic equipment.- By ensuring this product is disposed of correctly, you will help prevent potential negative consequences for the environment and human health, which could otherwise be caused by inappropriate waste handling of this product. For more detailed information about the recycling of this product, Please contact your local council office or your household waste disposal service.


Documents / Resources
References
Download manual
Here you can download full pdf version of manual, it may contain additional safety instructions, warranty information, FCC rules, etc.
Download Gourmia GVS445 - VACUUM SEALER FOOD PRESERVER MANUAL
Advertisement


Need help?
Do you have a question about the GVS445 and is the answer not in the manual?
Questions and answers