Advertisement
- 1 Safety Precautions
- 2 FAQ
- 3 Packing list
- 4 Main technical parameters
- 5 Installation instructions
- 6 Electrical diagram
- 7 Product dimensions
- 8 Maintenance and cleaning tips
- 9 Troubleshooting
- 10 Introduction of Product Diagram(HYZK26-E1)
- 11 Quick operation guide(HYZK26-E1)
- 12 Introduction of Product Diagram(HYZK26-E2)
- 13 Quick operation guide(HYZK26-E1)
- 14 Documents / Resources
Safety Precautions
In order to protect users from injury or product damage, please take note of the following caution marks.
Please read and observe all safety instructions.
Classification by degree of hazard and damage
Please take note of this  or
or  symbol. Failure to do so could result in product damage, property damage or loss, and person injury or death

Ignoring this symbol and any improper operation which is possible to result in ' personal injury or property damage.
Recomendation
For safe and proper use of this product, the following contents are listed for reference.
Symbols of Warning and Caution
 |  |  |  |  |  |  |  |  |
Hot | Electric Shock | Mandatory | Grounding | Forbidden | No Open Flames | Do Not Touch | Do Not Operate with Wet Hands | Do Not Disassemble |
* Special note: Please use this product following all the guidelines in the Users Manual. Failure to do so can result in injury, product damage, or property damage.
| |||
 | Do not allow children or people with sensory issues - operate this unit without supervision. Failure to comply with this, can result in burns, electric shock, or other accidental injuries. | | The oven is used only for cooking food through roasting, baking, air-frying, steaming, and dehydrating. Any other type of usage could result in injury or property damage and will void the FOTILE warranty. FOTILE is not responsible for damages or injury caused by improper usage. |
| Do not place anything on the bottom liner portion of the oven. This may conduct further heat transfer and damage the oven. | | Do not add cold water to any food baked at high temperatures as this could cause excessive steam and serious burns. |
| Do not clean the glass of the oven door with any rough or abrasive materials as this could scratch the glass surface or even break the glass. | | Do not heat any foods in a can or a container with the lid closed. Explosion may occur due to excessive heat and pressure building up inside the container. |
| Do not touch the oven at any time with wet hands during operation. This could lead to electrical shock and injury | | Never use the oven when there is a loose electrical plug or wire as this can result in electric shock, short circuit, or even a fire. |
| Do not clean this product with a steam cleaner. | | Do not use a multi-functional socket with multiple plugs. |
| Do not place anything on the glass oven door when it is opened. This could damage the unit. | | Never immerse the electrical cord in water as this may cause electrical shock and injury |
| Never place the following items in the oven for cooking: paper, cardboard, plastic, cloth, flammable items | | Do not use the oven near any flammable items such as gas, alcohol, or other flammables |
| To avoid fire hazard, keep the oven away from flammable items such as curtains, blinds, aerosol cans and detergents when the oven is in use. | | When unplugging the electrical cord from the electrical outlet, please the end of the plug when pulling it from the outlet to avoid damage to the power cord. |
| Never store any items inside the oven when not in use. |  | Only authorized FOTILE technicians may dismantle or service the oven. to comply could result in voiding your warranty. |
| Avoid Cleaning the liner bottom of the oven right after use as the temperature is still too high. Never spray any cleaning liquids or water in the oven when it is hot. | | For any issues that occur when in use, please cut off the power immediately to avoid personal injury or product damage. |
| Please wait 30 to 60 seconds to carefully open the oven door after excessive steam in the oven. | | To reduce risk of injury to children, please make sure they never use the oven as a toy or play near the oven when in use. |
| In case of oven malfunction, press the power button to turn the unit off and unplug the power cord from the electrical outlet. Contact FOTILE Customer Service to resolve the problem. | | Do not try connecting the oven to an external timer or a remote control system. |
| |||
| Never use a plastic container in the oven when cooking. If you do, please make sure the manufacturer of the food has approved the plastic container for cooking or heating. | | Please make sure to wear oven gloves when handling hot food or when adjusting the baking and steaming trays to avoid bums to your skin. |
| If the service location is infested with rats or insects, please try to keep the unit and its surrounding environment clean and sanitary. FOTILE is not responsible for product damage due to rats or insects. | | To avoid these dangers, please refrain from putting alcohol in the food when it is in the oven. |
| If you experience a damaged power cord, it must be replaced by a qualified Mandatory FOTILE Technician. Please call FOTILE Customer Service to arrange service. | | Please do not add any oil to cook your food in the oven as overheated oil or grease can be a fire hazard. |
| Before cleaning your Combi oven, be sure to turn off the power first and use a neutral cleaner without any abrasives and a soft towel to clean your unit. | | Please keep all boxes and packaging materials away from children as they can be a choking hazard or cause asphyxiation. |
| If you are using the oven to keep food warm, please cover the food. Excessive moisture in the food can corrode the oven if not covered. Covering your food will also help keep your food moist and not dry |  | The electrical outlet being used should have a grounding outlet to ensure safety. Do not connect the grounding wire to a gas pipe, water pipe, or a lightening rod. Imperfect grounding may cause electrical shock and personal injury. |
| Do not place any cookware or cooking utensils on the bottom of the oven. | | Do not connect this product using a long extension cord. If the cable is too long, it become an electrical hazard. |
 | The Heating Tube is located inside the oven at the top. Do not touch this tube especially after oven use. The tube will remain hot after use until the oven cools down. | | Use a dedicated 10A power outlet and make sure the plugs on the power cord are not bent before inserting the power cord into the wall outlet. |
| To avoid steam and heat loss when cooking, do not open the oven door during the cooking process as much as possible. | | Please keep children away from the oven while in operation to avoid any accidents. |
| Please use oven gloves when taking food out of the hot oven. Never use wet gloves Mandatory to get your food as this can transfer the heat through the gloves quickly and burn your hands. | ||
 | Never open up the housing of the oven and try to troubleshoot or fix it. It is very dangerous to touch any connecting wires or heating elements. Such actions could cause electrical shock and injury. | | Please ensure the water tank base is firmly fixed in place otherwise there be a pumping failure. |
| | To prevent any burns to your body, please open the oven door slowly and carefully after cooking to let out excess steam and heat before reaching for the food. | | The oven will become very hot during use. Please do not touch the oven when in use and keep children away from the hot oven when in use. |
| | It is normal for steam to come out of the exhaust grille of the oven as well as the oven door during cooking. Please be sure to keep all children away from the unit when in operation and follow all safety warnings. | | Please use purified water when steam cooking to the machine such as over calcification avoid damage to and scale build up. |
| The oven is not designed for outdoor use. | | Waming, never keep the oven door opened during operation. |
| |||
| This product is used for home cooking only and not for any other purpose. FOTILE can not be held responsible if the product is used for another purpose and results in personal injury or property loss. | | In case the oven malfunctions, please turn it off, unplug it from wall, and wait 30 seconds. The plug the unit back in the power outlet and power it on. If problems still persists, please call FOTILE Customer Service. |
| For Hygienic purposes, please pour out the remaining water in the water tank each time after use to avoid mold and bacteria growth over time. Be sure to frequently wash the water tank with water and a mild dish detergent. | | Be sure to dry off the bottom of the water tank every time the is replenished before putting back in the oven. |
Ignoring this symbol and any improper operation may result in danger, serious injury, or fire. The Company will not be responsible for any consequence arising from non-observance of Safety Precautions.
This product contains chemicals known to the State of California to cause cancer, and birth defects or other reproductive harm. For more information, please go to: www.P65Warnings.ca.gov
Remarked: Instructions for details installation, use, clean and maintenance of this product are provided by the manufacturer. Only necessary waming sentences required by standards are listed as below.
IMPORTANT PROTECT MEASURES
This appliance should continuously working less than 3 hours Before operating your new appliance, please read all instructions carefully and for future reference.
IMPORTANT SAFEGUARDS
- Read all instructions before using.
- Do not touch the hot surfaces. Use handles or knobs.
- To protect against electrical shock and affecting the function, do not immerse the appliance, body, cord, or plug in water or other liquid.
- Close supervision is necessary when any appliance is used by or near children.
- Unplug from outlet when not in use and before cleaning. Allow to cooling before putting on or taking off parts, and before cleaning the appliance.
- Do not operate oven with a damaged cord or plug or after the appliance malfunctions or has been damaged in any manner. Return the appliance to the nearest authorized service facility for examination, repair or adjustment.
- The use of accessory attachments not recommended by the appliance manufacturer may result in fire, electric shock or injuries.
- Do not use outdoors.
- Do not let cord hang over edge of table of counter, or touch hot surfaces.
- Do not place the appliance in the presence of explosive and /or flammable fumes.
- Do not move the appliance when the appliance is contained with food, hot oil or other hot liquids.
- Do not use the appliance for other than intended use.
- To disconnect, turn off the machine, then remove plug from wall outlet.
- Make sure to use on a heat resistant and even surface. Keep at least 15 cm away from walls and other flammables.
- Notice that the tray only can put food or liquid at the 2/3 of capacity.
- Turn the thermostat knob to the "O", the appliance stopping working.
- Before the appliance stops working, the heater surface keeps warm a long time. Do not touch the surface before cooling.
- Do not operate the appliance without any things, or else the body is easy to change shape.
![]()
TO REDUCE THE RISK OR ELECTRIC SHOCK, COOK ONLY IN THE PROVIDED REMOVABLE CONTAINER.![]()
Hot surface![]()
To ensure continued protection against risk of electric shock, connect to properly grounded outlets only.- When the appliance provided with a flexible cord less than 4-1/2 feet (1.4m) in length, the extension cord should be a grounding-type 3-wire cord and meet the following requirements:
- A short power-supply cord should be used to reduce the risk resulting from becoming entangled in or tripping over a longer cord.
- Longer extension cords are available and may be used if care is exercised in their use.
- If a longer extension cord is used:
- The marked electrical rating of the extension cord should be as great as the electrical
![]() rating of the appliance.
rating of the appliance. - The cord should be arranged so that it will not drape over the countertop or tabletop where it can be pulled on by children or tripped over unintentionally.
- The marked electrical rating of the extension cord should be as great as the electrical
This appliance is intended for Household Use Only.
The appliances are not intended to be operated by means of an external timer or separate remote control system.
This appliance is intended to be used in household and similar applications such as:
- Staff kitchen areas in shops, offices and other working environments;
- Farm houses;
- By clients in hotels, motels and other residential type environments;
- Bed and breakfast type environments.
This appliance is not intended for use by persons (including children) with reduced physical, sensory or mental capabilities, or lack of experience and knowledge, unless they have been given supervision or instruction concerning use of the appliance by a person responsible for their safety.
Recommendation
- Before the first use, please read important information about safe use, operation and maintenance of the oven listed in the use manual to avoid accidents and damage.
- Clean the oven before first use. Take the water tank out and wash the inside of the water tank using hot water. Do not use any cleaning solution or detergent. lIts accessories can also be taken out for cleaning. For details, see section Maintenance and Cleaning. You are recommended to clean the inner wall and the liner of the oven using a cleaning solution diluted with hot water.
- Dry the condensate water tank using a soft cloth each time after you use of the oven.
- Open the door of the oven to dry the moisture completely after each use.
- If the oven will not be used for a long time, thoroughly clean it to avoid an unpleasant order or bacteria growth. For details, see section Maintenance and Cleaning.
- Confirm that the voltage and frequency of your household power supply are the same as those of the oven before you use it.
- Place the oven firmly on the counter top before operation.
- Clean and dry the oven each time after use once it cools to avoid build up of food, grease, and bacteria.
- Please place the oven on a proper counter-top at the correct height so it is safe and easy to open and close the oven door to handle food.
- Please be careful not to pinch your fingers or hands in the hinges or edges of the oven door when opening and closing.
- When cooking food, please be careful not to tip it over in the oven.
- When moving the oven, be sure to unplug the power plug first. remove the power plugs first. The oven should be discarded in accordance with local laws and regulations.
Installation and maintenance safety
- The oven should be repaired by FOTILE Service Technicians only. Before first use, please be sure to read the User Manual entirely including all the safety warnings.
- Confirm that the voltage and frequency of your household power supply are the same as those of the oven before you use it.
- Ensure that the oven is grounded safely, reliably and properly. For electrical safety, the grounding wires of the oven should be properly and reliably connected to the grounding system of the household power grid, which is an essential safety requirement. The Company will not be responsible for any damage or injury arising from any problem in the household power grid.
Location of steaming and baking Racks

The Middle Layer is recommended for all racks.
FAQ
- Check if there is any heat leakage coming through the oven door due to improper seal rings or dirt on the temperature sensor inside the oven.
- Keep the door closed as much as possible during cooking. Also check to make sure the door is closing properly.
- When the oven cools down, check to make sure there is no food, dirt, or grease built up inside the oven. Make sure you clean your oven regularly after use.
- There is a noticeable color difference in cooking. Check whether a proper cooking mode is selected, and lower the set temperature appropriately.
- The door must be closed when the oven is in use. If the door is not fully closed during operation, the Pre-Heat/Working will blink and you will hear a buzzing tone.
- Steam bake will produce a lot steam, and steam will eventually condensate into cavity which is normal. Please use "Dry Up" function after Steam bake and clean up the cavity with cloth if necessary.
- There is an unpleasant odor in the cavity. After several times of cooking, the residual moisture and grease in the cavity are not removed in a timely manner. Please clean the cavity in a timely manner to ensure itis dry and tidy.
- Water drops from the underside of the cavity. Please check whether the drip tray is full of water. The overflow of water in the drip tray will cause water to drip from the underside of the cavity. Please remove the water in the drip tray after each cooking.
- When opening the door, there is a lot of smoke/stream. To ensure the cooking effect, the cavity is designed with excellent airtight performance, so part of the smoke/stream produced during cooking remains in the cavity. When opening the door, please open it slightly by 10°-15° to early release the smoke/stream in the cavity; and then fully open the door.
- Due to the difference in the cooking environment (such as voltage, temperature, and room temperature), the cooking effect will be affected. In this case, please adjust cooking temperature and time by yourself based on the cooking effect.
- When using the baking function, please ensure that the cavity is dry and free of water, especially when baking cakes.
Packing list
- Combi Oven
- User Manual
- Wire Rack
- Glove
- Warranty Card
- Perforated Steaming Tray
- Baking Rack
- Humidity-controlled Chip
Main technical parameters
| Model | HYZK26-E1; HYZK26-E2 | ||
| Rated voltage | 120V | Heating temperature range | 86°F-446°F |
| Rated frequency | 60Hz | Display mode | LED display |
| Rated power | 1550W | Cavity volume | 1 Cu. Ft |
| Light | 25W/120V~60Hz | Net weight | 35Lbs |
Installation instructions
- Take out all accessories and their packages inside the cavity of the oven;
- Carefully check whether the oven is damaged. In case of any damage, please contact the dealer or after-sales service immediately;
- The oven should be placed stably and securely in a place where operation and maintenance are convenient, and slanting installation should be avoided;
- It is strict prohibited to install the oven and power sockets in places that may get damp or wet easily, and they should be used in a ventilated and dry environment without any corrosive gas, away from high temperature and steam;
- Do not put anything on the top of oven.
Electrical diagram
Main circuit diagram

Product dimensions

Maintenance and cleaning tips
General precautions
The used cavity, door, handle, control panel, drip tray, and door sealing rings should be cleaned after each use, and power must be cut off before cleaning to avoid electric shock. Cleaning can only be conducted after the cavity is cooled, and the cavity must be completely dry before closing the door. In this way, the surface of the upper and lower cavity can be free of grease or other dirt, which is hard to be removed. Sometimes, it may cause the decoloration of the surface, and the grease deposition can also make the door sealing rings brittle, thus being prone to crack.
All surfaces need to be cleaned with a soft sponge and cloth dipped in water and a little cleaning solution, and then they should be dried with a soft cloth. Do not use any detergent to clean this machine. The steam under pressure will bring permanent damages to its surface and accessories, and any loss caused thereby will not be borne by the Company. Neither the detergents, which contain alkali, soda, acid, or chlorine, nor clean sprays, detergents for dishwashers, or corrosive detergents, hard brushes, scouring pads, and wire brushes should be used. In addition, any sponge stained with corrosive agents should not be used, so as not to scratch the surface.
Door gasket
Please clean and dry the door gasket after each use. Please use cleaning sponges and warm water. As the door gasket may be perforated or cracked over time, in this case, please call the after-sales service center of FOTILE.
Steam and Bake racks
Please clean and dry the steam and bake racks after each use.
Product cavity
Most cooking residues can be cleaned with a piece of cloth and gentle detergents, supplemented by some hot water. In those areas with poor water quality, there may be a layer of white sediment on the inner wall of the product, and it can be wiped with a piece of wet cloth, supplemented by a little vinegar, and then cleaned with clear water. Meanwhile, the drip tray and hook groove of the water tank should also be dried.
About water tank
- The machine works only after pushing the filled water tank into the tank pedestal and confirming with a short press of Select button.
- If the "Water" icon on the display screen flashes with a prompt buzzing tone, this indicates that there is no sufficient water in the water tank and the oven stops working. If this happens, add water to the water tank immediately, push the water tank into the tank pedestal ensuring it is pushed in place, and then confirm on the oven with a short press of Select button.
- To keep cavity dry, you can select " Dry Up" function after each cooking. Better clean the residue water with cloth or paper towel first.
Cleaning and maintenance of stainless steel cavity
- Dilute 0.8 oz washing soda into 5 oz warm water, and wipe up oil stains in the cavity.
- Close the product door, select "Steam Clean" mode (please make sure that the water tank has been filled with water), and start cleaning.
- Steam can soften oil stains. After cleaning is complete, repeatedly wipe the liner with a clean towel dipped in alkaline water until all the oil stains are removed.
- Select "Steam Clean" mode to clean the liner again.
Descale
When the product works for 50 hours with steam function, the icon of "Descale" flashes and will actively prompt you to do descaling and maintenance of the waterway. The descaling steps are given below:
- Add 6.8 oz white vinegar and 6.8 oz room-temperature water into the tank and mix them thoroughly.
- Place the water tank back into the product, select "Descale" mode, and start descaling by pressing "Enter".
- After "Descale" program runs for a period (about 25min), open the door when the buzzer sounds, clean the liner, and take out the water tank to replace 16.9 oz water.
- Place the water tank back into the product, close the door and press dial to continue cleaning till the end of descaling.
- Wipe up residual water on the liner, and open the door to any unpleasant odor.
Cleaning of common stains
After use, please clean the liner with cleaning cloth, soft sponge or soft nylon brush dipped with solution mixed with warm water and cleaning fluid. The longer the stains remains, the harder it is removed.
Cleaning of stubborn stains
Stubborn stains such as those caused by baking are likely to be firstly soaked and cleaned with a wet sponge if cleaned. They can be scraped with a scraper suitable for glass surface, necessary. They can be completely flushed with clean water after scraping. Cleaning of relatively stubborn stains with an oven spray (neutral food grade).
Attentions
To keep the best cooking effect, the tank and accessories are recommended to be timely cleaned after each use. In case of failure to timely clean them, accumulated oil stains will lead to have difficulties in cleaning of the tank and accessories, affecting your use environment and experience.
Tips: It is preferred to clean up dirt (such as spills of juice and cake pulp) when the tank or steaming and baking pan is still warm. For the avoidance of scald, please make sure that the tank is not very hot during cleaning. To avoid the unrecoverable liner arising from yellowing, please clean up spills of juice and other acidic liquid timely because they may cause the yellowing inner container.
Troubleshooting
For your safety, please press the Power button to turn off the oven before troubleshooting.
| Faults | Cause analysis | Solution |
| No response after the power cable of the oven is plugged in | Cause 1: Electrical outlet may be broken | Contact a qualified electrician for inspection and repair. |
| Cause 2: The power cable may be loose. and not plugged in to the electrical outlet | Re-plug the power cable plug. | |
| Cause 3: Loose connection wire between control panel and power panel. | Please contact FOTILE to get service arranged. | |
| Insensitive button | Cause 1: Stains on control panel. | Clean up the control panel. |
| Cause 2: Control panel faults. | Please contact FOTILE to get service arranged. | |
| The fan still runs after cooking | Cause 1:The temperature of the liner is higher than 158°F after the end of the roasting function. Within 20 minutes after the end of the steaming function. | Open the door for quick heat dissipation. The fan stops running after the liner with roasting function is lower than 158°F. The fan stops running 20 minutes after the end of the steaming function. |
| Cause 2: Undamaged power panel or temperature probe. | Please contact FOTILE to get service arranged. | |
| Yellow Stain on baking pan | Steaming and baking pan will become yellow due to presence of uncleaned food. | Wipe down the steaming and baking pan with hot water and mild dish detergent and then dry it with a towel. |
| The oven leaks | Cause 1: Water overflows in drip tray. | Clean the drip tray with a towel. |
| Cause 2: The door is not fully closed. | Check that there is no food or debris in the way of the door and if so, carefully remove it. | |
| Cause 3: The water tank is not properly installed. | Check whether the water tank is fully pushed into the tank holder. | |
| Cause 4: Others. | Please contact FOTILE to get service arranged. | |
| Steam is generated but food cannot be well cooked | Cause 1: Short cooking time. | Prolong cooking time. |
| Cause 2: Excessive food volume. | Cut the food into smaller pieces. | |
| Cause 3: High food stacking layers. | Place the food at the middle and i bottom of the cavity as close as possible to heating plate. | |
| Cause 4: Inappropriate cooking ware. | Choose multi-hole cooking ware with short walls. | |
| Cause 5: Others. | Please contact FOTILE to get service arranged. | |
| Display E2 | Short circuit/open circuit of steam generator NTC. | |
| Display E3 | Abnormal communi'caticn between control panel and display panel. | |
| Display F3 | Open circuit of cavity probe. | |
| Display F4 | Short circuit of cavity probe. | |
| Add water please | Low water level for water tank. | Fill the tank with an appropriate amount of water. |
| Failed water pipeline system. | Please call FOTILE after-sale service hotline to get service arranged. |
Introduction of Product Diagram(HYZK26-E1)
")
- Air heater apron
- Door gasket
- Upper heating element
- Ventilation openings
- Control panel
- Display
- Humidity-controlled chip
- Water tank with drip tray
- Door switch
- Temperature probe
- Steaming and
- Wire rack Baking Rack
- Steaming Rack
- Door
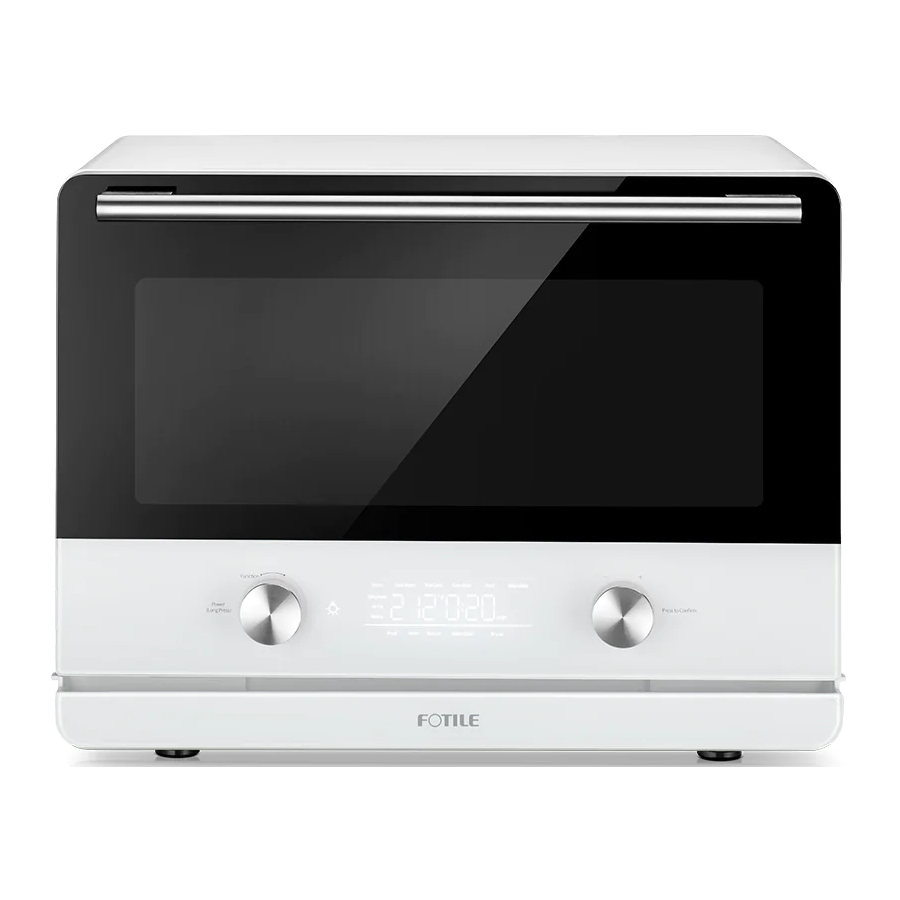
Quick operation guide(HYZK26-E1)
The control panel

Description of the buttons and rotary knobs of control panel and display interface
Operation buttons
- Power button: Press and hold the button for 1 second to turn on or off the oven.
- Select button: Press the button to confirm the selected function/temperature/time.
- Return button: Touch the button to return to previous setting; If you touch the button when oven is working, it will go to time setting and the oven will stop working.
- Light: Touch the button to turn on or off oven light.
Rotary function dial
- Rotary dial 1: Find the function you want to use by tuming the knob left or right.
- Rotary dial 2: Adjust the temperature and time parameters by turning the this knob left or right.
Display information on LED panel
- Major function display area: Display the current selected Steam or Bake mode.
- Auxiliary function display area: Display the current selected auxiliary mode.
- Display area for dehydration, air fry, and pre-set menus: It displays the current selected modes.
- Working status indicator: It displays the working status.
Preheat indicator: It displays that the oven is preheating.
Working indicator: It displays the oven is working.
Water indicator: If "water" text is flashing, the water tank is in shortage of water. (in Descale mode, it means you need do a water change. See descaling steps for details). Refill water and push the water tank into the base. Press "Select button" to continue working. - Time display: The displayed number refers to time.
- Temperature/Pre-set menu number display: The displayed number refers to temperature. you select the Pre-set menu mode, the displayed number refers to pre-set menu number.
- Temperature unit: It displays the temperature unit you set (°F).
- Time unit: It displays the time unit you set (h/min). When working time is shorter than 1 hour, the h indicator is off. When working time is longer than 1 hour, the h indicator is on.
Precautions before use
- Before using the oven for the first time, take out all the accessories including the steaming, baking and wire racks along with the packaging materials, and clean all accessories. Before use, wipe the inner part of the oven clean with a damp cloth or towel. Heat the oven using the convection bake mode to 392°F for 20 minutes, then open the door. You may smell some unpleasant odor when first heating the oven which are materials used to protect the oven during shipment. The unpleasant smell will disappear after a little while in a well vented room.
- Water tank filling
When you are using the oven's cooking function for the first time, please fill the water tank with fresh drinking water (or purified water as preferred) and make sure to push the water tank to its base until it is firmly in place. Please make sure you secure the oven on the counter before using it. This product can be moved without any additional fixtures. Please do not open the oven door too quickly, as it may tip over.
Tips:If the oven is close to a working range hood, we advise you to tum on the Range Hood to its. lowest fan speed. If you are cooking greasy or oily foods, we advise you to place aluminum foil under your food to prevent any grease build up at bottom of the oven.
- When cooking greasy food using the steam or wire racks, put the bake rack underneath the wire rack and keep them on the same layer together.
List of product functions
| Cooking Methods | Function | Default temperature /°F | Unit of least precision /°F | Temperature range /°F | Default time/h: min | Unit of least precision n/min | Time range /h: min | Best for |
| Steaming | Steam | 212 | 1 | 194-230 | 00:20 | 1 | 0:01-2:00 | Applicable for fish, pastry, rice. |
| Low Steam | 194 | 1 | 86-194 | 00:15 | 1 | 0:01-2:00 | Applicable for egg soup and veggies like spinach, broccoli. | |
| Bake | True Conv. | 248 | 9 | 140-446 | 00:30 | 1 | 0:01-3:00 | Applicable for roasting meats, bake pie, pastrios, cookies |
| Conv. Bake | 302 | 9 | 140-446 | 00:30 | 1 | 0:01-3:00 | Applicable for cakes, custards and flans, souffles, breads. | |
| Broil | 374 | 9 | 212-446 | 00:30 | 1 | 0:01-3:00 | Applicable for toast, croissant, casserole. | |
| Steam Bake | 356 | 9 | 140-446 | 00:20 | 1 | 0:01-3:00 | Inject steam during baking, applicable for tender meat like lamb, chicken, also good for baking squash. | |
| Versalite Cooking | Dehydrate | 176 | 9 | 140-248 | 01:00 | 1 | 0:01-3:00 | Applicable for beef jerky, plums, lemons. |
| Air Fry | 302 | 9 | 356-446 | 00:15 | 1 | 0:01-0:40 | Applicable for fries, chicken nuggets. | |
| Menus | / | / | / | / | / | / | Pre-set menus by FOTILE R&D,helps home chef get their meals done quickly and precisely. | |
| Assist | Proof | 95 | 1 | 86-122 | 01:00 | 1 | 0:01-3:00 | Bread Proof |
| Warm | 176 | 1 | 122-212 | 00:30 | 1 | 0:01-3:00 | Keep warm | |
| Descale | / | / | / | 00:35 | / | / | Descaling and maintenance. | |
| Steam Clean | / | / | / | 00:10 | / | / | Cavity Cleaning. | |
| DryUp | / | / | / | 00:20 | / | / | Dry up cavity after applying steam clean function |
Pre-set menus
You can select the pre-set menus of the oven to quickly cook certain dishes without setting time and temperature for most dishes. The following table shows the matching between the dish name and its display number in this mode. Preheating is not required for the following quick menu. You only need to select a cooking option, put the ingredients into the cavity, close the door and press Select Button to confirm. The cooking will automatically start.
| Cooking Methods | Pre set Menu Number | Dishes | Cooking Methods | Pre Set Menu Number | Dishes | Cooking Methods | Pre Set Menu Number | Dishes |
| Steam Cooking | P01 | Steamed Branzino | Baking | P16 | Cookies | Dehydration | P31 | Lemons |
| P02 | Steamed Cod | P17 | Chiffon Cake | P32 | Beef Jerky | |||
| P03 | Steamed Scallops | P18 | Pastry | P33 | Juju/Plums/Raisins | |||
| P04 | Steamed Maryland Crab | P19 | Tarts | P34 | Farfalle | |||
| P05 | Steamed Shrimp | P20 | Pizza | P35 | Candid Ginger | |||
| P06 | Steamed Clams | P21 | Roast Pork Chops | Combi Steam & Convection | P36 | Roasted Whole Chicken | ||
| P07 | Steamed Buns | P22 | Baked Salmon | P37 | Grilled Lamp Chops | |||
| P08 | Steamed Rice | P23 | Baked Sweet Potato | P38 | Baked Tilapia Fillet | |||
| P09 | Steamed Dumplings | P24 | Cupcake | P39 | Roasted Butterbut Squash | |||
| P10 | Steamed Green Beans | P25 | Baked Chestnuts | P40 | Artisan Bread | |||
| P11 | Steamed Chicken | Air fry | P26 | Fries | / | / | / | |
| P12 | Steamed Pork Chop | P27 | Chicken Nuggets | / | / | |||
| P13 | Steamed Corn | P28 | Chicken Wings | / | / | |||
| P14 | Steamed Broccoli | P29 | Fried Spring Rolls | / | / | |||
| P15 | Steamed Asparagus | P30 | Fries Shrimp | / | / |
Operation Guideline for the Combi Oven
Power-on
After the oven Powers on, all icons and texts will flash on the screen with a short audible buzzing sound.

Traditional cooking
- Start up and select functions.
After starting up with a long press of function dial(Power button), tum function dial to select a function, and confirm the selected mode with a short press of Select Button.

- Set cooking temperature.
Turn temperature/time dial to set temperature and confirm the temperature with a short press of the dial.

Notes: After function is selected, you can also directly turn temperature/time dial and skip to the temperature setting. - Set cooking time.
Turn temperature/time dial to set time and confirm the time with a short press of the dial.

- Preheat.
When the oven starts to preheat, the real-time temperature is displayed.

Notes: Air Fry mode has no "preheating"process. - Working.
After reaching the set temperature, start cooking and count down the time.

- Cooking completed. The countdown goes to zero, and "End" is displayed in the temperature display column. Click the Retumn button to skip to the selection page.

Notes: In the process of preheating and cooking, the cooking temperature and time could be reset by turning the temperature/time dial. If there is no operation for 10 seconds, it will return to the original work interface. After the cooking is completed, it will automatically shut down without operation for 2 minutes.


Steps for modifying parameters in operation
- Modify temperature parameters.
When preheating or operating, tum temperature/time dial and enter the interface for modifying temperature parameters. Continue to turn temperature/time dial to modify the temperature parameters, and confirm your modification with a short press of temperature/time dial and enter the interface for modifying time parameters at the same time.

- Modify time parameters.
Turn temperature/time dial to set time and confirm the modification with a short press of temperature/time dial.

Notes: If there is no operation for 10 seconds, it will return to the original work interface.


Tips: When using the Dehydration mode, please use the humidity-controlled chip as required in the menu. See the figure below for specific instruction.

Pre-set Menus
- Starting up and enter the homepage.

- Select the Pre-set menus.
Tum Power dial to Pre-set menu and confirm your selection with a short press;
Turn Temperature/time dial to preferred dish
(Dish codes from P01 to P40), and confirm your selection with a short press of Temperature/time dial.

- Set time.
Turn Temperature/time dial to adjust time.

Notes: The current display time is the default time. - Start working.
Please put food in the oven, close the door, and confirm to start working by short pressing Select button.

- Working.
Time starts counting down.

- Cooking completed.

Notes:- When preheating or cooking with the Pre-set menu, the cooking time may be set withing a certain range by tuming Temperature/time dial.
- The dish names corresponding to the codes of pre-set menus can be found in the instruction or on the inner surface of glass door.
- When preheating or cooking with the Pre-set menu, the cooking time may be set withing a certain range by tuming Temperature/time dial.


Steps for operating auxiliary functions
- Select auxiliary functions.
Turn Function dial to auxiliary functions (taking steam cleaning as an example).

- In operation.
Tum Temperature/time dial to start working, And the time starts counting down. Press![]() button to exit.
button to exit.

- Work completed.


 button to exit.

Introduction of Product Diagram(HYZK26-E2)
 - Part 1")
 - Part 2")
- Air heater apron
- Door gasket
- Upper heating element
- Ventilation openings
- Control panel
- Display
- Water tank with drip tray
- Door switch
- Temperature probe
- Steaming and baking rack
- Wire rack
- Steaming rack
- Door
- Humidity-controlled chip
Quick operation guide(HYZK26-E1)
Control Panel

Description of the buttons of control panel and display interface
Function buttons
- Power button: Press and hold the button for 1 second to turn on or off the oven.
- Function Switch button: Shortly press or continuously press the button to switch working mode.
- Light button: Touch the button to turn on or off oven light.
- Pre-set Menus button: Touch the button to enter pre-set menus mode.
- "-" button: Press the button to reduce temperature/time parameter. Quickly scroll to reduce temperature/time parameter by long press of this button.
- "+" button: Press the button to increase temperature/time parameter. Quickly scroll to increase temperature/time parameter by long press of this button.
- Retum/Cancel button: Touch the button to return to previous setting. If you touch the button when oven is working, it will go to time setting and the oven will stop working.
- Select/Start button: Shortly press this button to confirm selected parameter when setting. After the setting ends, the oven starts working by shortly pressing this button.
Display information on LED panel
- Function mode display area: Display the current selected working mode.
- Breathing light/working status indicator: The breathing light is normally on when the oven is on but not in working state. The breathing light is flashing when the oven is preheating/working. The breathing light is flashing, indicating to close door/refill water.
- Temperature/pre-set menus number display: The displayed number refers to temperature. If you select the pre-set menus mode, the displayed number refers to pre-set menus number.
- Time display: The displayed number refers to time.
- Pre-set menus display: It displays the pre-set menus is enabled on mobile/equipment end.
- Working status indicator: It displays the working status.
Preheat indicator: It displays that the oven is preheating.
Working indicator: It displays the oven is working.
Water indicator: If "Water" text is flashing, the water tank is in shortage of water. (In Descale mode, it means you need do a water change. See descaling steps for details). Refill water and push the water tank into the base. Press Select button to continue working.
- Temperature unit: It displays the temperature unit you set (°F).
- Time unit: It displays the time unit you set (min).
Precautions before Use
First use
Take out all the accessories including the steaming, baking and wire racks along with the packaging materials, and clean all accessories. Before use, wipe the inner part of the oven clean with a damp cloth or towel. So the dust or residual packaging material left in the liner during storage and unpacking can be cleaned. Heat the oven using the convection bake mode to 392°F for 20 minutes, then open the door to ventilate the room. You may smell some unpleasant odor when first heating the oven which are materials used to protect the oven during shipment. The unpleasant smell will disappear after a little while in a well vented room. Close doors to other rooms at the same time to prevent the unpleasant odor from spreading to the entire house.
Water tank filling
When you are using the oven's cooking function for the first time, please fill the water tank with fresh drinking water (or purified water as preferred) and make sure to push the water tank to its base until it is firmly in place. Please make sure you secure the oven on the counter before using it. This product can be moved without any additional fixtures. Please do not open the oven door too quickly, as it may tip over.
Tips: If the oven is close to a working range hood, we advise you to tum on the Range Hood to its lowest fan speed. If you are cooking greasy or oily foods, we advise you to place aluminum foil under your food to prevent any grease build-up at bottom of the oven.
When cooking greasy food using the steam or wire racks, put the bake rack underneath the wire rack and keep them on the same layer together.
List of product functions
| Cooking Methods | Function | Default temperature /°F | Unit at least precision /°F | Temperature range /°F | Default time /h: min | Unit at least precision n/min | Time range /h: min | Best for |
| Steaming | Steam | 212 | 1 | 86-230 | 00:20 | 1 | 0:01-2:00 | Applicable for fish, pastry, rice. |
| Bake | True Conv. | 248 | 9 | 140-446 | 00:30 | 1 | 0:01-3:00 | Applicable for roasting meats, bake pie, |
| Conv. Bake | 302 | 9 | 140-446 | 00:30 | 1 | 0:01-3:00 | Applicable for toast, croissant, casserole. | |
| Steam Bake | 356 | 9 | 140-446 | 00:20 | 1 | 0:01-3:00 | Inject steam during baking, applicable for tender meat like lamb, chicken, also good for baking squash | |
| Versalite Cooking | Air Fry | 302 | 9 | 356-446 | 00:15 | 1 | 0:01-0:40 | Applicable for fries, chicken nuggets. |
| Menus | / | / | / | / | / | / | Pre-set menus by FOTILE R&D helps. home chef get their meals done quickly and procisely. | |
| Assist | Proof | 95 | 1 | 86-122 | 01:00 | 1 | 0:01-3:00 | Bread Proof |
| Descale | / | / | / | 00:35 | / | / | Descaling and maintenance. | |
| Steam Clean | / | / | / | 00:10 | / | / | Cavity Cleaning | |
| Dy Up | / | / | / | 00:20 | / | / | Dry up cavity after applying steam clean function |
Pre-set menus
You can select the pre-set menus of the oven to quickly cook certain dishes without setting time and temperature for most dishes. The following table shows the matching between the dish name and its display number in this mode. Preheating is not required for the following quick menu. You only need to select a cooking option on equipment end, put the ingredients into the cavity, close the door and select the menu number to confirm. The cooking will automatically start.
| Cooking Methods | Pro set Menu Number | Dishes | Cooking Methods | Pre set Menu Number | Dishes | Cooking Methods | Pre set Menu Number | Dishes |
| Steam Cooking | POt | Steamed Branzino | Steam Cooking | P11 | Steamed Chicken | Baking | P21 | Roast Pork Chops |
| P02 | Steamed Cod | P12 | Steamed Pork Chop | P22 | Baked Salmon | |||
| P03 | Steamed Scallops | P13 | Steamed Corn | P23 | Baked Sweet | |||
| P04 | Steamed Maryland Crab | P14 | Steamed Broccoli | P24 | Cupcake | |||
| P05 | Steamed Shrimp | P15 | Steamed Aspamgus | P25 | Baked Chestnuts | |||
| P06 | Steamed Clams | Baking | P16 | Cookies | Air fry | P26 | Fries | |
| P07 | Steamed Buns | P17 | Chiffon Cake | P27 | Chicken Nuggets | |||
| P08 | Steamed Rice | P18 | Pastry | P28 | Chicken Wings | |||
| P09 | Steamed Dumplings | P19 | Tarts | P29 | Fried Spring Rolls | |||
| P10 | Steamed Green Beans | P20 | Pizza | P30 | Fried Shirmp | |||
| Dehydration | P31 | Lemons | Combi Steam & Convection | P36 | Roasted Whole | / | / | / |
| P32 | Beef Jerky | P37 | Grilled Lamp Chops | / | / | |||
| P33 | Juju/Plums/Raisins | P38 | Baked Tilapia Fillet | ! | ! | |||
| P34 | Farfalle | P39 | Roasted Butternut Squash | / | / | |||
| P35 | Candid Ginger | P40 | | Artisan Bread | / | / |
Operation Guideline for the Combi Oven
Power-on
Power it on. After the oven is powered on, all icons and texts will flash on the screen with a short audible buzzing sound.

Traditional cooking
- Start up and select functions.
After starting up with a long press of Power button, click the Function Switch button to select a function (including cooking, baking and air-fry mode), and confirm the selected mode with a short press of Select button.

Note: Click the Function Switch button to switch functions. Click "+" button to switch functions clockwise, and click "-"button to switch functions counterclockwise. - Set cooking temperature.
Press "-" or "+" button to set temperature. Confirm the setting by clicking Select button.

Notes: When "+" button is pressed to change temperature, short press means the temperature will switch one by one, long press means the temperature will quickly scroll to switch. - Set cooking time.
Press "-" or "+" button to set time. Confirm the setting by clicking Select button and the oven will start working.

Notes: When "+" button is pressed to change temperature, short press means the temperature will switch one by one, long press means the temperature will quickly scroll to switch. - Preheat.
When the oven starts to preheat, the real-time temperature is displayed.

Notes: Air Fry mode has no "preheating" process. - Working.
After reaching the set temperature, start cooking and count down the time.

- Cooking completed.
The countdown goes to zero, and "End" is displayed in the temperature display column. Click the Retumn button to skip to the selection page.

Notes: In the process of preheating and cooking, click "+" button to change cooking temperature and time. If there is no operation for 10 seconds, it will return to the original work interface. After the cooking is completed, it will automatically shut down without operation for 2 min.


Steps for modifying parameters in operation
- Modify temperature parameters.
When preheating or operating, click "+" button to enter the interface for modifying temperature parameters. Continue to click "+" button to modify the temperature parameters, and confirm your modification with a short press of Select button and enter the interface for modifying time parameters at the same time.

- Modify time parameters.
Click "+" button to modify time parameters and click Select button to confirm your modification.

Notes: If there is no operation for 10 seconds, it will return to the original work interface.


Tips: When using the Dehydration mode, please use the humidity-controlled chip as required in the menu. See the figure below for specific instruction.

Pre-set Menus
- Starting up and enter the homepage.

- Select the pre-set menus.
Touch Pre-set Menus button to enter pre-set menus mode. Click "![]() " button to select your preferred dish (dish codes from P01-P40), and confirm your selection with a short press of Select button.
" button to select your preferred dish (dish codes from P01-P40), and confirm your selection with a short press of Select button.

- Set time. Click "
![]() " button to adjust time.
" button to adjust time.

Notes: The current display time is the default time. - Start working.
Please put food in the oven, close the door, and confirm to start working by short pressing Select/Start button.

- Working.
Time starts counting down.

- Cooking completed.

Notes:- When preheating or cooking with the pre-set menus, the cooking time may be set within a certain range by pressing "+" button.
- The dish names corresponding to the codes of pre-set menus can be found in the user manual or on the inner surface of glass door.

 " button to select your preferred dish (dish codes from P01-P40), and confirm your selection with a short press of Select button.


Steps for operating auxiliary functions
- Select auxiliary functions.
Press Function Switch button or "+" button to enter auxiliary functions (taking Dry up as an example).

- In operation.
Press Select/Start button to start working and the time starts counting down. Press![]() button to exit.
button to exit.

- Work Completed.


 button to exit.


Documents / Resources
References

Download manual
Here you can download full pdf version of manual, it may contain additional safety instructions, warranty information, FCC rules, etc.
Advertisement


Need help?
Do you have a question about the HYZK26-E1 and is the answer not in the manual?
Questions and answers