Gourmia GPA2060- 6 QT One-Lid Pressure Cooker + Air Fryer with 15-One-Touch Cooking Functions Manual
- User manual (24 pages)
Advertisement
PARTS


Multi-purpose Rack
Always add to basket, and to pot for STEAM and Combo Cooking.

Grease Filter
Click the nonstick cap onto the mesh screen to assemble the filter.

Grease Collector
Ensure the grease collector is inserted in the bottom of the base.

Condensation Collector
Ensure the condensation collector is inserted in the top of the base.


 NOTE: When using the air fry basket, ensure the grease filter is in place in the center of the basket, and always place the multi-purpose rack inside.
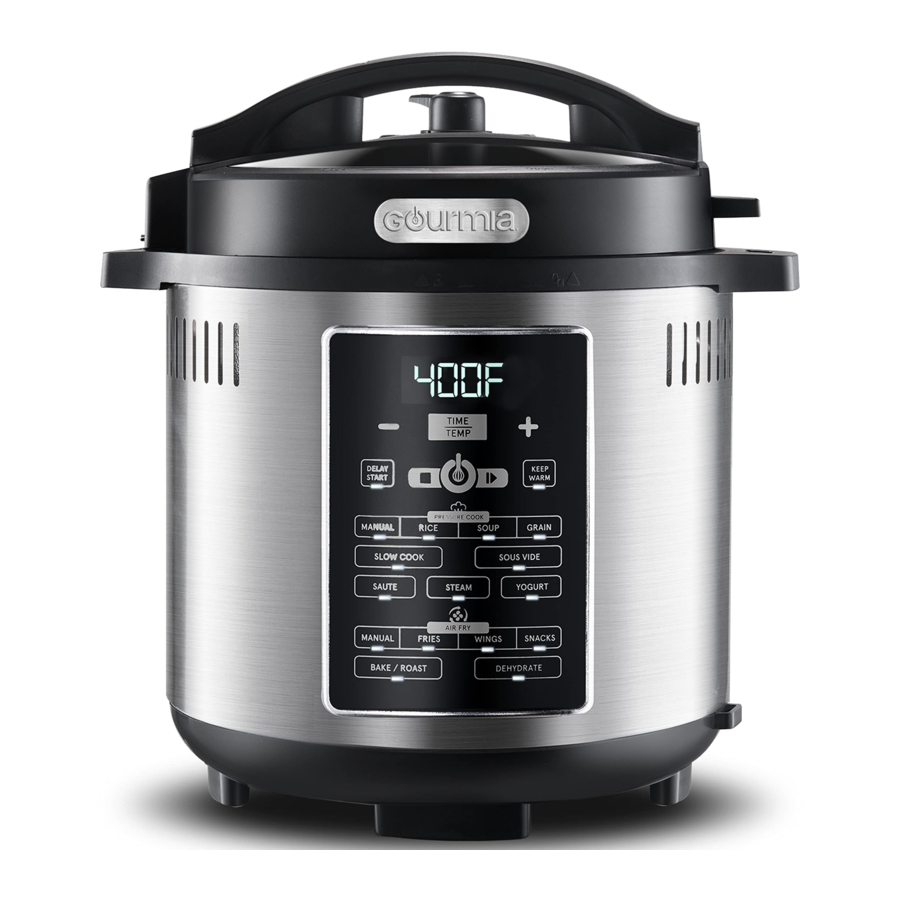
CONTROL PANEL

BEFORE FIRST USE
- Place the machine on a flat, stable surface. If the countertop may possibly be damaged by heat, use a trivet positioned under the base for safety.
- Press the red Lock/Unlock button on the lid handle.
- Rotate the lid counterclockwise so the arrow on the lid aligns with unlock marking on the base and remove the lid.
- Remove the pressure cooker pot from the base.
- Thoroughly clean the air fry basket and multi-purpose rack with hot water, some dishwashing liquid, and a non-abrasive sponge.
- Wipe the inside and outside of the base with a moist cloth.
- Inspect the machine to ensure that it is ready for use with the pressure and safety valves clean and clear of any blockage and the rubber seal ring clean and in place around the lid.
- To ensure that the unit is assembled and working properly, it is recommended that you fill the pressure cooker to the 2/5 line and allow the pressure cooker to operate for a half-hour. Upon completion, remove the water then rinse and dry the inner pot. The unit is now ready for use.
![]()
Be careful not to put your hands and face near the steam release valve at any time. - The air fryer works using hot air.
- Do not fill the pan with oil, frying fat, or any other liquid.
- Do not put anything on top of the air fryer.
NOTE: During the first few uses, there might be a "hot plastic" smell. This is perfectly normal in new air fryers as the material is heated for the first time. It will go away after the first few uses.
PRESSURE COOKING
Pressure Release
This pressure cooker allows two different ways to release cooking pressure: Natural Release and Quick Release.
Natural Release
Allows the machine to rest after cooking until the pressure naturally decreases enough to safely open the lid. This method is best for foods with high liquid contents such as soup, beans, and stews.
To use the natural pressure release, rotate the steam release valve to the sealing marker and do not move it during or after cooking. When the float valve drops, it is safe to open the lid.
Quick Release
Allows the machine to release pressure quickly when cooking is complete. Best for foods that require a precise cook time.
To use the quick pressure release, set the steam release valve to Sealing during cooking and turn it to Venting when the cooking is done.

Do not turn the steam release valve to Venting after cooking soup, or any other food with a lot of liquid; the steam must be released naturally, leaving the steam release valve set to Sealing.
Pressure Cooking Notes
- The multi-purpose rack is not required unless you are combo cooking.
- Turning the steam release valve to Venting is optional unless you are combo cooking. See "How to Use Steam Release Valve" for details.
- When cooking completes, the machine will switch to Keep Warm mode and the Keep Warm button will illuminate. Press the Stop button to turn off Keep Warm mode. This mode will not turn on for SOUS VIDE, SAUTÉ, or YOGURT.
- You must use the cooking pot for pressure cooking. If you attempt to use the air frying basket, a POT error message appears on the display and you will not be able to cook until the correct pot is inserted.
- If the lid is not attached properly, a LID error message appears on the display and you will not be able to cook until the lid is correctly attached and locked.
Never attempt to open the lid before the product has cooled and all internal pressure has been released. Difficulty rotating the lid indicates that contents are still under pressure – it should never be forced open. After all the steam is released the pressure will decline and the lid will be able to rotate with ease.

How to Cook with Pressure
(Manual, Rice, Soup, Grain Functions)
- Place the pressure cooker pot in the base.
- Add a cup of water to the pressure cooker pot and add the food to be cooked (for "Combo Cooking", place the food onto the multi-purpose rack)
- Lock the lid into place and turn the steam release valve to Sealing.
- Press the power button and, on the PRESSURE COOK section of the control panel, select a preset or MANUAL cooking. Each function has its own preset time and pressure.
- To increase or decrease the default cooking time, press the + or – buttons
- To change the default pressure setting, press TIME/TEMP and use the + or – buttons to set the desired pressure, either HI (high pressure) and LO (low pressure).
- Press the start/pause button to start the cooking.
- When the cooking is complete, the machine beeps and END appears on the display. Either allow the pressure to release naturally or do so manually (see PRESSURE RELEASE).
- Unlock and remove the lid. Remove the pressure cooker pot from the base and enjoy!
Slow Cook
- Place the pressure cooker pot in the base and add the food to be cooked.
- Lock the lid into place and turn the steam release valve to Venting.
- Press the power button and, on the PRESSURE COOK section of the control panel, press SLOW COOK.
- To increase or decrease the default cooking time (6 hours) in 15 minute increments, press the + or – buttons.
![warning]() NOTE: The default temperature cannot be changed for this function.
NOTE: The default temperature cannot be changed for this function. - Press the start/pause button to start the cooking.
- When the cooking is complete, the machine beeps and END appears on the display.
- Unlock and remove the lid. Remove the pressure cooker pot from the base and enjoy!
Sous Vide
- Place the pressure cooker pot in the base.
- Add enough water to the pot to ensure that your food will be fully submerged.
- Lock the lid into place and turn the steam release valve to Venting.
- Press the power button and press SOUS VIDE.
- To increase or decrease the default cooking time (2 hours) in 15 minute increments, press the + or – buttons.
- To change the default temperature (130°F), press TIME/TEMP and press the + or – buttons.
- Press the start/pause button to start heating the water. The display shows PRE, indicating the preheating process is in progress.
- When the water reaches the correct temperature, the machine beeps and the cooking time countdown begins.
- Unlock and remove the lid. Gently place the sealed food into the water to begin cooking the food.
- When the cooking is complete, the machine beeps and END appears on the display.
- Carefully remove the sealed food from the pot from the base and enjoy!
Sauté
- Place the pressure cooker pot in the base.
- Press the power button and press SAUTE.
- To increase or decrease the default cooking time (5 minutes), press the + or – buttons.
![warning]() NOTE: The default temperature cannot be changed for this function.
NOTE: The default temperature cannot be changed for this function. - Press the start/pause button to start heating the pot. The display shows PRE, indicating the preheating process is in progress.
- When the machine reaches the correct temperature, the machine beeps and the cooking timer begins.
- Add the food to be cooked. If desired, add a small amount of oil before adding the food.
- When the cooking is complete, the machine beeps and END appears on the display.
- Remove the pressure cooker pot from the base and enjoy!
Steam
- Place the pressure cooker pot in the base.
- Add water to the pot and insert the rack.
- Place the food to be cooked on the rack.
- Lock the lid into place and turn the steam release valve to Sealing.
- Press the power button and press STEAM.
- To increase or decrease the default cooking time (15 minutes) in 15 minute intervals, press the + or – buttons.
- To change the default pressure setting (HI), press TIME/TEMP and use the + or – buttons.
- Press the start/pause button to start the cooking.
- When the cooking is complete, the machine beeps and END appears on the display. Either allow the pressure to release naturally or do so manually (see PRESSURE RELEASE).
- Unlock and remove the lid. Remove the pressure cooker pot from the base and enjoy!
Yogurt
- Place the pressure cooker pot in the base.
- Add yogurt ingredients to the pot.
- Lock the lid into place and turn the steam release valve to Venting.
- Press the power button and press YOGURT.
- To increase or decrease the default cooking time (8 hours) in 15 minute intervals, press the + or – buttons.
![warning]() NOTE: The default temperature cannot be changed for this function.
NOTE: The default temperature cannot be changed for this function. - Press the start/pause button to start the cooking.
- When the cooking is complete, the machine beeps and END appears on the display.
- Unlock and remove the lid. Remove the pressure cooker pot from the base and enjoy!
Delay Start
This function allows you prepare the food and the machine for cooking in advance and automatically begins the cooking process at a later time.
- Follow the instructions for adding the food and adjusting the time and temperature or pressure for whichever function you are using.
- Before pressing the start/pause button, press the DELAY START button. The display shows the timer.
- To increase or decrease the time delay in 30 minute increments, press the + or – buttons.
- Press the start/pause button. The timer begins counting down. The cooking will automatically begin once the timer runs out.
Keep Warm
This mode is on by default for all pressure cooking functions except for SOUS VIDE, YOGURT, and SAUTÉ. When Keep Warm is enabled, food is kept hot for up to 24 hours once cooking is complete.
To disable Keep Warm, after selecting a function, press and hold the KEEP WARM button until the light goes off.
AIR FRYING

Air Frying Tips

- Smaller ingredients usually require a slightly shorter cook time than larger ingredients.
- Shaking smaller ingredients halfway through the cook time optimizes the end result and can help prevent unevenly fried ingredients.
- Add 1 tablespoon of oil to fresh potatoes for a crispy result. Fry your ingredients in the air fryer within a few minutes after you add the oil.
- Do not prepare extremely greasy ingredients, such as sausages, in the air fryer.
- Snacks that can be prepared in an oven can also be prepared in the air fryer.
- Use pre-made dough to prepare filled snacks quickly and easily. Pre-made dough also requires a shorter preparation time than homemade dough.
- Place a baking tin or oven dish in the air fry basket if you want to bake a cake or quiche, or if you want to fry fragile or filled ingredients.
- You must use the air frying basket for air frying. If you attempt to use the cooking pot, a POT error message appears on the display and you will not be able to cook until the cooking pot is removed and the air frying basket is inserted.
- If the lid is not attached properly, a LID error message appears on the display and you will not be able to cook until the lid is correctly attached and locked.
- To prevent overheating, the machine's fan runs for about 40 seconds when cooking is paused or ended.
How to Air Fry
(Manual, Fries, Wings, Snacks Functions)
- Place the air fry basket into the base, then place the assembled grease filter into the center of the basket, followed by the rack.
- Place the food to be cooked onto the rack.
- Lock the lid into place and turn the steam release valve to Venting.
- Press the power button and, on the AIR FRY section of the control panel, select a preset or MANUAL cooking. Each function has its own preset time and temperature.
- To increase or decrease the default cooking time, press the + or – buttons.
- o change the default temperature, press TIME/TEMP and use the + or – buttons.
- Press the start/pause button to start the cooking.
- During the cooking, you can press the start/pause button and unlock the lid to give the food a shake for more even cooking. Then relock the lid and press the start/pause button to resume cooking.
- When the cooking is complete, the machine beeps and END appears on the display.
- Unlock and remove the lid. Carefully remove the food and enjoy!
Bake / Roast
- Place the air fry basket into the base, then place the assembled grease filter into the center of the basket, followed by the rack.
- Place the food to be baked in an ovenproof dish and onto the rack.
- Lock the lid into place and turn the steam release valve to Venting.
- Press the power button and press BAKE.
- To increase or decrease the default cooking time (15 minutes), press the + or – buttons.
- To change the default temperature (350°F), press TIME/TEMP and use the + or – buttons
- Press the start/pause button to start the cooking.
- When the cooking is complete, the machine beeps and END appears on the display.
- Unlock and remove the lid. Carefully remove the food and enjoy!
Dehydrate
- Place the air fry basket into the base, then place the assembled grease filter into the center of the basket, followed by the rack.
- Place the food to be dehydrated onto the rack in the basket.
- Lock the lid into place and turn the steam release valve to Venting.
- Press the power button and press DEHYDRATE.
- To increase or decrease the default cooking time (2 hours) in 30 minute increments, press the + or – buttons.
- To change the default temperature (160°F), press TIME/TEMP and use the + or – buttons
- Press the start/pause button to start the cooking.
- When the cooking is complete, the machine beeps and END appears on the display.
- Unlock and remove the lid. Carefully remove the food and enjoy!
Combo Cooking
Combo cooking allows you to quickly cook foods in the pressure cooker and then give them a crispy finish using the air fryer.
- Pressure cook the food on the multi-purpose rack (see "How to Cook with Pressure").
- Remove the pressure cooker pot from the base.
- Place the assembled grease filter into the center of the air fry basket, and place the basket into the base.
- Remove the multi-purpose rack with food from the pressure cooker pot and place it in the air fry basket.
- Lock the lid into place and turn the steam release valve to Venting.
- Press the power button and select a preset or MANUAL under AIR FRY on the control panel.
- Set the desired amount of time using the + or – buttons.
- Press TIME/TEMP and set the desired temperature using the + or – buttons.
- Press the start/pause button. The air frying begins.
CLEANING & MAINTENANCE
- Make sure the machine is completely cooled off before cleaning.
- Clean the machine after every use.
- Do not use metal kitchen utensils or abrasive cleaning material to clean the any of the parts, as this may damage the non-stick coating.
- Remove the main plug from the wall outlet and let the machine cool down.
- Tip: Remove the pressure cooker pot or the air fry basket from the machine to help it cool down quicker.
- Wipe the outside of the machine with a moist cloth.
- Separate the two parts of the grease filter for better cleaning.
- Clean all the removable parts with hot water, some dishwashing soap, and a non-abrasive sponge.
![information]() Tip: If residue is stuck to the bottom of the pressure cooker pot or the air fry basket, fill it with hot water and some dishwashing soap and let soak for approximately 10 minutes.
Tip: If residue is stuck to the bottom of the pressure cooker pot or the air fry basket, fill it with hot water and some dishwashing soap and let soak for approximately 10 minutes.- Clean the inside of the machine with hot water and a cleaning brush to remove any food residue.
TROUBLESHOOTING
| PROBLEM | POSSIBLE CAUSE | SOLUTION |
| Steam continuously escapes from the steam-release valve | Steam release valve is set to Venting | Turn the steam release valve to Sealing |
| Display shows "LID" and unit is beeping | Lid is not locked | Re-position and lock the lid |
| Water is dripping from the unit | Condensation collector is not installed | Install the condensation collector |
| Ticking or light cracking sound is heard | Temperature is changing | This is a normal occurrence |
| Pressure cooking pot is wet on its exterior bottom | Dry the exterior bottom of the pressure cooking pot | |
| Lid will not lock | Sealing ring is not properly installed | Remove and reinsert the sealing ring |
| Float valve is in raised position | Press down the float valve | |
| Lid will not open | Cooker contains pressure Release pressure using the | quick-release method or natural release method |
| Lid is leaking steam from its sides | Sealing ring is not properly installed | Remove and reinsert the sealing ring |
| Sealing ring is damaged | Replace the sealing ring | |
| Sealing ring has food debris attached | Wash the sealing ring | |
| Lid is not locked | Re-position and lock the lid | |
| The float valve is leaking steam for longer than 2 minutes | Float valve and its seal have food debris attached Float valve seal is damaged | Wash the float valve and its seal Replace float valve seal. Contact customer service. |
| Float valve will not rise | Not enough food or liquid in the inner pot | Add ample water |
| Lid is not locked | Re-position and lock the lid | |
| The machine is not working | The machine is not plugged in | Plug the main plug into a grounded wall socket |
| The timer has not been set | Tap + and - icons to set the required cook time to turn on the air fryer | |
| The air frying basket is not inserted properly | Slide the basket into the air fryer properly | |
| The air frying basket does not fit inside the machine | The basket is overfilled | Do not fill the basket beyond max line |
| The food did not cook | There is too much food in the basket | Cook in smaller batches |
| The set temperature is too low | Tap + and - icons to set the required temperature setting | |
| The cook time is too short | Tap + and - icons to set the required cook time | |
| The food is fried unevenly | Some food needs to be shaken halfway through the cook time | Food that lie on top of or across each other (e.g. fries) need to be shaken halfway through the cook time |
| Fried snacks are not crispy | You used a type of snack meant to be cooked in a traditional deep fryer | Use oven snacks or lightly brush some oil onto the snacks for a crispier result |
| White smoke comes out of the air fryer | You are preparing greasy ingredients | When you fry greasy ingredients in the air fryer, a large amount of oil will leak into the basket. The oil produces white smoke and the basket may heat up more than usual. This does not affect the air fryer or the end result |
| The basket still contains grease residue from previous use | White smoke is caused by grease heating up in the basket. Make sure you clean the basket properly after each use | |
| Fresh fries are fried unevenly | Quality potatoes will give an even cook | Use fresh potatoes and make sure they stay firm during frying |
| Potatoes are too starchy | Rinse the potato sticks properly and dry to remove starch from the outside of the sticks | |
| Fresh fries are not crispy | The crispiness of the fries depends on the amount of oil and water in the fries | Make sure you dry the potato sticks properly before you add the oil. Cut the potato sticks smaller for a crispier result. Add slightly more oil for a crispier result |
IMPORTANT SAFEGUARDS
Read all instructions before using the electric appliance. The following basic precautions should always be followed:
- This appliance is not intended for use by persons (including children younger than 8) with reduced physical, sensory or mental capabilities, or lack of experience and knowledge, unless they have supervision.
- Close supervision is necessary when any appliance is used near children. Children should be supervised to ensure that they do not play with the appliance. Cleaning and user maintenance shall not be done by children unless they are older than 8 and supervised.
- Check if the voltage indicated on the appliance corresponds to the local main voltage before you connect the appliance.
- Do not use the appliance if the plug, the main cord or the appliance itself is damaged. Always make sure that the plug is inserted properly into a wall outlet.
- Do not operate any appliance with a damaged cord or plug, after the appliance malfunctions, or has been damaged in any manner. Return appliance to the nearest authorized service facility for examination, repair, or adjustment.
- Do not let the cord hang over the edge of the table or counter or touch hot surfaces.
- To protect against electric shock, do not immerse cord, plugs, or appliance in water or other liquid. Do not plug in the appliance or operate the control panel with wet hands.
- Never connect this appliance to an external timer switch or separate remote-control system in order to avoid a hazardous situation. To disconnect, turn off the appliance, then remove plug from wall outlet.
- Do not place the appliance on or near combustible materials such as a tablecloth or curtain. The accessible surfaces may become hot during use. Do not place on or near a hot gas or electric burner, or in a heated oven.
- Do not place the appliance against a wall or against other appliances. Leave at least 4 inches of free space on the back and sides and 4 inches of free space above the appliance. Do not place anything on top of the appliance.
- Do not use the appliance for any other purpose than described in this manual. The use of accessory attachments not recommended by the appliance manufacturer may cause injuries.
- Do not let the appliance operate unattended. Extreme caution must be used when moving an appliance containing hot oil or other hot liquids.
- Do not touch the hot surfaces; use handle. During air frying and pressure cooking, hot steam is released through the air outlet openings. Keep your hands and face at a safe distance from the steam and from the air outlet openings. Also be careful of hot steam and air when you remove the cooking pot or air fry basket from the appliance.
- After using the appliance, avoid contact with the hot metal inside. Unplug from outlet when not in use and before cleaning. Allow to cool before cleaning the appliance.
- Immediately unplug the appliance if you see dark smoke coming out of the appliance. Wait for the smoke emission to stop, before you remove the cooking pot or air fry basket from the appliance.
- Do not alter or tamper with any component or accessory included with this unit. Do not use with any accessory that was not designed specifically for this unit.
- Always attach the cord to the appliance before inserting into the socket. To disconnect, ensure the appliance is set to the off position and then remove the cord from the wall socket.
- Only cook using the cooking pot or air frying basket. Cooking directly in the electrical base can result in electric shock.
- Make sure the lid is properly closed before operating. Improper use may result in scalding or other injuries.
- Always inspect the steam release valve to ensure it is clear of any clogging before use.
- Never attempt to open the lid before the product has cooled and all internal pressure has been released. Difficulty rotating the lid indicates that contents are still under pressure – it should never be forced open. After all the steam is released the pressure will decline and the lid will be able to rotate with ease.
- Tilt the lid away from you when removing it, in order to better protect your hands and face from the excess steam.
- Do not fill above the FULL line located within the cooking pot. When cooking foods that expand such as rice or dried vegetables, do not fill the cooking pot more than half-way. Over-filling may result in a clogged vent pipe or excess pressure.
- Not all foods are compatible with a pressure cooker. Applesauce, cranberries, barley, oatmeal, cereals, split peas, pasta and rhubarb create foam which clogs the steam vent. They should not be used in a pressure cooker.
- Do not use oil to fry foods in the pressure cooker.
- Paper, cardboard and plastic materials can never be placed within the appliance while it is in operation.
- Never pour cold water into a hot cooking pot.
- Ensure that the appliance has completely cooled down before attaching or removing components, and before cleaning.
- Do not use the cooking pot with any source of heat other than this unit. Do not replace the cooking pot with any accessory not created specifically for this unit.
- Steam emitting from the circumference of the lid symbolizes a malfunction in the unit. Disconnect from its power supply and contact a local authorized repairman.
- Do not use outdoors.
- FOR HOUSEHOLD USE ONLY.
SAVE THESE INSTRUCTIONS
CORD SAFETY
- A short power-supply cord is provided to reduce risk of becoming entangled in or tripping over a longer cord.
- Extension cords may be used if care is exercised in their use.
- If an extension cord is used:
- The marked electrical rating of the extension cord should be at least equal to the electrical rating of the appliance; and
- The longer cord should be arranged so that it will not drape over the countertop or tabletop where it can be pulled on by children or tripped over.
ELECTRICAL 3-PRONG PLUG

Appliance is equipped with a 3-prong grounding-type plug. It should be properly connected to a grounding-type outlet. The plug is designed to fit ONLY a 3-grounding outlet unit, and as such, the grounding prong should never be removed. If needed, a 2-prong adapter may be used if local codes allow it.
Power: 120V 60HZ 1500W
SAVE THESE INSTRUCTIONS
FOR CUSTOMER SERVICE QUESTIONS OR COMMENTS VISIT
WWW.GOURMIA.COM
EMAIL INFO@GOURMIA.COM
OR CALL 888.552.0033
MON-THU 9:00AM TO 6:00PM ET
AND FRI 9:00AM TO 3:00PM ET
Get cooking with Gourmia


Documents / Resources
References
Download manual
Here you can download full pdf version of manual, it may contain additional safety instructions, warranty information, FCC rules, etc.
Advertisement


Need help?
Do you have a question about the GPA2060 and is the answer not in the manual?
Questions and answers