Advertisement
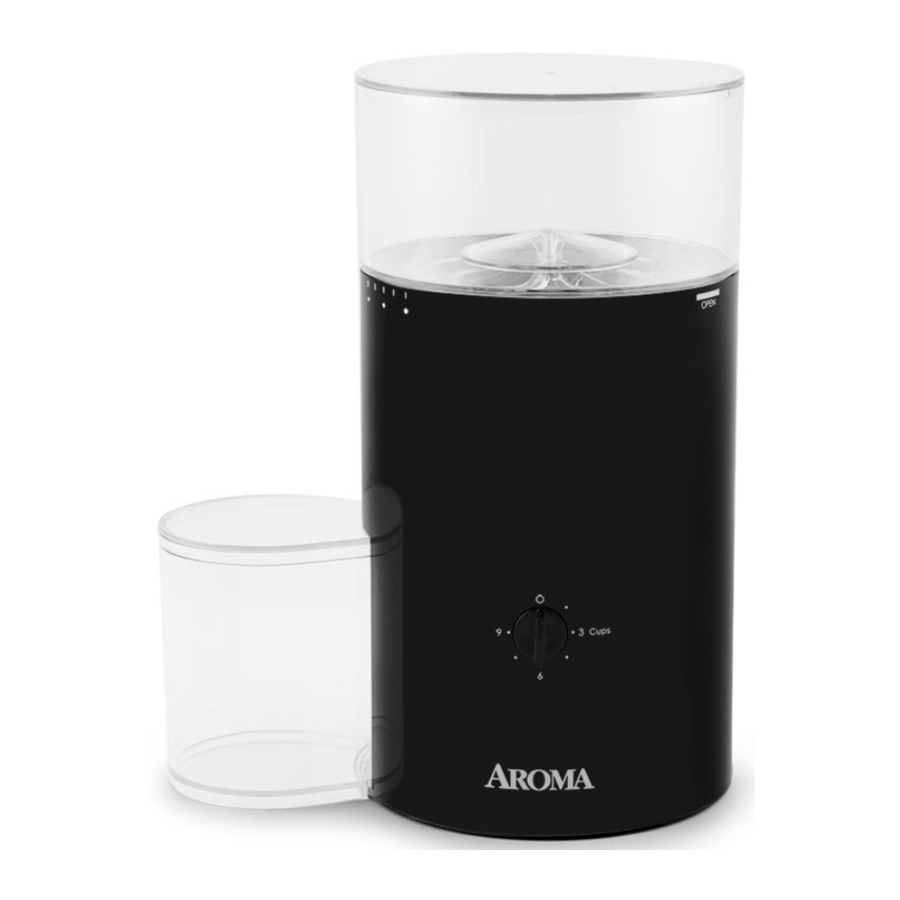
Parts Identification

Controls/Functions
Power Button
Turns the power on and off.
Grind Setting
Allows you to choose between 9 grind settings from fine to coarse.
Cup Amount Setting
Choose the amount of cups you would like grinds for.
Before First Use
- Read all instructions and important safeguards.
- Remove all packing materials and make sure that the product has been received in good condition.
- Take care to keep the electrical components on the exterior of the coffee grinder dry. Wipe the exterior of the coffee grinder and inside the Bean Hopper with a damp cloth.
- Remove the Hopper by slowly twisting it in a counter-clockwise direction to align the indicator line on the clear plastic with the dot on the grinder. Lift the Bean Hopper from the grinder.
- Wash the Hopper, Lid, and Ground Coffee Collector with warm soapy water. Rinse and dry thoroughly, then replace onto the grinder.
Note:
- Never attempt to disassemble the coffee grinder
- Never immerse the grinder, power cord or plug in water.
- Always take care not to allow electrical components to come into contact with water.
![shock hazard]() Do not use abrasive cleaners or scouring pads of any kind on the appliance. This will cause damage to the finish and may create a risk of electrical shock.
Do not use abrasive cleaners or scouring pads of any kind on the appliance. This will cause damage to the finish and may create a risk of electrical shock.- Any other servicing should be performed by Aroma Housewares.
 Do not use abrasive cleaners or scouring pads of any kind on the appliance. This will cause damage to the finish and may create a risk of electrical shock.
To Clean
- Unplug the grinder from the wall.
- Wipe the exterior of the grinder with a damp cloth.
- Remove any remaining beans from the Hopper. Remove the Hopper by slowly twisting it in a counter-clockwise direction to align the indicator line on the clear plastic with the dot on the grinder. Lift the Bean Hopper from the grinder.
- Wash the Hopper, Lid, and Ground Coffee Collector with warm soapy water. Rinse and dry thoroughly.
- Remove the upper cone burr on the grinder by lifting it straight up. Use the Cleaning Brush to remove any loose coffee residue, as well as brush the lower burr mounted in the grinder.
- Reassemble the burr by lining up the three bulges on the burr with the three slots in the holder, push into place.
- Replace the Hopper by lining up the indicator line with the dot, then turning clockwise into position.
- NOTE: you do not need to clean the grinder after each use.

Always unplug the grinder and allow it to cool completely before cleaning.
Tips
- Keep the Bean Hopper Lid sealed to keep the coffee beans fresh for best aroma.
- Fill the desired amount of coffee beans for each use to keep them fresh. Leaving excess beans in the Hopper will result in less delicious coffee.
- For Filter/Drip coffee, use a coarse Grind Setting.
- For a coffee pot, use medium Grind Setting.
- For espresso, use fine Grind Setting.
- If the grinder is used daily, clean the burrs every few weeks.
- Always make sure the Ground Coffee Collector is fully inserted into the grinder. If it is not in place, the grinder will not work.
Note:
- To manually stop grinding, press the Power Button.
- For help on which fineness setting to choose, see "Grinding Table".
To Grind Coffee
- Plug grinder into an available 120V AC wall outlet.
- Remove the Lid and pour in the desired amount of roasted coffee beans. Replace the Lid.
- Push the Ground Coffee Collector into the grinder all of the way. If it is not inserted, the machine will not work.
- Rotate the Bean Hopper to choose the grinding level.
- Adjust the Cup Amount Setting to the desired amount. You should grind only for the amount of cups you wish to prepare and not more, as coffee is always better freshly ground.
- Press the Power Button to start grinding the coffee beans. It will automatically stop once the amount selected is reached. Or, you can stop grinding manually by pressing the Power Button again.
- Remove the Ground Coffee Collector and use it to make your coffee.
Grinding Table
| Fineness Selector | |
| Grind | Ground Coffee Fineness Selector |
| Fine | Smallest dot |
| Medium | Middle dot |
| Coarse | Largest dot |
Note:
- Do not change the grindsetting while the appliance is running
Helpful Hints:
For the first use, we suggest that you use an intermediate position and then adjust the grind setting to your taste. Once you have used the appliance a few times, you will find the ideal grind setting to suit your taste and brew method.
Service & Support
In the event of a warranty claim, or if service is required for this product, please contact Aroma customer service toll-free at:
1-800-276-6286
M-F, 8:30am-4:30pm, Pacific Time
Or we can be reached online at:
CustomerService@AromaCo.com
For your records, we recommend stapling your sales receipt to this page along with a written record of the following:
- Date of Purchase:
- Place of Purchase:
Note:
- Proof of purchase is required for all warranty claims.
Aroma Housewares Company
6469 Flanders Drive, San Diego, CA 92121, U.S.A.
1-800-276-6286 | www.AromaCo.com
M-F, 8:30am – 4:30pm, Pacific Time


/AromaHousewares

Documents / Resources
References
![www.aromaco.com]() Kitchen Countertop Cooking Products - Aroma Housewares
Kitchen Countertop Cooking Products - Aroma Housewares![www.aromatestkitchen.com]() Rice Cooker Recipes - Slow Cook, Steam and Grill - Aroma Housewares
Rice Cooker Recipes - Slow Cook, Steam and Grill - Aroma Housewares
Download manual
Here you can download full pdf version of manual, it may contain additional safety instructions, warranty information, FCC rules, etc.
Advertisement

Need help?
Do you have a question about the ACG-106 and is the answer not in the manual?
Questions and answers