Advertisement
PARTS & FEATURES

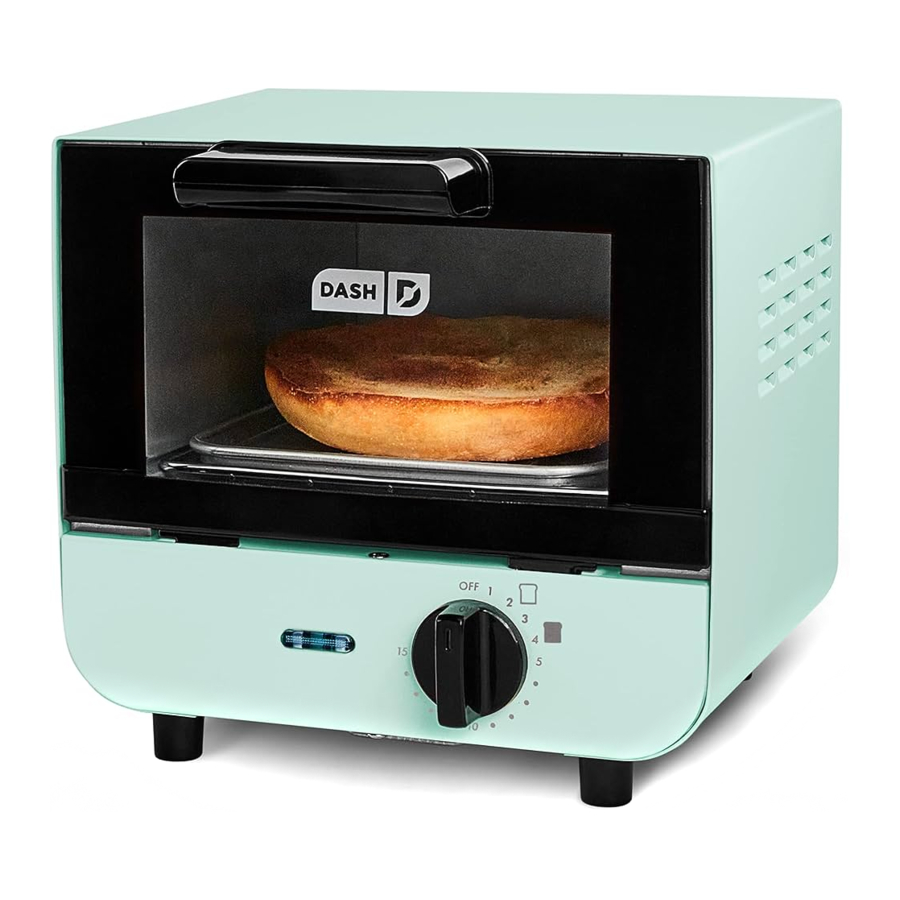
USING
BEFORE USING YOUR MINI TOASTER:
Remove all packaging materials.
Check that the Mini Toaster has no visible damage and that no parts are missing.
Before using the appliance for the first time or before using it after prolonged storage, wash and dry the appliance and any accompanying accessories. See "Cleaning & Maintenance" for instructions.
Your Dash Mini Toaster is always set to 400℉, so you don't have to worry about setting the temperature. To cook recipes that use a different temperature, simply adjust the time accordingly.

Your Mini Toaster Oven is hot, so do not touch the outside or inside while using.
Despite its small size, your Mini Toaster Oven is very powerful! Do not cook toast with it for longer than 4 minutes as indicated by the icon on the dial, as your toast may burn. Ensure your toast is at least 1/2 inch away from the heating elements within the Mini Toaster Oven: failure to do so may cause your toast to burn.
NOTE: Do not cook toast for longer than 4 minutes as indicated by the icon on the dial, as your toast may burn.
- Place the appliance on a stable, flat, heat-resistant surface. Plug the Mini Toaster into a wall socket.
NOTE: There is no On/Off button on the Mini Toaster Oven. To turn the Mini Toaster on, simply plug in the Mini Toaster Oven and set the appropriate time. To turn off, set the timer dial to the "off" position or unplug.
![]()
- Place your food on the Rack and/or Tray inside the Mini Toaster. Close the Glass Door. If using the Tray to toast, it is recommended to flip your food halfway through the cooking process. Ensure your toast is at least 1/2 inch away from the heating elements within the Mini Toaster Oven: failure to do so may cause your toast to burn. Flip at the halfway mark if using the Tray.
![]()
- Turn the Timer to the appropriate setting. Once you have set the time, the Indicator Light will illuminate.
NOTE: To set the Timer for less than 5 minutes, turn the Timer past 5 minutes, then back to your desired cooking time.
![]()
- When the cooking time has elapsed, the Mini Toaster will ring. Use oven mitts to remove your food from the Mini Toaster as the appliance and your food will be hot. NOTE: Do not cook toast for longer than 4 minutes as indicated by the icon on the dial, as your toast may burn.
![]()


TOASTING CHART
PLEASE NOTE:
This Toasting Chart is a guideline. Actual cooking times may vary depending on your food. Your Dash Mini Toaster is always set to 400℉, so you don't have to worry about setting the temperature. To cook recipes that use a different temperature, simply adjust the time accordingly.
The ![]() and
and  symbols around the Timer indicate light and dark toasting settings. The
 ![]() symbol represents the estimated time for light toast and the symbol represents the estimated time for dark toast.
symbol represents the estimated time for light toast and the symbol represents the estimated time for dark toast.
These symbols are only guidelines and your actual cooking time may vary depending on your ingredients.
| TOASTING LEVEL | TIME |
| Light | 2 minutes |
| Medium | 3 minutes |
| Dark | 4 minutes |
NOTE: Do not cook toast for longer than 4 minutes as indicated by the icon on the dial. Be careful not to set the dial over 4 minutes when making toast, as this may result in burnt toast and/or smoke.
CLEANING & MAINTENANCE
BEFORE CLEANING YOUR MINI TOASTER OVEN:
Ensure that you have unplugged the appliance before cleaning.
Allow the oven to cool completely before cleaning.
Thoroughly clean the Mini Toaster after each use.
WHEN CLEANING YOUR MINI TOASTER OVEN:
Use a damp cloth to wipe down the exterior of the appliance.
Dry with a soft cloth.
Do not use abrasive cleaning agents to clean the appliance.
Use warm water to clean the Rack, Tray, and Crumb Catch. Wipe down with a dry, clean cloth.
Open the Crumb Catch by pulling toward the front of the Mini Toaster until the latch has been released. Be sure to do this over a trash can as crumbs may fall out. The Crumb Catch will open but it will not remove entirely. Clean Crumb Catch weekly if you use it often. Using a damp, soapy cloth, wipe down the interior of the Mini Toaster. Thoroughly rinse the cloth and wipe again. Do not leave residual water in the oven.

Be careful not to touch or damage the quartz heating element while cleaning.
Always dry the Mini Toaster thoroughly.
It is highly recommended that you clean and dry the Rack and Tray by hand, after each use.
RECIPE IDEAS
PEANUT BUTTER & BANANA TOAST
Ingredients:
1 slice bread, toasted
peanut butter, to taste
½ banana, sliced
cinnamon, to taste
Directions:
Spread peanut butter on the toast and top with sliced banana. Sprinkle with cinnamon, and enjoy!
ALMOND BUTTER BLUEBERRY TOAST
Ingredients:
1 slice bread, toasted
almond butter, to taste
blueberries, to taste
granola, to taste
Directions:
Spread almond butter on the toast and top with blueberries. Sprinkle granola on top.
Enjoy!
CANTALOUPE & PROSCIUTTO TOAST
Ingredients:
1 slice bread, toasted
2-3 slices cantaloupe
1 piece prosciutto
feta, to taste
Directions:
Top toast with cantaloupe, prosciutto, and a sprinkle of feta. Enjoy!
EGG & AVOCADO TOAST
Ingredients:
1 slice bread, toasted
½ avocado, mashed
salt, to taste pepper, to taste
1 egg, fried or to preference sriracha
Directions:
Mash half of an avocado. Add salt and pepper, to taste. Mix until well combined. Spread the mashed avocado evenly across toast, top with the fried egg, and drizzle with sriracha. Enjoy!
PESTO & PARMESAN TOAST
Ingredients:
1 slice bread, toasted
½ avocado, sliced
2 tbsp pesto
1-2 tbsp parmesan, shaved
Directions:
Spread the pesto on your toast, top with the avocado and then the shaved parmesan.
CURROED HERB PITA CHIPS
Ingredients:
¼ cup olive oil
2 tbsp honey
1 tsp curry powder
½ tsp dried parsley
1 package (8-10 oz) whole wheat pita bread
Directions:
In a small cup, stir together olive oil, honey, curry powder, and parsley. Split each pita crosswise into 2 rounds; brush each round with the oil mixture. Cut each round into quarters and then cut each quarter in half. Line the Tray with parchment paper. Place pita pieces on the Tray. The chips can be baked in batches. Slide the Tray into the Mini Toaster Oven. Toast for 4 minutes. Store in plastic zip-loc bag.
NOTE: Make sure the parchment paper isn't in contact with any of the heating elements.
STRAWBERRY NUTELLA TOAST
Ingredients:
1 slice bread, toasted
1 tbsp of nutella
strawberries, to preference
Directions:
Toast bread for 2-4 minutes. Slice strawberries. Spread nutella and top with strawberries.
CUSTOMER SUPPORT
Dash values quality and workmanship and stands behind this product with our Feel Good Guarantee ™. To learn more about our commitment to quality, visit bydash.com/feelgood.
Our customer support teams in the US and Canada are at your service Monday - Friday during the times below.
Contact us at 1 (800) 898-6970 or support@bydash.com
Hey Hawaii! You can reach our customer service team from 3AM to 3PM. And also, Alaska, feel free to reach out from 5AM - 5PM.

REPAIRS

Risk of electric shock! The Dash Mini Toaster Oven is an electrical appliance. Do not attempt to repair the appliance yourself under any circumstances. Contact Customer Support regarding repairs to the appliance.
TECHNICAL SPECIFICATIONS
Voltage 120V ~ 60Hz
Power Rating 550W
Stock#: DMTO100_20180918_v9
IMPORTANT SAFEGUARDS
PLEASE READ AND SAVE THIS INSTRUCTION AND CARE MANUAL.
When using electrical appliances, basic safety precautions should be followed, including:
- Read all instructions.
- Remove all bags and packaging from appliance before use.
- Make sure the appliance is cleaned thoroughly before using.
- Never leave appliance unattended when in use.
- Do not use appliance for other than intended use.
- For household use only. Do not use outdoors.
- Close supervision is necessary when any appliance is used by or near children.
- A fire may occur if the toaster-oven is covered or touching flammable material, including curtains, draperies, walls, and the like, when in operation. Do not store any item on top of the appliance when in operation.
- Do not touch hot surfaces. Use handles or knobs.
- Allow appliance to cool completely prior to assembly, disassembly or cleaning.
- Oversized foods or metal utensils must not be inserted in a toaster as they may create a fire or risk of electric shock.
- Do not store any materials, other than the manufacturer's recommended accessories in this toaster when not in use.
- Extreme caution should be used when using containers constructed of materials other than metal or glass.
- Extreme caution must be used when moving an appliance containing hot oil or other hot liquids.
- Do not place any of the following materials in the toaster: paper, cardboard, plastic or similar materials.
- Do not cover any part of the toaster with metal foil. This will cause overheating of the toaster.
- Use extreme caution when removing tray or disposing of hot grease.
- Do not clean with metal scouring pads. Pieces can break off the pad and touch electrical parts creating a risk of electric shock.
- During first use, it is common to see a small amount of smoke, or experience a slight odor. This is normal.
- Do not open the door of the Mini Toaster Oven during use. This will cause the heat to escape and affect the cooking process.
- Do not spray water on the door of the Mini Toaster Oven while the appliance is in use.
- This appliance does NOT include a convection function, and therefore is not appropriate for baking poultry or meat. Use this appliance for warming ingredients within the designated 15 minutes time frame.
- Use oven mitts when removing ingredients from the Toaster.
- When cleaning, be careful of the fragile quartz tube. A broken quartz tube may result in electric shock or other injury.
- Do not operate this appliance with a damaged cord, damaged plug, after the appliance malfunctions, is dropped, or damaged in any manner. Return appliance to the nearest authorized service facility for examination, repair, or adjustment.
- For maintenance other than cleaning, please contact StoreBound directly at 1-800-898-6970 from 9AM-9PM ET Monday-Friday or by email at support@bydash.com.
- Do not place appliance on or near a hot gas burner, hot electric burner, or in a heated oven.
- Refrain from using attachments that are not recommended by the appliance manufacturer, as this may result in fire, electric shock, or personal injury.
- Do not let the cord touch hot surfaces, or hang over the edges of tables or counters.
- This appliance is not intended for use by persons (including children) with reduced physical, sensory, or mental capabilities, or lack of experience and knowledge unless they are provided with supervision and instruction concerning use of the appliance by a person responsible for their safety.
- Always be sure to unplug the appliance from the outlet prior to moving, cleaning, storage, and when not in use.
- To disconnect, turn the timer knob to "OFF", then remove plug from wall outlet.
- There is no On/Off button on the Mini Toaster Oven. To turn the Mini Toaster on, simply plug in the Mini Toaster Oven and set the appropriate time. To turn off, simply unplug the Mini Toaster Oven.
- StoreBound shall not accept liability for damages caused by improper use of the appliance.
- Improper use of the appliance can result in property damage or even in personal injury.

Documents / Resources
References
Download manual
Here you can download full pdf version of manual, it may contain additional safety instructions, warranty information, FCC rules, etc.
Download Dash DMTO100 - Compact Mini Toaster Oven Manual & Recipes
Advertisement


Need help?
Do you have a question about the DMTO100 and is the answer not in the manual?
Questions and answers