Advertisement
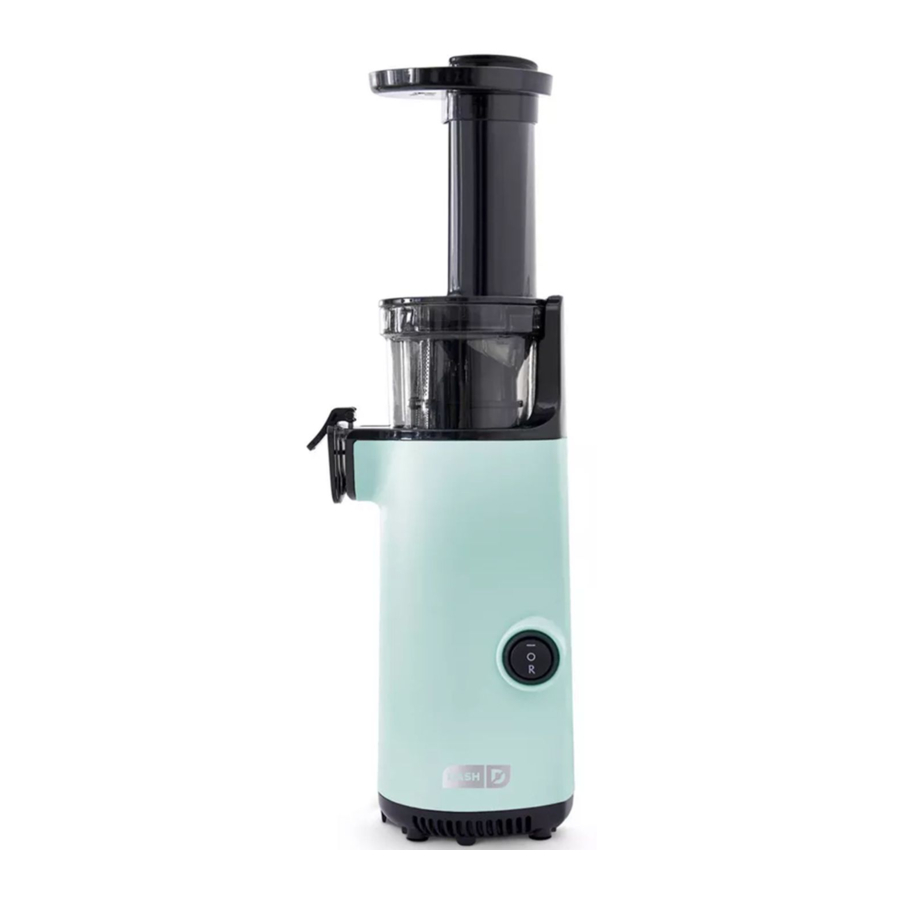
PARTS & FEATURES


BEFORE FIRST USE
- Remove all parts from the packaging. Note that the Hopper and Cleaning Brush are packed on the outside of the protective foam.
- Wash all removable and washable parts, such as the Pusher, Cover, Sieve, Auger, Bowl and Cups in warm, soapy water. Rinse and dry thoroughly.
SETTING UP
- Make sure the Cold Press Power Juicer is unplugged and the On/Off Switch is turned to Off prior to assembling (photo A).

- Position the Juice Bowl on the Motor Block. Make sure the Bowl is mounted properly on the Axle of the Motor Block (photo B).

- Push the Auger firmly into the center of the Bowl, making sure that it rests on the bottom (photo C).

- Position the Cover on the Bowl and twist until the cover clicks shut. Make sure the arrow on the Cover aligns with the Lock icon on the lid (photo D). Note that the unit will not power on if the Cover is not locked into place.

- Position one cup under the Juice Spout and one cup under the Pulp Spout. The Juicer is now ready to use (photo E). The Hopper can be added to the tube of the Cover to hold more ingredients, if you wish (photo F).


USING
- The On/Off Switch has 3 positions: On (I), Off (O), and Reverse (R) (photo A).

- Before using, make sure that the Juicer is turned Off and plug it in. Position the Cups underneath the Spouts (photo B). Clean fruit and vegetables you wish to juice. For best results, cut ingredients into 1-1.5" segments.


Remove hard pits or seeds prior to pressing to prevent possible damage to the Auger.
The peel and pits/seeds must be removed from oranges, lemons, grapefruit, and melons before use.
- Turn on the On/Off Switch (photo C).

- Insert the prepped ingredients into the opening at the top of the Cover. Push the food down into the bowl using the Pusher (photo D).


TIP: Begin with firmer ingredients, and then squeeze softer ingredients.
Never use the machine with an empty bowl, always add ingredients. If the Cover becomes loosened from the Bowl during use, the motor of the machine will automatically stop to prevent hazards.
DO NOT insert fingers or other foreign objects into the opening of the Cover while the machine is in use.
Use only the Pusher and NOT spoons, forks, tongs, etc.
- If the machine becomes stuck during use, turn the On/Off Switch to R and hold down the switch so that the machine runs in the opposite direction (photo E). This could remove any obstructions. Release the switch to stop the reverse movement. If this does not work, turn the machine off, remove the plug from the outlet and reassemble the machine according to the instructions. Then try to start the machine again.

- When the Cup is full or when all fruits and vegetables have been squeezed, turn the On/Off Switch off (photo F) and close the Juice Valve.


NOTE: If the machine overheats, it will turn off automatically. Turn the On/Off Switch to off and wait 10 minutes, then turn the machine on again. Juice should always be stored in the refrigerator.
Never let the machine work for longer than 30 minutes at a time. Do not touch the On/Off Switch with wet hands.
USING YOUR FROZEN ATTACHMENT

- Look for the
![]() to determine which attachment is the Frozen Attachment for frozen treats.
to determine which attachment is the Frozen Attachment for frozen treats. - The Frozen Attachment is perfect for making frozen smoothies and sorbet.
- NOTE: When using the Frozen Attachment, the fruit will come out of the Pulp Spout rather than the Juice Spout.
- Do not put ice cubes in the Power Juicer.
- If freezing your own fruit for sorbet, cut fruit into 1" cubes before freezing for best results.
- Allow frozen fruit to soften at room temperature for about 5-15 minutes.
- Only juice one piece of fruit at a time when using the Frozen Attachment. For example, using the Pusher, juice 1 piece of fruit through the Feed Tube until it is entirely processed and then add another piece of fruit.
- Apply steady pressure when pushing food through the Feed Tube.

CLEANING & MAINTENANCE
- Turn the On/Off Switch to off. Close the Juice Valve and remove the Cups. Unplug the Juicer and allow it to cool completely before cleaning.
- Remove the Cover by twisting counterclockwise (photo A) and then lifting. Remove Auger from Bowl (photo B) and clean underneath. If the Auger is stuck, try rotating and then removing.

- Remove the Juice Bowl (photo C). Empty the Cups and clean the Cover, the Pusher, Sieve, Bowl, and Auger and Cups under running water.

- Use the included Cleaning Brush to clean the Sieve properly (photo D). Be careful when cleaning the Sieve.


CHEF TIP: It is recommended to clean the Sieve with the Cleaning Brush for safety as the Sieve is sharp.
- Use the chisel end of the Cleaning Brush to help remove fibrous material from the Pulp Spout (photo E).
- If there is still residue in the mouth of the Spout, you can turn the Juicer Bowl over, open the Silicone Pressure Valve, and rinse with water (photo F). Then reattach the Silicone Pressure Valve.
NOTE: ALL parts of the Juicer are dishwasher safe, EXCEPT for the Motor Block.

DO NOT submerge the Motor Block in water.
DO NOT use harsh metal sponges, as they could damage the machine.
Dry all parts thoroughly after cleaning. Once completely dry, reassemble and store in a dry place.
TIPS & TRICKS
- Starchy fruits and vegetables, such as sugarcane, avocado, banana, fig, mango, papaya, dragon fruit, kiwi and grapes, are not suitable for juicing as they will easily clog the Sieve.
- Fruits and vegetables should be cut into pieces 1-1.5" long before juicing, especially fibrous foods like celery and pineapple.
- Seeds and pits should be removed from fruits like citrus and melon before processing.
- Very seedy fruits like strawberries and raspberries might clog the Sieve. Be sure to go slowly and limit these types of fruits to small quantities to avoid clogging.
RECIPE GUIDE
MAUI WOWIE
Ingredients:
2 pineapple rounds
1 inch of ginger
¼ cup of sparkling water
Directions:
- Chop up the pineapple and remove the rind from the rounds.
- Turn the Juicer on. Place pineapple rounds in the Ingredient Tube and use the Pusher to push the food through the tube.
- Chop up the ginger and place it in the Ingredient Tube. Use the Pusher to push the ginger through the Juicer.
- Now pour the sparkling water through the Juicer, the water will help to get the juice out of the Juicer. Serve and enjoy!
VEGGIE DELIGHT
Ingredients:
3 inch round of wheatgrass
2 large carrots
½ cup alfalfa sprouts
3 celery stalks
8 spinach leaves
Directions:
- Chop up the carrots and celery stalks into 1-1.5" pieces.
- Turn the Juicer on. Place the ingredients in the Ingredient Tube one after another and use the Pusher to push them through. Serve and enjoy!
SUNSHINE JUICE
Ingredients:
1 orange
½ cup of raspberries
3 fresh mint leaves
Directions:
- Peel the orange and turn it into slices.
- Turn the Juicer on. Place the orange pieces into the Ingredient Tube and use the Pusher to push the food through the tube.
- Place the raspberries into the Ingredient Tube and use the Pusher to push the fruit through the Juicer.
- Put the mint leaves into the Ingredient Tube and use the Pusher to push the food through. Serve and enjoy!
MEAN GREEN
Ingredients:
6 kale leaves
1 cucumber
4 celery stalks
2 green apples
½ inch lemon
Directions:
- Chop up the kale leaves.
- Turn the Juicer on. Place the kale into the Ingredient Tube and use the Pusher to push the kale leaves through the Juicer.
- Chop up the cucumber and place in the Ingredient Tube. Use the Pusher to push the cucumber through the Juicer.
- Chop up the celery stalks into 1-1.5" pieces and place in the Ingredient Tube. Use the Pusher to push the celery through the Juicer.
- Slice the apples and remove the seeds. Place the apple slices in the Ingredient Tube and push through with the Pusher.
- Remove the peel and rind from the lemon. Place the lemon piece in the Ingredient Tube and use the Pusher to push the lemon through the Juicer. Serve and enjoy!
WATERMELON PUNCH
Ingredients:
¼ watermelon
½ lemon
2 oranges
¼ pineapple
Directions:
- Remove the rind from the watermelon and chop up into small pieces.
- Turn the Juicer on. Place the watermelon pieces into the Ingredient Tube and use the Pusher to push through the Juicer.
- Remove the peel and rind from the lemon. Chop the lemon into smaller pieces and put in the Ingredient Tube. Use the Pusher to push the lemon through the Juicer.
- Peel the oranges and turn into slices. Place the orange slices into the Ingredient Tube and use the Pusher to push the orange through the Juicer.
- Chop up and remove the peel from the pineapple. Put the pineapple pieces into the Ingredient Tube and use the Pusher to push the pineapple through the Juicer. Serve and enjoy!
ALMOND MILK
Ingredients:
1 cup almonds
1/3 cup water
Honey, agave, cane sugar or maple sugar, to taste
Directions:
- Soak one cup of almonds in a large bowl of water approximately 8-12 hours. Rinse the almonds in a strainer.
- Turn on the Juicer. Measure out 2/
- Flavor the almond milk with honey, agave, nectar, cane sugar or maple sugar to taste.
We're here to help! Our customer support teams in the US and Canada are at your service Monday - Friday.
CUSTOMER SUPPORT
Dash values quality and workmanship and stands behind this product with our Feel Good Guarantee ™. To learn more about our commitment to quality, visit bydash.com/feelgood.
Contact us at 1 (800) 898-6970 or support@bydash.com.

bydash.com/help
REPAIRS

Risk of electric shock! The Dash Deluxe Cold Press Power Juicer is an electrical appliance. Do not attempt to repair the appliance yourself under any circumstances. Contact Customer Support regarding repairs to the appliance.
TECHNICAL SPECIFICATIONS
Voltage 120V~60Hz
Power Rating 130W
Stock#: DCSJ255_20230425_V9
IMPORTANT SAFEGUARDS
PLEASE READ AND SAVE THIS INSTRUCTION AND CARE MANUAL.
When using electrical appliances, basic safety precautions should be followed, including:
- Read all instructions before use.
- Remove all bags and packaging from appliance before use.
- Never leave appliance unattended when in use.
- Make sure the appliance is cleaned thoroughly before using.
- Do not use appliance for other than intended use. For household use only. Do not use outdoors.
- Only use the appliance on a stable, dry surface.
- ATTENTION: This appliance cannot be used with an external timer or a separate remote control.
- Do not place appliance on or near a hot gas burner, hot electric burner, or in a heated oven.
- This appliance can be used by persons with reduced physical, sensory, or mental capabilities or lack of experience of knowledge, if they have been given supervision or instruction concerning use of the appliance in a safe way and understand the hazards involved.
- This appliance is not a toy. Do not let children use this appliance. Close supervision is necessary when any kitchen appliance is used by or near children.
- To prevent the risk of fire, electric shock, or personal injury, do not put cord, plug, or appliance in or near water or other liquids. The Juicer is NOT dishwasher safe.
- Do not let the cord touch hot surfaces or hang over the edge of tables or counters.
- Refrain from using attachments that are not recommended by the appliance manufacturer, as this may result in fire, electric shock, or personal injury.
- Never let the machine work for longer than 20 minutes at a time.
- Unplug the appliance prior to assembly/disassembly, moving, cleaning, storage, and when not in use. To unplug, grasp the plug and pull from the outlet. Never pull from the power cord.
- Do not operate this appliance with a damaged cord, damaged plug, after the appliance malfunctions, is dropped, or damaged in any manner. Return appliance to the nearest authorized service facility for examination, repair, or adjustment.
- For maintenance other than cleaning, please contact StoreBound directly at 1-800-898-6970 Monday – Friday or by email at support@bydash.com.
- StoreBound shall not accept liability for damages caused by improper use of the appliance.
- Improper use of the appliance can result in property damage or even in personal injury.
- This appliance has a polarized plug (one blade is wider than the other). To reduce the risk of electric shock, this plug will fit in a polarized outlet only one way. If the plug does not completely fit in the outlet, reverse the plug. If it still does not fit, contact a qualified electrician. Do not attempt to modify the plug in any way.
- A short power supply cord is to be provided to reduce the risk resulting from becoming entangled in or tripping over a longer cord. An extension cord may be used if care is exercised in its use. If an extension cord is used, the marked electrical rating of the extension cord should be at least as great as the electrical rating of the appliance. If the appliance is of the grounded type, the extension cord should be a grounding 3-wire cord. The extension cord should be arranged so that it will not drape over the countertop or tabletop where it can be pulled on by children or tripped over unintentionally.

Documents / Resources
References
Download manual
Here you can download full pdf version of manual, it may contain additional safety instructions, warranty information, FCC rules, etc.
Download Dash DCSJ255 - Deluxe Compact Cold Press Power Juicer Manual & Recipes
Advertisement


Need help?
Do you have a question about the DCSJ255 and is the answer not in the manual?
Questions and answers