ANJANK AC-190 - Wireless Charging Digital LED Alarm Clock MAnual
- Instruction manual and warranty (17 pages)
Advertisement
- 1 Introduction
- 2 Video Support
- 3 Features
- 4 Power Specifications
- 5 Getting Started
- 6 Front View
- 7 TOP View
- 8 Back View
- 9 Bottom View
- 10 12 / 24H Switch
- 11 Setting The Time
- 12 Setting The Alarm and Alarm Tone
- 13 Alarm On / Alarm Off
- 14 Using The Alarm And Snooze
- 15 Setting The Manual-scan Radio Station
- 16 Setting The Auto-scan Radio Station
- 17 Setting The Radio Alarm
- 18 Sleeper Timer Setting
- 19 Using The Wireless Charging Function
- 20 USB Charging Port
- 21 Display Brightness Adjustment
- 22 Headphone Jack Support
- 23 Email Support
- 24 Warranty
- 25 Videos
- 26 Documents / Resources
Introduction
The utmost care has gone into the design and manufacture of this product. Please read the instructions carefully and keep this manual in a safe place for future reference.
Video Support
We've provide an instructional video that will help you work with clock more smoothly. Just scan the QR code or enter the link to access the video.
https://www.youtube.com/watch?v=-zi590A8wGU

Features
- Wireless Charging
- FM Radio
- 9 Minutes Snooze
- 5-level of LED Display
- 12/24H Mode
- Battery Backup(Only Memory function)
- USB Charging Port
- Sleep Timer ( In FM mode)
- Headphone Jack Supported
Power Specifications
Power adapter: AC100-240V, 50-60Hz
DC, 9V-2A 18W, Class 2
Getting Started
Plug in the adapter into a standard household outlet to get the clock working. Insert two AAA batteries(Not included) to preserve the TIME and ALARM settings in case of the power outage.
Note:
- Under the battery power, the display will go blank and the preset alarm will not go off, but the TIME and ALARM settings are saved.
- Once the battery is removed and with an interruption of power, the TIME and ALARM need to be reset when the power comes back.
Front View

TOP View

Back View

Bottom View

12 / 24H Switch
Press the "12/24H " button to change the time mode. In 12-Hour mode, the "AM" will appear in the morning and the "PM" will appear in the afternoon.
Setting The Time
- Press the "TIME SET" button to start the time settings, then press the
![]() and
and ![]() buttons to set the right hour;
buttons to set the right hour;

- Press the "TIME SET" button to set MINUTE, then press the
![]() and
and ![]() buttons to set the minute;
buttons to set the minute;

- Press the "TIME SET" button again to end the setup.


Setting The Alarm and Alarm Tone
Note: Please carefully check the 12H/24H. In 12-Hour mode, the indication AM or PM will be shown on the screen. In 24-Hour mode, there's no indication of "AM" or "PM" on the screen.
- Press the "ALARM SET" button to start the alarm settings, then press the
![]() and
and ![]() buttons to the set alarm hour you want;
buttons to the set alarm hour you want;

- Press the "ALARM SET" button to set MINUTE,then press the
![]() and
and ![]() buttons to set the alarm minutes you want;
buttons to set the alarm minutes you want;


- Press the "ALARM SET" button to set up the alarm ringtone.
A number will be shown on the display and sound will be played accordingly to indicate the alarm ringtone (# 01 is beep, #02 is FM radio). Pressing the![]() or
or ![]() buttons to select your preferred ring type;
buttons to select your preferred ring type;

- Press the "ALARM SET" button again to end the setup.

Alarm On / Alarm Off
Alarm will be turned on after you set the alarm time, press the " ALARM ON /OFF " button to turn off the alarm.

Using The Alarm And Snooze
- When the alarm is ringing, press the "SNOOZE"button to activate the snooze. It will ring again after 9 minutes.
- When the alarm is going off, you can silence the alarm by pressing any button except "SNOOZE" button on the top. Alarm will be go off on the next day.
- Beep alarm(#01 alarm tone) will last sound 5 minutes; FM radio alarm (#02 alarm tone)will sound for 1 hours.
Setting The Manual-scan Radio Station
- Press the
![]() button to turn the radio mode on or off.
button to turn the radio mode on or off. - When the radio is on, press the
![]() and
and ![]() buttons to manual select your favorite channel.
buttons to manual select your favorite channel.
Setting The Auto-scan Radio Station
- When the radio is on, long press the
![]() button, FM radio will scan and auto-store the scanned stations. Then press the
button, FM radio will scan and auto-store the scanned stations. Then press the ![]() and
and ![]() buttons to select your favorite channel.
buttons to select your favorite channel.

- It can save up to 30 channels.
- Rotate volume slider at the back of the clock to adjust the Radio Volume. Volume adjustment is only used for FM radio volume.

Setting The Radio Alarm
When the radio is on, you can select the channel you want, then long press the "SNOOZE / DIMMER" button until the letter "AL" blinks on the display, then this channel will be saved as the second alarm ringtone (02 alarm ringtone).

Sleeper Timer Setting
When the radio is on, press the "SLEEP" button to enter the sleeper timer setting. You can select the sleep time from 10 to 120 minutes. Default state is off.

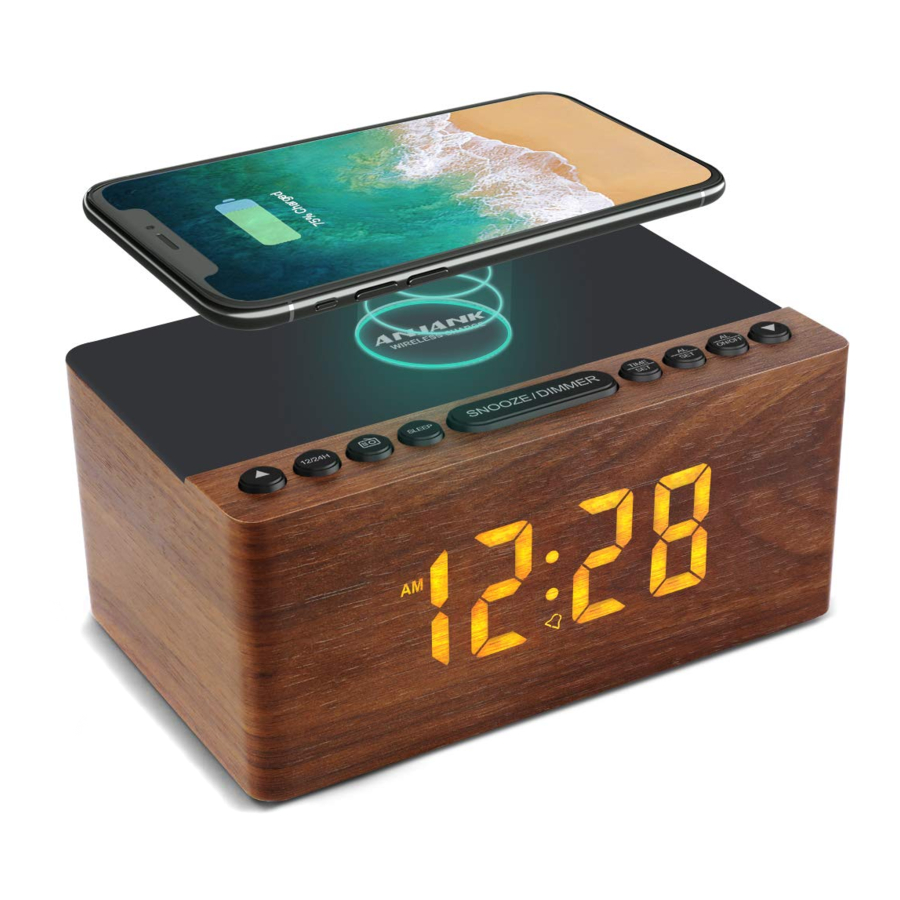
Using The Wireless Charging Function
Place your phone on the center of the wireless charging pad, the phone will light up to indicate the phone is charging.
Note:
- Supported devices:
Supports all enabled wireless charging devices or devices with receiver such as iPhone, Samsung, HUAWEI and other smart phones. - Provides fastest wireless charging speed for your Phone at 7. 5W
- Output: 5W/7.5W/10W
USB Charging Port
The clock comes with a USB port is used to charge your other phones or digital device.
Note:
- Wireless Charging and USB Charging function can work at the same time;
- USB Charging function may not be supported for some phones and electronics;
- Output: 5V /1A.
Display Brightness Adjustment
Press the "SNOOZE " button to adjust 5 levels brightness of the display. (Full, High, Medium, Low, Dark to your preference.)
Headphone Jack Support
Use a 3.5mm headphone to listen your favorite radio station without disturbing other people near you.
Email Support
If any questions with the clock, please contact our customer support team through customer01@kerchanstar.com. We will deal with your issue within 24 hours.
Warranty
ANJANK backs 45-day money back and the 18-month warranty for our product in our store.

Changes or modifications to this unit not expressly approved by the party responsible for compliance could void the user's authority to operate the equipment.
NOTE: This equipment has been tested and found to comply with the limits for a Class B digital device, pursuant to Part 15 of the FCC Rules. These limits are designed to provide reasonable protection against harmful interference in a residential installation. This equipment generates, uses and can radiate radio frequency energy and, if not installed and used in accordance with the instructions, may cause harmful interference to radio communications.
However, there is no guarantee that interference will not occur in a particular installation. If this equipment does cause harmful interference to radio or television reception, which can be determined by turning the equipment off and on, the user is encouraged to try to correct the interference by one or more of the following measures:
- Reorient or relocate the receiving antenna.
- Increase the separation between the equipment and receiver.
- Connect the equipment into an outlet on a circuit different from that to which the receiver is connected.
- Consult the dealer or an experienced radio/TV technician for help.

VideosANJANK AC-190 Wooden Alarm Clock with FM Radio, 10W Super Fast Wireless Charger Station for Phone Video
Documents / Resources
References
Download manual
Here you can download full pdf version of manual, it may contain additional safety instructions, warranty information, FCC rules, etc.
Download ANJANK AC-190 - Wireless Charging Digital LED Alarm Clock MAnual
Advertisement


Need help?
Do you have a question about the AC-190 and is the answer not in the manual?
Questions and answers