Advertisement
Foreword
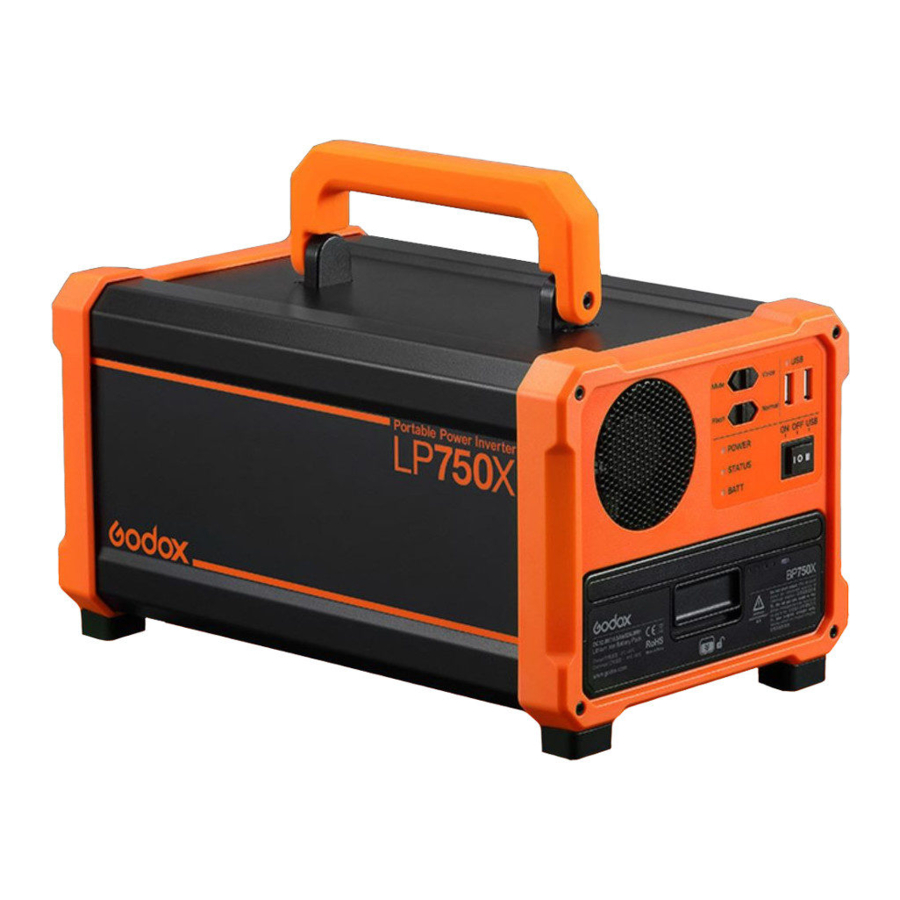
Godox Portable Power Inverter LP750X is designed in accordance with the industrial standard. Featured by excellent performance, powerful function, reliable stability and portable design, it becomes the ideal solution of outdoor AC power supply and indoor emergency supply.
LP750X features in special circuit design for studio flashes, meeting the demanding requirements of any advanced flashes. Served with LP750X Inverter, your studio flash is able to be operated in a studio with AC power supply, and also plays its portability to be used in location shooting.
LP750X Inverter is of superior quality. Please read the instructions prior to use, because proper operation and protection will guarantee you to enjoy its durable and excellent performance better and longer.
Warning

- As a professional power supply, the Inverter shall not be used by minors under 18 years!
- Be careful of electric shock caused by the high-voltage AC output by the Inverter!
- No using the Inverter in water fog, rain or snow without any protection!
Please read the following safety precautions prior to installing or using the Inverter so as to avoid any damage of the Inverter or personal injury.
General Warning
Its rated power is 750W. Do not connect the Inverter with any equipment with the rated power of over 750W.
The equipment shall be used in a dry and dustless environment. Do not expose it in water fog, rain, snow or dust.
To avoid fire or electric shock, please ensure the existing circuit to be in a good condition and used modestly. Do not use the Inverter in a damaged or unacceptable circuit. Some components of the Inverter may cause sparks. Therefore, to avoid any fire or explosion, do not place flammable materials on the Inverter, nor store or use it in a place with any flammable gas.
 Do not cover or block the vent. Please ensure the Inverter to be no less than 30cm away from other articles. Do not place it in a gapless space, because overheating may cause some fault.
The battery of Inverter is Lithium-iron battery, so it is recommended that it should be used under the temperature range of -10°C- 40°C; otherwise, it may be decayed or inoperative under other temperatures.
Please close the socket cover for the unused AC socket.
The equipment shall be maintained by the authorized institution or personnel.
Warning of Battery Use
The battery is a high-quality Lithium-iron battery featured with high capacity & voltage and rapid discharge. Do not connect the anode and cathode with a metal object, otherwise, the incurred huge current or high temperature may hurt persons or damage the battery, even explosion may be caused.
In case that the skin or clothes contacts battery acid, please wash it with soap and water immediately. In case of eye contact, please wash the eye with cold water right now; then please get medical attention after at least 20min.
Do not place any metal tool on the battery; otherwise, short circuit may be caused to bring serious consequences.
Do not enable personal metal articles such as a ring, bracelet, necklace, and watch to be close to the Inverter. In case of any short circuit caused by high temperature, such metal articles may be melted to burn somebody.
Product Introduction
Characteristics
- With the leading technology, it is designed in accordance with the industrial standard to meet professional demands and eliminate damage to equipment.
- Equipped with the professional optimization and dual modes including flash mode(max. output 1400W) and normal mode(stable output 750W), it can be applied widely.
- The inverter is supplied with high-quality Lithium-iron battery(15000mAh), which features convenient replacement.
- There are two USB port to charging for the product with USB port e.g. iPhone, iPad, etc.
- The external interface of anode and cathode can be connected with an external storage battery to supply the energy longer.
- Featured with pure sine wave output, the output voltage includes 230V/50HZ or 110V/60HZ.
- The continuous power is up to 750W, and the conversion efficiency is up to 95%.
- It is equipped with the built-in self-adjustable cooling fan.
- It is equipped with the high-end microelectronics processing system.
Automatic Protection
- Low-voltage input protection
- Overload protection
- Short-circuit protection
- Low-electric energy prompt
- High-voltage input protection
- Overheating protection
Applicable Scope
* Photographic apparatuses and household appliances.
Direction for Product
Component Name


- Handle
- AC Output Socket
- Socket Protection Cover
- Power Switch
On (Power on)
Off (Power off)
USB (USB starts outputing)
- POWER Indicator (displaying output power)
- STATUS Indicator (working condition)
- BATT Indicator (displaying the electric quantity of battery)
- USB Output Port (USB 1, USB2)
- USB Function Indicator
- Air Inlet of Cooling Fan
- Air Outlet of Cooling Fan
- Mode Selection
Mute (Silent)
Voice (Beep)
Flash (Flash Mode)
Normal (Normal mode) - Battery
Battery

- Battery Body
- Battery Handle
- Battery Handle Button
- Battery Compartment
- Charging Indicator
- Charging Socket
Included Item
- Portable Power Inverter
![]()
- Battery
![]()
- Charger
![]()
- Power Cable
![]()
- Portable Bag
![]()
- Instruction Manual


Optional Accessories
External Power Source Connector for LP750X
Model: EC750

Function Description
- LED Indicator Description
- Power Indicator (displaying output power)
Power LED Output Power(LP750X) Off 0~35W Green 35W~230W Red 520W~670W Red, flickering >670W - Status (working condition)
Status LED Working Condition Red No Green Yes - BATT Indicator (displaying the electric quantity of battery)
Battery LED Battery Voltage Red, flickering <10.7 or >15.4V Low battery level alarm Red 11.5~10.9V Green 12.3~14.6V >12.4V Full power state
- Power Indicator (displaying output power)
*In loaded operation, the voltage of battery is reduced, and LED changes correspondingly; the higher load power is, the more obviously LED changes.
* In loaded operation, in case that the indicator light "Power" (displaying output power) flickers continuously and the buzzing occurs for over 5s, then the equipment is locked automatically, which indicates that the existing electric quantity of battery cannot afford the load, so please reuse if after charging.
Status LED Lamp Alarm
During charging the flash, the instantaneous power may be increased by more than 3 times, e.g. for 100WS flash, its transient current may be equal to that of a 300W lamp. Therefore, when using certain flashes, the indicator light "Power" may flicker with short buzzing, which is normal as the instantaneous power of the flash has exceeded 750W.
If the indicator light "Power" (displaying output power) flickers continuously, occurring buzzing for over 5s, the equipment will be locked automatically.
After locking the equipment automatically, you only need to turn off the mains switch, and then turn it on to reuse.
- USB Indicator (working condition)
| Status LED | Working Condition |
| Red | Yes |
| Off | No |
- Mode Switch
LP750X Inverter is equipped with two operating modes including "Normal" (normal mode) and "Flash" (flash mode). Users can choose one of the working modes according to the loaded machine. The "Flash"(flash mode) is specially designed pursuant to the performance characteristics of flashes, also supporting the use of electrical appliances with rated power; however, no power-down mode is provided and the standard battery can stand by for 13 hours continuously in this mode. To the electronic products that continuously output rated power, , it is recommended "Normal" (normal mode) should be used, because it can save electricity; in this case, the standard battery can stand by for 48 hours continuously; in the mode, flashes cannot be used. As for detailed data, see the following "Introduction to Function Mode".
Note: when turning the Flash (flash mode) mode to standby mode, you need to turn off the power inverter at first. Then, turning it on to finish setting. - Main Switch
"OFF" refers to power off;
"ON" refers to power on; at the moment, the equipment can be used;
"USB" refers to USB charging starts, at the moment, the USB indicator is lit on and portable products can be charged e.g. iPhone, iPad, etc. There is no AC power output in USB mode. USB 1/USB 2: output 5V/2A x 2. - AC Output Socket
- Two AC output sockets are parallel, and each of them can output the maximum power.
- AC output standard voltage is 230V/50Hz. If additional requirements are from some special voltage, please consult our relevant personnel prior to purchase.
Operation Instruction
Battery Installation and Detachment
Installation:

- Insert the battery into the Battery Compartment.
- Push it in until it is locked.
Detachment:

- Push up the button and the battery handle will pop out.
- Hold upward the button and pull out the handle to remove the battery.
- Charging Source
The charger can connect to 100-240V AC power supply.- Take out the battery.
- Insert one end of the charging connect cable into the charging socket of the inverter.
![]()
- Connect the AC output plug of charging power cable to the charger's AC input socket, and connect the other end of AC input plug to connect any AC power source to start charging.
Note: please disconnect the power source in time after charging finished.
![]()
- LED Lamps of the Charger and Battery
- The red lamp is flickering: No charging;
- The red lamp is lit continuously and green light blinking: In charging;
- The green lamp is lit: Completing charging.
Note: If the battery has been spent, about 3.5 hours is needed to charge it fully. After charging, please pull out the charging connecting cable. To ensure the expected service life of battery, please charge it fully in the following special cases:- When the inverter alarms in low battery.
- Reusing the battery after nonuse beyond 100 days.


Connecting Inverter LP750X
- Move the button "Main Switch" to "OFF" (power off).
![]()
- Insert the load into the "AC Output Socket".
![]()
- Move the button "Main Switch" to "ON" (power on).
![]()
- Move the "Mode Switch" to "Flash" (flash mode) or "Normal" (normal mode).
![]()
- Turn on the load power supply to use.
![]()


Note:
- It is recommended that the modeling light should be closed while using it in a flash, because the modeling light may use up the electric energy in the battery of Inverter in short time.
- Move the button "Main Switch" of power supply to "ON" (power on); at the moment, the buzzer gives out buzzing, which indicates the Inverter will perform internal detection automatically, and LED indicator lights will display different colors. Finally, the buzzer gives out another buzzing, and the indicator light "Status" (working condition) is green, which indicates the Inverter begins to work normally.
- In case of outdoor photography, the Inverter can be placed in a waterproof bag to avoid any dust, sand and water. At the moment, users can open the "bag mouths" on both sides of waterproof bag to hang it at the braces, avoiding blocking and sealing "Air Inlet of Cooling Fan".
Connecting Other External Storage Batteries
Connecting an External Battery
Use an external power cable (separately purchase) to connect the inverter to external battery(battery voltage 11-15V). In case that an external battery is used, generally, the capacity of an external storage battery is larger, so the Inverter can work longer than that in using the built-in battery. You can purchase and prepare external batteries with different capacities according to the actual demand to elevate the continuous service time of the product.
- Take the LEADPOWER Inverter out of the water-proof bag.
- Reconfirm the Inverter is in the mode of shutdown.
- Connect the power input port of controller with external power source output port of battery.
- Connect the external battery and power source by external battery power cable. Please note the anode and cathode.
- In case that the above connection is correct, move the "Main Switch" of Inverter to "ON" to operate.
The Standard of External Power Cables
- Purchasing GODOX standard 2M connecting cables
![]()
- Please ensure the anode and cathode of external battery aren't reversed; otherwise, the fuse of inverter may be burned and even the inverter is damaged irreversibly. We are not responsible for the warranty of any fault caused by the reversion of anode and cathode.
- No operating in the environment with any flammable and explosive gas.
- Make sure the power source input port of controller is connected with external power source output port of battery.
Note:
- When the Inverter is connected with an external battery, you only need to connect the Inverter with battery by connecting the inverter to any external battery by the power cable of external battery and connect the power input port to the external power output port; in this way, the external battery will replace the battery to supply power.
- The required voltage of external battery is from 11V to 15V.
- [+] represents anode, while [-] represents cathode.
Introduction to Function Mode
Normal Mode
In the mode, the flash is inappropriate to be used, but supporting the use of any electrical appliance with rated power. The maximum power of used equipment is 750W (3 minutes) with energy-saving function.
In case that the service power exceeds 750W, the indicator light "Power" (displaying output power) will become red and flickering, meanwhile, the buzzing occurs.
Note: When the loaded power is below 45W, please use flash mode. Otherwise, the inverter will automatically enter energy-saving function in the normal operating when the loaded power is below 45W and there is no AC output.
Flash Mode
The mode is designed in accordance with the performance characteristics of flashes, supporting the use of the second-level flash products and electrical appliance with rated power but without the power-down mode.
When an electrical appliance with rated power is used, please refer to the output time.
Maintenance
This product, except consumables e.g. charger and charger cable, is supported with a one-year warranty.
Avoid sudden impacts and the product should be dedusted regularly.
Maintenance of the flash must be performed by our authorized maintenance department which can provide original accessories.
Unauthorized service will void the warranty.
If the product had failures or was wetted, do not use it until it is repaired by professionals. Changes made to the specifications or designs may not be reflected in this manual.
Technical Data
| Model | LP750X |
| Continuous Output | 750W |
| Peak Power | 1400W |
| Input Voltage Range | DC 10.8V-15.5V |
| USB Output | 5V/2A x 2 |
| Output Voltage/Frequency | AC 220V-240V/50Hz x 2 |
| Output Waveform | Pure Sine wave |
| High Harmonic Distortion | < 3% |
| No-load Current Consumption | Normal mode: 0.24A Flash mode: 0.95A |
| Conversion Efficiency | 95% |
| Low-voltage Alarm | Yes |
| Low-voltage Shutdown | Yes |
| Working Temperature Range | -10°C - 40°C |
| Operating Temperature Range | 0-40°C |
| Battery Model | BP750X |
| Nominal Capacity of the Battery | 15000mAh(12.8V) |
| Charging Period | About 3.5h (standard 5A charger) |
| Fuse | 3*35A |
| Size | 172*178*293mm |
| Weight | approx. 6.96kg |
Godox After-sale Service Call 0755-29609320-8062

Documents / ResourcesDownload manual
Here you can download full pdf version of manual, it may contain additional safety instructions, warranty information, FCC rules, etc.
Advertisement


Need help?
Do you have a question about the LP750X and is the answer not in the manual?
Questions and answers