Advertisement
Introduction
Read all instructions before using
This product is mainly designed for dental laboratory use. This product can be used for clinical use at dental clinic.
In order to have trouble-free performance
Please read all instructions before operating.
Please keep this manual for future reference. Saeshin is not responsible for the accident causing by not following the instructions.
Design and specification of the product can be subject to be changed for improving the quality.
Informing the product, model faulty status, and the customer' (tel or email etc), the kind consulting and quick service will provided.
Handpiece - 1year
Control box & Foot Pedal - 1 year
Warranty does not include misuse or normal wear of bearing, carbon brush collet chuck, spindle and armature.
SERVICE FOR CHARGE
In case of the fault or malfunction from the misuse of the user
- Using with wrong Input Voltage (AC Voltage)
- Dropping down during setting or moving
- In case of user's misuse or improper use
- Using consumable parts or accessories not recommended by manufacturer
- Malfunction after repairing at the places not recommended by manufacturer
Other cases
- Faulty by Act of God (Fire, sea wind or water, flood etc).
- Replacing by the normal wear of the consumable parts (ball bearings, collet chuck, carbon brush, spindle, or armature etc.)
SETTING AND OPERATION
- After checking off-switch in control box, plug in.
- Connect handpiece to output of control box.
- Set the speed dial of control box to "0"
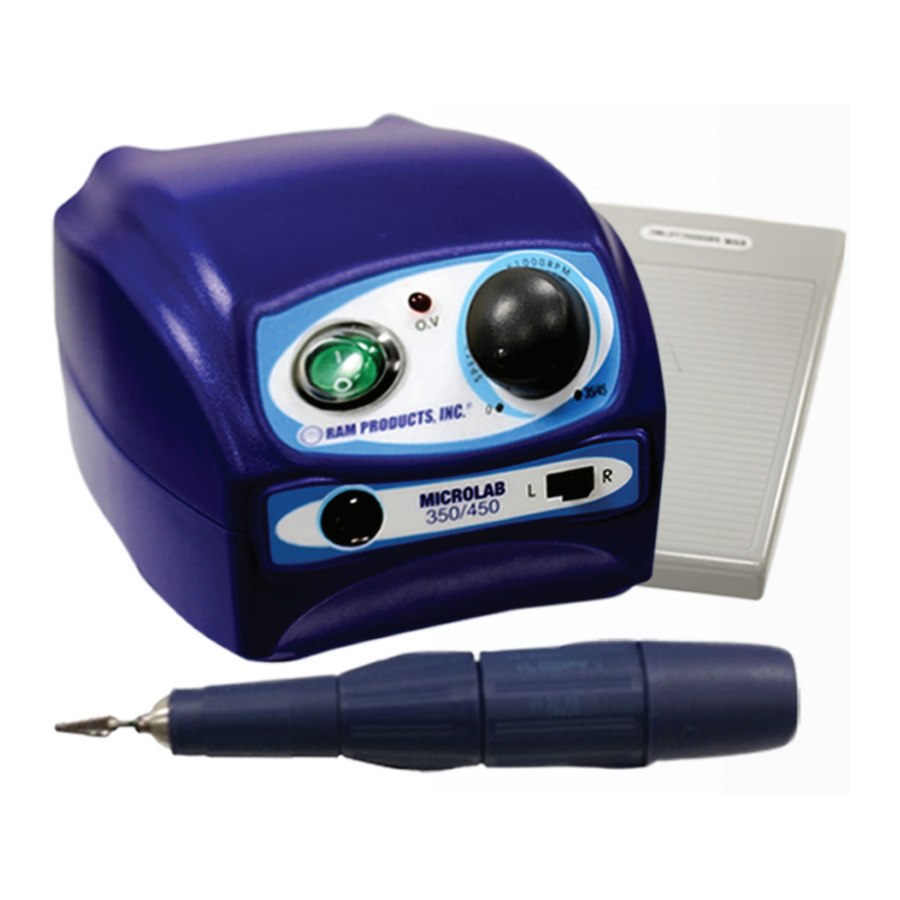
[PART NAME]

- CONTROL BOX
- HANDPIECE
- SPEED FOOT PEDAL
ON/OFF FOOT PEDAL - POWER SWITCH
- FORWARD-REVERSE SWITCH
- MOTOR CONNECTOR
- SPEED CONTROL DIAL
- FOOT PEDAL CONNECTOR
- POWER CONNECTOR
- FUSE HOLDER
- HAND FOOT SWITCH

In case of easy chuck change type or front-chuck-open type (Forte, 103L, 107 and 102 WL HP), please use it after checking the bur is completely lock. This is because the chuck could be loose after chuck or bur change.
- Hold handpiece with one hand and with the other hand, turn on the power of control box.
- Check handpiece running normally controlling speed dial in control box.
- Turn off the power and connect the foot pedal to control box. Check speed operating of the pedal.
- Turn off the power and switch to reverse direction. Turn on the power and check the operating.
Please turn off the switch when you do not use the unit
- Do not work in a dangerous place. Do not use the control box in a humid place.
- Transport and storage conditions:
Temperature: 1~40oC
Humidity 30~75% RH
Atmospheric Pressure: 700 hPa to 1060 hPa - Our handpiece & foot pedal should be only used for our control unit.
- Bur
*Dimensions of the bur: 2.35mm (ISO7785-2 TYPE2)
*Minimum fitting length of bur: 10mm
*When locked in the chuck the maximum projection length of should be less than 3mm Use a bur the conform to the ISO standards. Avoid using a rusty or bent bur that may cause excessive wear of bearings.
Keep safe speed, and precautions recommended by bur manufacturer. - Check for any troubles, including vibration of bur, at low speed, and then start high speed.
- Operate the speed control dial in control box softly
- Use a fuse of 220V/230V/2A for control box.
- Turn off the power in order to change the bur.
- Be careful not to drop the handpiece as it may be damages or broken. In that case it is dropped, check if the bur is bent or if any excessive heat is generated while carefully operating it.
- If any problem occurs in handpiece use after repairing.
- Do not turn on the power of control box while the collet chuck of handpiece open (Short circuit of the motor may be caused).
- Make sure that the switch is off before putting the power plug in the socket, in order to avoid an unexpected injury due to sudden start.
- A circuit breaker is provided to protect the motor. It is actuated when there is an overload which the motor cannot stand. Work within a range of load which it is not actuated.
- Do not open the chuck while operating.
- Keep the handpiece with setting a bur to the collet church after operation.
- Do not put the handpiece down before it stops completely.
- Be sure to pull out the power cord before moving the control box.
- Use the specified voltage.
- Use accessories suitable for this product.
- For recommended speed in various applications, follow the manufacturer's instructions.
- Wear proper protective clothes and equipment, including a dust mask and safety googles. Use a proper suction unit and ventilator.
- Keep the work place clean. Debris may cause an accident.
[The allowable RPM according to the bur diameter]
Please keep the RPM according to below diagram against the accident.
<The allowable RPM could be different from the bur material and type.

[CONTROL BOX ]
| problem | check | cause | solution |
| The motor does not run | The power is out. | The control box may have a problem | Check the fuse. |
| The power lamp is out, when the power switch turn on | Check the connection of power cord | Connect the power cord properly. | |
| The handpiece does not run, when the hand/foot switch is on and power lamp is on. | Check if the OV (overload) lamp is on | Turn o the power and then turn on. | |
| Open the end cap of handpiece and check the burnt smell. | Ask to the seller. | ||
| Check the connection connector and HP cord | Connect the handpiece properly | ||
| Check the pedal connection. | Connect the pedal properly | ||
| check if the cord is broke down or disconnected. | Ask the seller. | ||
| Check the carbon brush | Change the carbon brush or ask to the seller | ||
| The motor uns | Speed control is out The control box | may have a problem. | Ask to the seller |
[HANDPIECE]
| problem | cause | solution |
| The handpiece does not run although the chuck is lock. | Check the connection of bearing, carbon brush, control box | Ask to the seller. |
| The handpiece is getting warm during use. | Check the bearing. | Ask to the seller. |
| The noise and vibration | Check the bearing and chuck. | Ask to the seller. |
| happen during use. | Check if the bur is bent | Change the bur. |
REPLACEMENT OF FUSE
The fuse is in a small fuse box beside the power connector at the back of the control box
Pull out the fuse box then replace it with a new one
(120V-T3.15A/250V,230V-T2A/250V)
CHANGE CARBON BRUSH
Please make sure the power is off, before you change the carbon brush. Please run the motor for 1 minute with non-load in order to put the carbon brush in right place.
Please check periodically the carbon brush wear in order to prevent the sever damage.
The motor can be damaged if the carbon brush worn out is not changed in proper time.
[ 102, 102L, 102LS, 102WL, 102L, 107II, 120II, 108E, 108EI ]
- Unscrew the carbon bolt. The terminal is separated at the same time.
![]()
- Change carbon brush.
![]()
![]()


[130]
- Unscrew the bolt 130-23 and unscrew 130-13 fixed the carbon brush.
![]()
- Remove the soldered carbon and change the new one.
![]()


CHANGE COLLET CHUCK
[STRONG102WL]-Easy chuck open type

- Open the chuck and remove the bur.
![]()
- Fix the wrench to chuck and turn into
![]()


- Set and fix the wrench turning the bur.
![]()
- Turn to open direction. check open.
![]()
- Turn the chuck to the counter-clockwise In case of not turning by hand, use wrench.
- Change the chuck.
- Fix the bur and chuck turning to clockwise.
And then turn again to counter clockwise a bit and set the tension to remove the bur.


Lock the handle properly.
If the handle is turned continuously with pressure, the handle and motor part may be disassemble.
If not skilled engineer, do not disassemble. It may cause the breakage.
For the replacing the ball bearings, fix the wrench on the nose tip and then turn the handle to the "open" direction.
Turn the wrench and loosen the nose tip slightly. Turn the handle again to the "close" direction.
Spin the wrench again until the nose tip is disassembled and then bearings can be replaced.
However, if the process is not followed property, the nose tip may be damaged or broken.
If not skilled engineer, do not disassemble.
[STRONG 102, 102L, 102LS, 107II,120II]

- Fix the wrench to the collet chuck in spindle assyr and turn to the arrow mark direction with screwdriver.
![]()
- Change the chuck.
![]()


Clean and assembly the chuck very carefully..
If not skilled engineer, do not disassemble the handle and motor part.
It may cause the breakage.
If disassembled, delrin joint of handle and the shaft of the motor part has to be fit each other.
If it doesn't, vibration, nose, heat and bearing damage may caused.
*If the chuck is not open, please turn it with the wrench.
SUGGESTION FOR MAINTENANCE
- Keep the place around in the handpiece clean from dust and grindings.
- Remove dust on handpiece wiping with isopropyl alcohol and avoid wet inside.
Do not apply the oil to the goods or clean with water. The grease inside of the bearing could melt away due to the oil. - Air cleaning is acceptable but air pressure may affect the handpiece or motor.
- Insertion and removal of bur
Turn the handle in the open direction to open the chuck.
Then the chuck is opened and the bur is removed, turn the handle in the close direction, and the chuck is closed and the bur is recurred. Turn the ring until a click sound.
FOR YOUR SAFETY, KEEP THE FOLLOWING
- Do not use with damaged our faulty power cord, plug, and outlet, contact to the manufacturer. If may cause the danger of fire, electric shock.
- When unplug the power cord, hold the plug and do not touch with wet hand. Do to use with loosing power plug causing the danger of electric shock and fire.
- Do not bend the power cord excessively and do not press with heavy things. If may cause electric shock and fire.
- Do not place near heat equipment and candles or cigarette causing fire.
- Close supervision needs if this product is used by or near by the very young, the elderly or invalid.
- Do not leave children unattended in any room where this products has been installed.
- Type of protection against electric shock: Class I equipment
- Degree of protection against electric shock: Type B applied parts
- Classification according to the degree of protection against ingress of water as detailed in the current edition of IEC 60529:
Equipment: IPX0, ordinary equipment
Foot witch: IPXI - This equipment is not suitable for use in the presence of flammable anesthetics or oxygen
- Made of operation: continuous operation
- "This equipment has been tested and found to comply with the limits for medical devices in IEC 60601-1-2:1994. These limits are designed to provide reasonable protection against harmful interference in a typical medical installation. This equipment generates, uses and can radiate radio frequency energy and, if not installed and used in accordance with the instructions, may cause harmful interference to others devices in the vicinity. However, there is no guarantee that interference will not occur in a particular installation. If this equipment does cause harmful interference to other devices, which can be determined by turning the equipment o and on the user is encouraged to try to correct the interference by one or more of the following measures:
- Reorient or relocate the receiving device.
- Increase the separation between the equipment.
- Connect the equipment into an outlet on a circuit different from that to which the other device(s) are connected.
- Consult the manufacturer or eld services technician for help. "
- Use the grounding conductor. Breakage or electric leak may cause the danger of electric shock. For grounding, inquiry to electrician or to main office.
- In case of using extension cord, do not use many electricity equipments in one time. It causes fire and electric shock.
- Do not place or set up the product in the humid and rainy or snowy location. It brings the danger of electric shock and fire.
- Do not drop or damage the handpiece. In case of malfunction, dropping, drowning, do not use and contact to the manufacturer, (If may cause vibration of the bur, overheating, or damage of the bearings.)
- Use the products in proper use as per the instruction and do not use not recommended by the manufacturer.
- If may cause injury or property loss if not following the instructions.
- Saeshin is not responsible for the accident causing by not following the instructions.
Ram Products, Inc.
182 Ridge Road, Suite D
Dayton, N.J. 08810
Monday thru Friday 8:30 - 6:30 EST
Phone: 1-877-RAM-PROD / 1-732-651-5500
Fax: 1-732-651-6688 or e-mail us at ram@ramhp.com
182 Ridge Road, Suite D Dayton, N.J. 08810
www.ramprodinc.com
Phone: 1-877-RAM-PROD / 1-732-651-5500

Documents / Resources
References
Download manual
Here you can download full pdf version of manual, it may contain additional safety instructions, warranty information, FCC rules, etc.
Download RAM MICROLAB 350, MICROLAB 450 - Dental Equipment Manual
Advertisement

Need help?
Do you have a question about the MICROLAB 350 and is the answer not in the manual?
Questions and answers