Advertisement
Controls and Functions

Front Antenna, Radar and Laser
Needs unobstructed view ahead.
Volume +
Volume –
Press-and-hold to raise or lower Initial Volume. Sound level 0-9 indicated in display.
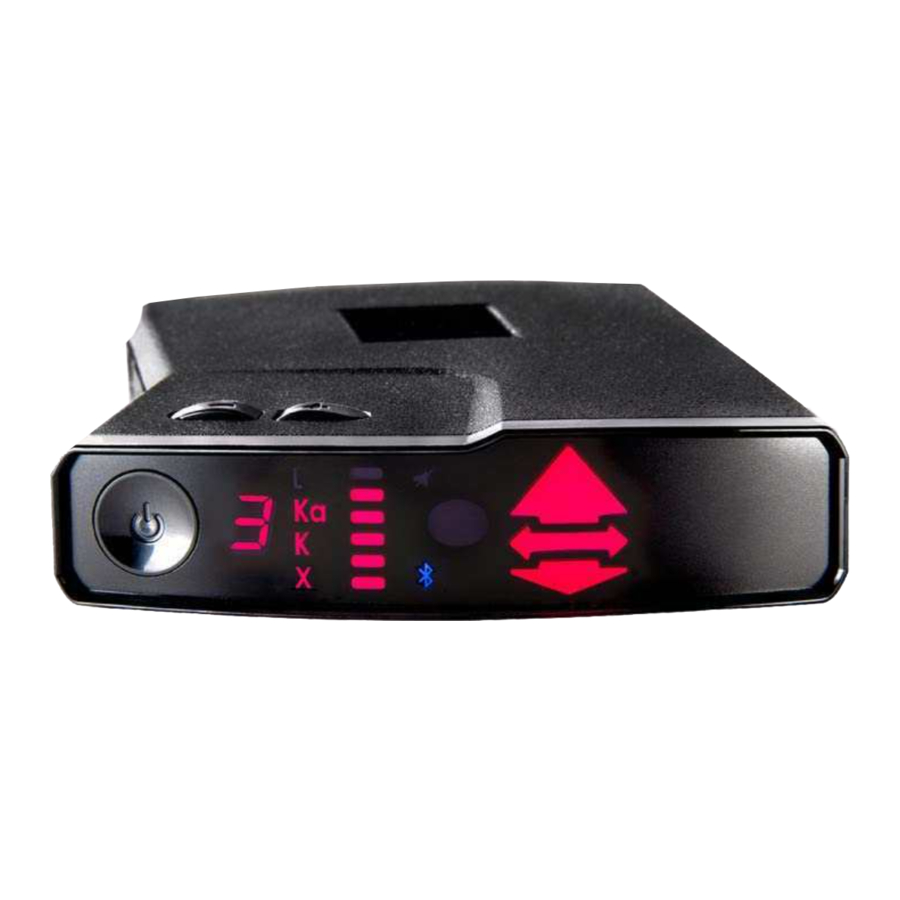
Control Button
Power on - Tap Control
Button Power off - Press-and-hold Control Button until display goes dark (4.75 seconds)
Changing modes - Press-and-hold Control Button for 1.5 seconds
Muting - Tap Control Button during an alert
Bogey Counter
Blank - Power off
 - Power on, All-Bogeys mode
 - Power on, Logic mode
 - Power on, Advanced-Logic mode
 - One bogey
 etc. - Number of bogeys being tracked
 - Laser warning
 - Alert terminated; not radar
Band Identification
NOTE: In the case of multiple bogeys on different bands, a blinking icon will indicate the strongest threat.
Radar-strength Indicator
More blocks glow as radar gets stronger.
Bluetooth icon
Illuminated when connected.
Radar Locator

Radar ahead

Radar beside

Radar behind
NOTE: In the case of multiple bogeys from different directions, an arrow will glow for each direction. The strongest threat will be indicated by a blinking arrow. The audio warning will correspond to the blinking arrow.
Rear Radar Antenna
Needs unobstructed view behind.
Rear Laser Sensor
Needs unobstructed view behind.
Mute icon
Illuminated when volume is muted.

How to mount

Using one of the supplied mounts, starting from the front-antenna end of the detector, slide it into the mounting grooves on each side of the detector. Position the detector so the front antenna looks through the windshield and the rear antenna has a clear view to the rear of your car. Stay clear of the wipers and the black mask at top of the glass.

When the detector is properly orientated, the driver will see this view.

SAFETY WARNING: Because a detector on a windshield mount or visor mount is not permanently attached to the car, it could come loose in a crash, possibly causing injury. Also, a passenger may move forward on impact and contact the detector. Keep these possibilities in mind when you mount your Valentine One.

How to connect to 12V

Plug one end of the supplied power cords into the detector's RJ11 connector. Plug the other end into the Lighter Adapter jack marked "MAIN" and insert the adapter into the car's 12V socket. If your vehicle has only a USB socket, you'll need to purchase a USB-to-12V Convertor.
How to connect a headphone
Plug headphone jack into the detector's 3.5mm socket.
For Bluetooth headphones, connect through your phone.
How to set Muted Volume
In addition to the Initial Volume, you can also set the sound level you will hear after muting: Tap ![]() or
or ![]() to start the test tone.
to start the test tone.
Tap the Control Button (Mute icon will appear), then press ![]() or
or ![]() until you've reached your preferred sound level. Sound level 0-9 indicated in display.
until you've reached your preferred sound level. Sound level 0-9 indicated in display.
Display readings
- If the display is dark:
- Power is off, or;
- A Concealed Display is connected, or;
- Dark Mode has been enabled in the app.
- With power on, in the absence of alerts, the current Mode will be displayed.
- During alerts,
- The Mode indication will be replaced by the Bogey Count (number of radar signals in range).
- Signal strength indicated by a vertical bar graph.
How to set Analyzer Modes
With power on in the absence of an alert, press-and-hold the Control Button repeatedly to step through the three available Analyzer Modes.
- In All-Bogeys mode
![]() , all bogeys will be reported at the Initial Volume as soon as they are detected. Use your judgment to decide whether or not they are threats.
, all bogeys will be reported at the Initial Volume as soon as they are detected. Use your judgment to decide whether or not they are threats. - In Logic mode
![]() , X- and K-band bogeys assessed to be too weak to be threats will be reported at the Muted Volume. If and when they become threats, the audio warning will increase to the Initial Volume.
, X- and K-band bogeys assessed to be too weak to be threats will be reported at the Muted Volume. If and when they become threats, the audio warning will increase to the Initial Volume. - In Advanced Logic mode
![]() , X- and K-band bogeys the Analyzer determines to be unthreatening will not be reported at all. Threats will be reported at Initial Volume. This mode is particularly useful in metro areas. One exception: to be failsafe, the Analyzer will always pass extremely strong alerts along to you for your judgment.
, X- and K-band bogeys the Analyzer determines to be unthreatening will not be reported at all. Threats will be reported at Initial Volume. This mode is particularly useful in metro areas. One exception: to be failsafe, the Analyzer will always pass extremely strong alerts along to you for your judgment.
NOTE: In Logic mode ![]() and Advanced Logic mode
and Advanced Logic mode ![]() , you are deferring to an algorithm that will assess the threat level and report accordingly.
, you are deferring to an algorithm that will assess the threat level and report accordingly.
Be assured that the Analyzer has years of radar experience. It always operates the receiving circuitry at maximum sensitivity, and it knows that instant-on radar is a greater threat than ordinary radar. Therefore it will always warn of instant-on immediately at the Initial Volume whenever it is detected.
How to get our free app
Go to your app store and download V1connection, the app.


How to connect the device to your phone
Pairing: V1connection the app will automatically connect to V1 Gen2. If you are prompted to select a V1 Gen2, select the one with the highest (least negative) RSSI value from the list. V1 Gen2's Bluetooth icon ![]() will turn on when the app is connected.
will turn on when the app is connected.
NOTE: The V1 Gen2 will not be shown in the list of Bluetooth devices on your iPhone, iPad or iPod touch.
Valentine Research
10280 Alliance Road
Cincinnati OH 45242
(513) 984-8900
1-(800)331-3030
www.valentine1.com;
Valentine One Generation 2 is a trademark of Valentine Research, Inc.

Documents / Resources
References
Download manual
Here you can download full pdf version of manual, it may contain additional safety instructions, warranty information, FCC rules, etc.
Download Valentine One V1 Gen 2 - Radar Detector Quick Start Guide
Advertisement
Need help?
Do you have a question about the One V1 Gen 2 and is the answer not in the manual?
Questions and answers