Advertisement
Operation
Note: Enroll the device by scanning the QR code that is on the device, or follow the instructions for enrolling the device to the panel.
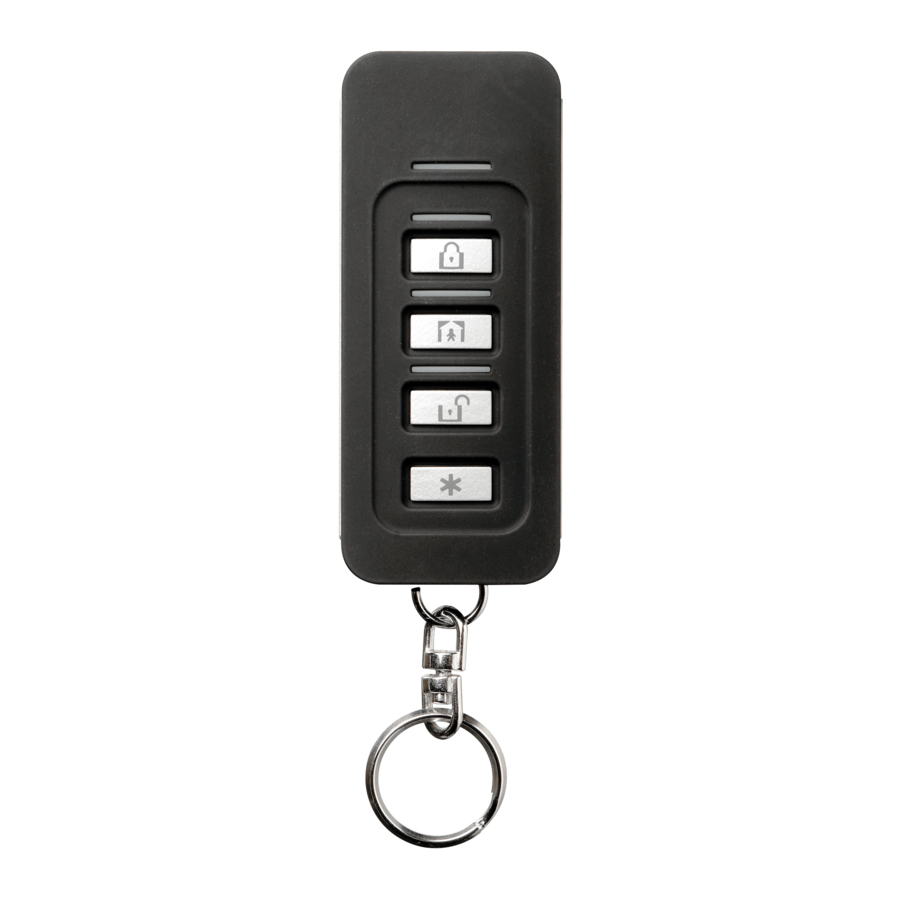
Note: For UL Listed Product, Panic is for ancillary use only. The PG9929/PG8929/PG4929 is a programmable four-button, multi-LED, 2-way wireless key. The wireless key can be configured to transmit up to five separate commands to the alarm system. Four of the commands are transmitted by pressing one of the buttons separately, and the fifth is by pressing button 1 and 2 (as shown below) simultaneously. Sending a command to the system causes the red LED to briefly illuminate. If the system successfully acknowledges the command the green LED briefly lights, then the associated blue LED lights and the acknowledgment tone sounds. If the system cannot perform the command the red LED briefly lights and the error tone sounds. If the wireless key battery is low the yellow LED blinks for 2 seconds. If there is a trouble on the system the yellow LED lights for 2 seconds. The default configuration of each button is as follows:

- AWAY arm
- STAY arm
- DISARM
- PANIC
- Command Output 1 (buttons 1 and 2)
- Message LED
- Status LEDs
Device Setup
Enrollment
To quick enroll:
- On a keypad press [*] [8] [Installer Code] [804] [000].
- Press and hold the [*] button on the wireless key until the LED lights steady and then release the [*] button while the LED is still lit and a confirmation message appears on the keypad.
- Press [*] on the keypad to confirm the device ID.
- Enter [3 digit wireless key #]
- Assign the wireless key to a partition by entering the [three digit partition #].
- To assign the wireless key to a user enter the [3 digit user #].
To pre-enroll:
- Remotely configure the unique ID number into the system. For more information see the HSM2HOST manual.
- When on-site, press the [*] button on the wireless key.
Programming Buttons
To change button programming:
- From a keypad enter [*] [8] [Installer Code] [804][601] to [632].
- Configure button 1 (Away Arm) using the table below. Enter the desired two digit option.
- Configure button 2 (Stay Arm) by entering the desired two digit option and repeat for button 3 (Disarm), button 4 (Panic) and button 5 (buttons 1 and 2 pressed simultaneously).
| 00 | Disabled | 16 | Quick Exit |
| 01 | Disarm | 17 | Arm Interior |
| 02 | Instant Stay Arm | 21 | Comm. Output 1 |
| 03 | Stay Arm | 22 | Comm. Output 2 |
| 04 | Away Arm | 23 | Comm. Output 3 |
| 05 | [*][9] No Entry | 24 | Comm. Output 4 |
| 06 | Chime On/Off | 29 | Bypass Group Recall |
| 07 | System Test | 30 | Quick Bypass |
| 09 | Night Arm | 33 | Bypass Recall |
| 11 | Away Arm no Entry | 36 | Reactivate Stay/Away/ Night |
| 12 | Global Stay Arm | 51 | Aux. Alarm |
| 13 | Global Away Arm | 52 | Panic |
| 14 | Global Disarm |
Configuration
To enter the wireless configuration section enter [804][601].
Device Toggles
[011][01]
Supervision - Default [N]
Enables supervision of the device.
Maintenance
Replacing the Battery
The required battery is CR2032 Lithium 3V, manufactured by VARTA or Energizer, purchased from a DSC-approved supplier.
When this wireless key is out of use, remove all batteries and dispose of them separately. Bring electrical appliances to the local collecting points for waste electrical and electronic equipment. Batteries are harmful to the environment, Please help to protect the environment from health risks.
Replace the battery at least once every 5 years, or upon observing that the LED flickers when transmitting.
Note: The polarity of the battery must be observed. Improper handling of lithium batteries may result in heat generation, explosion or fire, which may lead to personal injuries.

Danger of explosion if batteries are installed incorrectly. Replace only with the same or equivalent type recommended by the manufacturer. Keep away from small children. If batteries are swallowed, promptly see a doctor. Do not try to recharge these batteries. Disposal of used batteries must be made in accordance with the waste recovery and recycling regulations in your area.
- Remove backside screw and open the cover.


- Button pad
- LED indicator
- Battery holder
- Battery
- Using a screwdriver, push out the battery from its holder and install new battery.
- Reattach the cover and securely fasten with screw.
- Test the unit by pressing one of the buttons. The LED should blink.
Cleaning
The use of abrasives of any kind and solvents such as kerosene, acetone or thinner is strictly forbidden.
Clean the wireless key only with a soft cloth or sponge moistened lightly with a mixture of water and mild detergent, and wipe it dry immediately.
Testing
Always test the system at least once per a year.
- Ensure the device is enrolled in the system.
- Stand 3 m (10 ft) away from the control panel and press a button. Verify that the transmit LED lights and the control panel responds as programmed.
- Operate the wireless key from various locations within the area covered by the receiver to determine "dead" locations, where transmission is blocked by walls and large objects, or affected by structural materials.
Note: If dead/marginal zones are a problem, relocating the receiver may improve the performance.
Specifications
Frequency Band (MHz): CE Listed PG4929: 433-434MHz; CE/EN listed PG8929: 868-869MHz; FCC/IC/UL/ULC listed PG9929: 912-919MHz
Communication Protocol: PowerG
Battery type: For UL/ULC listed installation use only Varta or Energizer 3V CR-2032 Lithium battery consumer grade
Battery Life Expectancy: 5 years (not verified by UL/ULC)
Low Battery Threshold: 2.1 V
Note: If transmission is still possible despite the battery condition, the unit will send a low battery signal to the control panel.
Temperature range: -10ºC to +55ºC (UL only verified the range 0º-49ºC)
Relative Humidity: up to max. 93%RH non-condensing
Dimensions (LxWxD): 67 x 27.6 x 12 mm (2.64 x 1.09 x 0.47 in.).
Weight (including battery): 25 g (0.9 oz).
Color: Black
Note: To be used in non-hazardous locations only.
Compatible Receivers
433MHz Band: HSM2HOST4; HS2LCDRF(P)4; HS2ICNRF(P)4; PG4920
868MHz Band: HSM2HOST8; HS2LCDRF(P)8; HS2ICNRF(P)8; PG8920
912-919MHz Band: HSM2HOST9; HS2LCDRF(P)9; HS2ICNRF(P)9; PG9920
Note: Only devices operating in band 912-919MHz are UL/ULC listed.
HS2ICNRF(P)9; PG9920
Note: Only devices operating in band 912-919MHz are UL/ULC listed.
Toronto, Canada
www.dsc.com
Tech. Support: 1-800-3873630 (Canada, US), 905-760-3000

Documents / Resources
References
Download manual
Here you can download full pdf version of manual, it may contain additional safety instructions, warranty information, FCC rules, etc.
Download Tyco PG9929, PG8929, PG4929 - 2-Way Wireless Key Manual
Advertisement

Need help?
Do you have a question about the PG9929 and is the answer not in the manual?
Questions and answers