Danby DBTO0412BBSS - 0.4 cu. ft./12L 4 Slice Toaster Oven Manual
- Owner's manual (33 pages)
Advertisement
Introduction
We are proud of our quality products and we believe in dependable service. We suggest that you read this owner's manual before plugging in your new appliance as it contains important operation information, safety information, troubleshooting, and maintenance tips to ensure the reliability and longevity of your appliance.
You are entitled to the warranty coverage as described in the owner's manual provided with your new appliance.
- Please write down your appliance information below. You must keep the original proof of purchase receipt to validate and receive warranty services.
- Register your product online and receive a FREE 2 MONTH WARRANTY EXTENSION after fi lling out a product survey, at www.danby.com/support/product-registration/
Need Help?
- Read your Owner's Manual for installation help, troubleshooting, and maintenance assistance.
- Visit www.Danby.com to access self-service tools, FAQs and much more by searching your model number in the search bar.
- For the Quickest Customer Service, please fi ll out the web form at www.danby.com/ support. Your submission will go directly to an expert on your particular appliance. Our average response times are between 20 minutes and 2 hours, during EST business hours.
- Call 1-800-263-2629 - please note that during peak hours, hold times can exceed one hour.
Important Safety Information

READ AND FOLLOW ALL SAFETY INSTRUCTIONS
SAFETY REQUIREMENTS
- Read all instructions.
- Do not touch hot surfaces. Use handles or knobs.
- To protect against electrical shock do not immerse cord, plugs or any other part of the appliance in water or any other liquid.
- Close supervision is necessary when any appliance is use by or near children.
- Unplug from the wall outlet when not in use and before cleaning. Allow to cool before putting on or taking off parts.
- Do not operate any appliance with a damaged cord or plug or after the appliance malfunctions or has been damaged in any manner. Return the appliance to the nearest authorized service facility for examination, repair or adjustment.
- The use of accessory attachments not recommended by the appliance manufacturer may cause injuries.
- Do not use outdoors.
- Do not let the cord hang over the edge of the table or counter or touch hot surfaces.
- Do not place on or near a hot gas or electric burner or in a heated oven.
- Extreme caution must be used when moving an appliance containing hot oil or other hot liquids.
- Always attach the plug to the appliance fi rst and then plug the cord into the wall outlet. To disconnect, turn any control to "off" and then remove the plug from the wall outlet.
- Do not use the appliance for other than its intended use.
- When operating the oven keep at least 4 inches of space on all sides of the oven to allow for adequate air circulation.
- Do not rest cooking utensils or baking dishes on the glass door.
- The maximum weight of food allowed on the food tray/wire rack can not be more than 3.0 kg. Do not concentrate the food on one side of the food tray/wire rack, place food evenly.
- The rear surface of the appliance should be placed against a wall.
- Oversize foods, metal foil packages or utensils must not be inserted in a toaster as they may involve a risk of fi re or electric shock.
- A fi re may occur if toasters are covered or touching fl ammable material including curtains, draperies, walls and the like when in operation.
- Do not attempt to dislodge food when the toaster is plugged in.
- Do not operate unattended.
- When heater toaster pastries, always use the lightest toaster colour setting.
- Do not clean with metal scouring pads. Pieces can break off the pad and touch electrical parts involving risk of electric shock.
- Extreme caution should be exercised when using containers constructed of anything other than metal or glass.
- Do not store any materials other than the manufacturers recommended accessories inside this oven when not in use.
- Do not place fl ammable materials such as paper, cardboard, plastic, etc, in the oven.
- Do not cover the crumb tray or any part of the oven with metal foil. This will cause overheating of the oven.
- This appliance has a tempered safety glass door. The glass is stronger than ordinary glass and more resistant to breakage. Tempered glass can break but the edges will not be sharp. Avoid scratching the door surface or nicking the edges. If the door glass has a scratch or nick, contact consumer service before using the oven.
- The temperature of the door or the outer surface may be higher when the appliance is working.
- Temperature of accessible surfaces may be high when the appliance is operating.
- This appliance is intended to be used in household and similar applications such as: farm houses; staff kitchen areas in shops, offi ces and other working environments; by clients in hotels, motels and other residential type environments; bed and breakfast type environments.
- Protect against hurt by sharp edge when action.
- Children should be supervised to ensure that they do not play with the appliance.
- Do not place on or near a hot gas or electric burner or inside a heated oven.
- Turn the timer knob to "OFF" to the turn the appliance off.
- Appliances are not intended to be operated by means of an external timer or separate remote control system.
- This appliance can be used by children aged 8 years and above if they have been given supervision or instruction concerning use of the appliance in a safe way and understand the hazards involved.
- Cleaning and user maintenance shall not be made by children without supervision.

This appliance includes a heating function. Surfaces, other than the functional surfaces may develop high temperatures. Since temperatures are perceived differently by different people, this device should be used with CAUTION. Hold the appliance exclusively to grip surfaces intended to hold and use such heat protection measures as heat protection Gloves or pot holders. Areas which are not intended to grips must be given suffi cient time to cool.

APPLIANCE SURFACES ARE HOT AFTER USE. ALWAYS wear protective, insulated oven gloves when touching hot oven or hot dishes and food, or when inserting or removing rack, pans or baking dishes.
GROUNDING INSTRUCTIONS
This appliance must be grounded. Grounding reduces the risk of electrical shock by providing an escape wire for the electrical current.
This appliance has a cord that has a grounding wire with a 3-prong plug. The power cord must be plugged into an outlet that is properly grounded. If the outlet is a 2-prong wall outlet, it must be replaced with a properly grounded 3-prong wall outlet. The serial rating plate indicates the voltage and frequency the appliance is designed for.
Improper use of the grounding plug can result in a risk of electric shock. Consult a qualifi ed electrician or service agent if the grounding instructions are not completely understood, or if doubt exists as to whether the appliance is properly grounded.
Do not connect your appliance to extension cords or together with another appliance in the same wall outlet. Do not splice the power cord. Do not under any circumstances cut or remove the third ground prong from the power cord. Do not use extension cords or ungrounded (two prongs) adapters.
If the power supply cord is damaged, it must be replaced by the manufacturer, its service agent or similar qualifi ed person in order to avoid hazard.
Have a qualifi ed electrician install a grounded outlet near the appliance if the power cord is too short. A short power supply cord is provided to reduce the risks resulting from becoming entangled or tripping over a longer power cord.
SAVE THESE INSTRUCTIONS!
BEFORE FIRST USE
- Unpack the appliance.
- Remove all racks and pans. Wash the racks and pans in hot sudsy water or in dishwasher.
- Thoroughly dry all accessories and re-assemble in the oven. Plug the oven into the outlet and it is ready to use.
- It is recommended to run the oven at MAX temperature for 15 minutes before using for the fi rst time to eliminate and packing oil that may remain after shipping.
Note: The oven may produce smoke during this process. This is normal for a new oven and will not last more than 10 - 15 minutes.
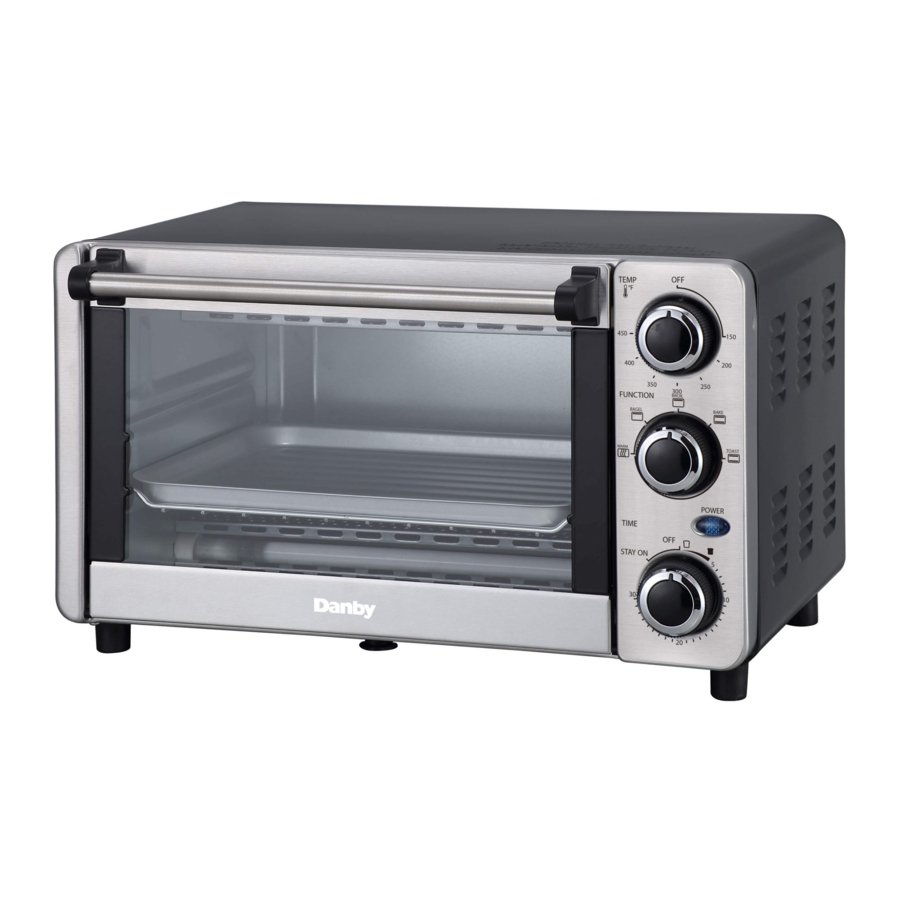
FEATURES

- Door handle
- Housing
- Temperature knob
- Function knob
- Indicator light
- Time knob
- Baking rack
- Baking tray
CONTROL PANEL

Time Setting
0-30 MINUTES: The timer can be set up to 30 minutes. The oven will not turn "stay on" without the timer being set. When the time knob is in the "OFF" position the oven will not operate.
To set the time, turn the knob clockwise to the desired time. Indicator light is lit only when time has been set. When the timer has reached the OFF position, a bell sound will be heard. Power supply will be cut off automatically.
Adjusting Time
Timer can be change during cooking cycle. Just turn the timer knob to the desired time and continue cooking.
Note: To select the cooking time, fi rst rotate the timer knob more than 90 degrees and then turn the switch back to the time you require.
Temperature Setting
Turn the temperature knob clockwise to the desired temperature setting. The temperature can be set from 150°F to 450°F.
STAY ON
To use the toaster without setting a time, turn the timer knob to position "stay on". In this setting, the toaster will continue to operate at the set temperature until the oven is manually turned off.
Note: The food may catch fi re is the cooking time is allowed to run too long. Close supervision is necessary when using this setting.
FUNCTION SETTING
The oven includes fi ve different functions for versatile cooking all in one appliance.
WARM: ![]()
- The lower heating elements are working
BAGEL: ![]()
- The upper heating elements are working
BROIL: ![]()
- The upper heating elements are working
BAKE: ![]()
- The upper and lower heating elements are working
TOAST: ![]()
- The upper and lower heating elements are working
COOKING INSTRUCTIONS
- Place the baking rack in position that will accommodate the height of the food to be cooked.
- Set the food on the rock. Make sure that you always use an oven proof container in the oven, never use plastic or cardboard containers.
- Never use glass or ceramic pans or lids.
- Do not let juices run into the bottom of the oven. Use the crumb tray when cooking.
- Set the temperature as suggested by the recipe or as desired.
- Securely shut the door and set the cooking time to begin operating the oven.
Warm
Use the warm function for foods such as less tender cuts of meat, soups and stews.
- Place the baking rack to the desired height.
- Set the function knob to warm.
- Select the desired length of time.
- Rotate the temperature knob clockwise to the desired temperature.
- Continue baking for desired length of time.
- Check food temperatures before moving to ensure that proper internal temperatures have been reached.
- Always remove food with oven mitts. Food and oven are very hot.
Bagel
The bagel function is ideal for fi sh, beef, etc.
- Place the baking rack to the desired height.
- Set the function knob to bagel.
- Select the desired length of time.
- Rotate the temperature knob clockwise to the desired temperature.
- Continue baking for desired length of time.
- Check food temperatures before moving to ensure that proper internal temperatures have been reached.
- Always remove food with oven mitts. Food and oven are very hot.
Broil
The broil function is ideal for steak, vegetables, etc.
- Place the baking rack to the desired height.
- Set the function knob to broil.
- Select the desired length of time.
- Rotate the temperature knob clockwise to the desired temperature.
- Continue baking for desired length of time.
- Check food temperatures before moving to ensure that proper internal temperatures have been reached.
- Always remove food with oven mitts. Food and oven are very hot.
Bake
The bake function can be used for foods such as corn, bread, etc.
- Place the baking rack to the desired height.
- Set the function knob to bake.
- Select the desired length of time.
- Rotate the temperature knob clockwise to the desired temperature.
- Continue baking for desired length of time.
- Check food temperatures before moving to ensure that proper internal temperatures have been reached.
- Always remove food with oven mitts. Food and oven are very hot.
Toast
The toast function can be used for foods such as cookies, reheating food, etc.
- Place the baking rack to the desired height.
- Set the function knob to toast.
- Select the desired length of time.
- Rotate the temperature knob clockwise to the desired temperature.
- Continue baking for desired length of time.
- Check food temperatures before moving to ensure that proper internal temperatures have been reached.
- Always remove food with oven mitts. Food and oven are very hot.
CARE & MAINTENANCE
MAINTENANCE
This appliance requires very little maintenance. It contains no user serviceable parts. Do not try to repair it yourself. Contact a qualifi ed appliance repair technician if the product requires servicing.
CLEANING
To protect against electrical shock DO NOT IMMERSE THE OVEN IN WATER OR ANY OTHER LIQUIDS.
The oven should be cleaned regularly for best performance and long life. Regular cleaning will also reduce the risk of fi re hazard.
- Remove the plug from the electrical outlet. Allow the oven to cool completely before completely any cleaning.
- Wash all attachments with a damp, soapy cloth. Make sure to only use mild soap.
- To clean the inside of the oven, wipe the oven walls, bottom and glass door with a damp, soapy cloth. Repeat with a dry, clean cloth.
- Wipe the outside of the oven with a damp cloth.
Do not use abrasive cleaners, scrubbing crushes or chemical cleaners as this will damage the non-stick coating of the baking tray.
LONG-TERM STORAGE
Allow the appliance to completely cool and dry before placing into storage.
If storing the oven for long periods of time make certain that the oven is clean and free of food particles.
Store the oven in a dry location such as on a table or counter top or cupboard shelf.
Other than recommended cleaning, no further user maintenance should be necessary. Any other servicing should be performed by an authorized service representative.

Documents / Resources
References
Download manual
Here you can download full pdf version of manual, it may contain additional safety instructions, warranty information, FCC rules, etc.
Download Danby DBTO0412BBSS - 0.4 cu. ft./12L 4 Slice Toaster Oven Manual
Advertisement


Need help?
Do you have a question about the DBTO0412BBSS and is the answer not in the manual?
Questions and answers