Advertisement
In order to ensure that you get the best use out of this product, please read the following instructions before using.
Please keep these instructions in a safe place for future reference.
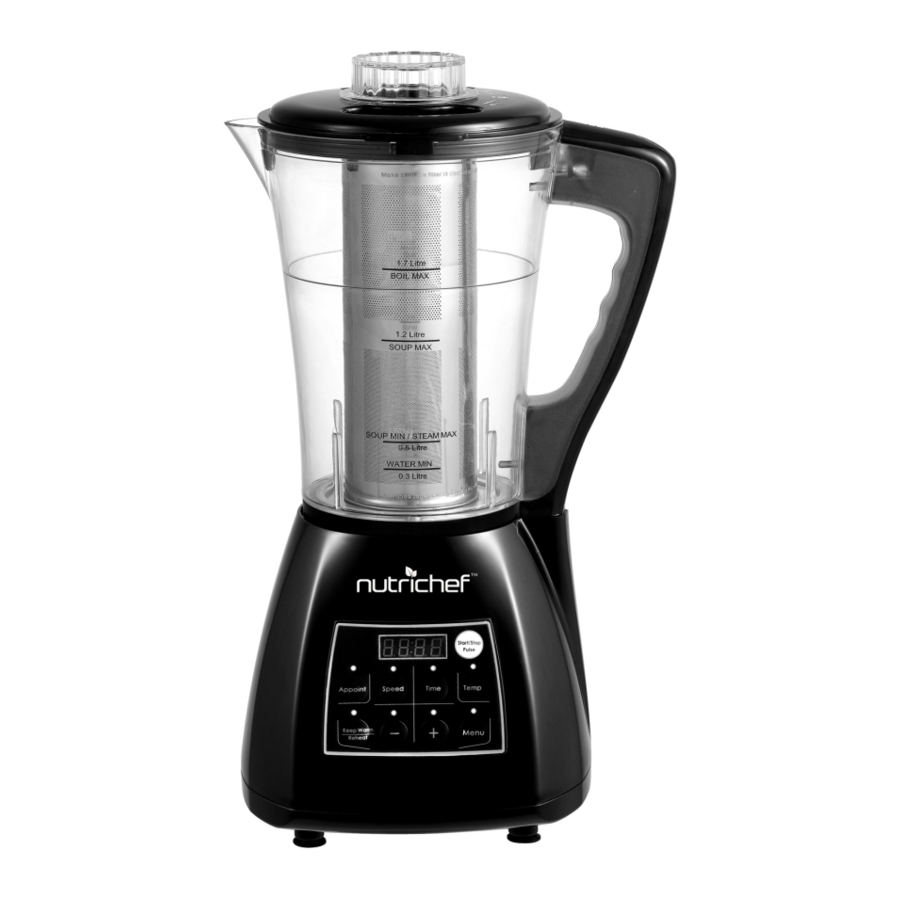
Overview

Getting Started
Remove the soup maker from the box. Remove any packaging from the product.
In the Box
Soup maker power base
Soup maker jug with built in blade
Jug Lid
Measuring cup
Instruction Manual
Filter
Sponge & Brush
Features
| 2 Automatic Soup Settings | Blender Function |
| Reheat Function | Minimum liquid safety sensor |
| Hot liquid overflow sensor | 2 portion size settings |
| Illuminated buttons | Audible warnings |
| Non slip suction feet | Locking lid with food chute |
| Built in blending/mixing blade | Programme finish alarm |
Safety Instructions
When using electrical appliances, basic safety precautions should always be followed.
- Check that the voltage indicated on the rating plate corresponds with that of the local supply before connecting the appliance to the power supply.
- This soup maker is not intended for use by persons (including children) with reduced physical, sensory or mental capabilities or lack of experiences or knowledge. They should be given supervision and instruction in the use of the appliance by a person responsible for their safety.
- Children should be supervised to ensure that they do not play with the soup maker.
- If the supply cord is damaged, a qualified engineer must replace it in order to avoid a hazard.
- Take care to keep hands, loose clothing and other items away from the rotating blades.
- Do not use the soup maker if the rotating blades are damaged.
- Do not use the soup maker without the lid being securely clipped in place.
- Do not immerse the soup maker (Jug, cord and motor housing) in water or any other liquids.
- The appliance contains no user serviceable parts. All repairs should only be carried out by a qualified engineer. Improper repairs may place the user at risk of harm, and will invalidate any guarantee.
- Do not operate the soup maker after a malfunction or if it has been dropped or damaged in any way.
- Do not leave the soup maker unattended whilst connected to the mains power supply.
- This appliance must be unplugged from the power supply after use and whilst any maintenance such as cleaning is being carried out.
- Always use the soup maker on a stable, heat-resistant surface.
- Ensure there is enough ventilation around the soup maker to allow the escape of heat and steam.
- The jug body becomes hot during use. Always hold using the handle provided.
- Do not use the soup maker for any purpose other than that for which it has been designed.
- Ensure that the supply cord is kept away from heat or sharp edges that could cause damage.
- Do not allow the supply cord to hang over the edge of the work surface or tabletops.
- The soup maker is intended for domestic use only. It should not be used for commercial purposes.
- Do not use any accessories or attachments with this appliance other than those recommended by the supplier.
- Wipe out the spills around the jug properly after use.
Product Information
The soup maker has been designed to create either smooth or chunky soups. It also features a reheat function allowing precooked soups to be reheated, ready to serve. It is fitted with several safety features including an interlocking lid cut-out; a minimum liquid sensor; a hot liquid overflow sensor and a safety micro-switch cut-off on the motor base.
The built in blender blades can also be used to allow the soup maker to be used solely as a blender to make smoothies, purees, dips and dressings.
Instructions for Use
Before using the soup maker for the first time, rinse out the jug and wipe the lid with a damp cloth. The use of a mild detergent is recommended.
 The jug contains very sharp blades and should be handled with care at all times. Do not immerse the unit or jug in water or any other liquids |
Place the base unit of the soup maker on a heat-resistant, stable surface. Carefully position the jug on the base unit aligning the connections in the base of the jug with those in the base unit. The jug should sit securely on top of the base unit.
Chop all your ingredients into approximately 2-3cm cubes. Items chopped larger may not cook in the programmed time.
| It is not recommended to use raw meats in the soup maker. Any meat or fish must be pre-cooked. Do not add any frozen ingredients. Ensure all ingredients are at room temperature. |
For A Smooth Soup
Place all your ingredients into the jug, and then add your liquid or stock to the required fill level.
For A Chunky Soup
Insert the filter into the jug, ensuring that the filter is secure. There is a circular ridge in the base of the jug to allow for correct placement of the filter, and will ensure that it is locked in place when the lid is attached.
Add your chopped ingredients to the jug (outside the filter), and then add your liquid or stock to the jug to the required fill level.
Note: All liquids added to the soup maker must be at room temperature, and must not be above the maximum or below the minimum levels as printed on the side wall of the jug. Failure to add enough liquid to the unit will result in the Alarm sounding and the unit failing to operate. Overfilling above the maximum fill lines will cause the hot contents to reach the jug lid. This will activate the upper sensor and a safety switch will switch off the unit to help prevent it boiling over.
 Ingredients that contain high levels of starch or sugar can easily stick to the heating plate and burn. |
Once all your ingredients and liquid are added to the jug, fit the lid to the soup maker. Put the lid in position and twist clockwise until the Lock Arrow on the lid is aligned with the arrow on the handle. Twist the lid anti-clockwise to unlock.
Ensure that the measuring cup stopper is fitted correctly to the top of the lid.
When everything is positioned correctly, connect the soup maker to the mains power supply and press the on/off button. The button will illuminate indicating the soup maker is on.
If any alarms sound, disconnect the soup maker from the mains power and check that the lid is properly fitted and the fluid levels are correct as described above.
Once checked, reconnect to the mains and power up.
To start the cooking process either choose one of our easy to use pre-set programs or enter your own manual settings as preferred.
The soup maker is controlled by using the choices below:

| Option | Description | Range |
| Start/Stop Pulse | Press to Start or Stop operation Press and hold to operate Pulse feature | |
| Menu | 5 Easy to use preset programs | P1-P5 |
| Keep Warm/ Reheat | Press once to keep contents warm at the end of the cooking cycle Press twice to activate the Reheat feature to warm cold contents | |
| Appoint | Press this button followed by +/- buttons to set time delay. | 10mins-24hours |
| For manual setting of the soup maker for bespoke recipes or to use the blender function only, use the following settings | ||
| Speed | Press this button followed by +/- to select the motor speed in manual operation | 1-5 |
| Time | Press this button followed by +/- to select the time for the machine to operate in manual operation | 1-90mins |
| Temp | Press this button followed by +/- to select the temperature required | 40°C-100°C |
The Pre-Set programmes are as follows:
| P1: | Smooth Soup Program (approx 25 minute program) |
| P2: | Chunky Soup program (approx 25 minute program) |
| P3: | Reheat Program |
| P4: | Blend Program |
| P5: | Boil Program |
Once all your ingredients and liquid have been added to the soup maker, the lid fitted and locked in place, connect it to the mains and switch it on. Press the Start/Stop button once. All the indicator lights will start to flash. Press the "Menu" Button or the +/- buttons to select the correct program. The Soup maker will then start.
Once the program is completed the soup maker will sound an audible alarm and will stop heating. Your soup can then be poured straight from the jug. Take care when removing the lid from the jug as it will be very hot.
| Heat/Steam will be emitted from the lid. Care must be taken when removing the lid and food chute. |
Note: The above pre-set programs rely on uninterrupted operation. Any interruption will result in the cancellation of the program. Restarting will result in the cooking stages being repeated which may affect the finished result.
If you need to add additional ingredients during the cooking process you can remove the measuring cup stopper and insert food without interrupting the program.
Reheat Program (P3)
Connect your soup maker to the mains power supply and press the Start/Stop button. Select P3 using the Menu Button or the +/- buttons
The reheat program will complete the following sequence:
Heating-Mixing-Heating-Mixing-Heating
This process will continue to follow the above cycle until the soup is heated and reaches the optimum temperature of 70°C, ready to serve. An audible alarm will sound as soon as this is reached.
Note: The Reheat function is not a cooking function. All soups used in this process must be pre-cooked first. The reheat program is only recommended for smooth soups, otherwise the mixing will chop up the chunks. For reheating Chunky soups, please use the manual settings as described below.
Blend Program (P4)
The soup maker can also be used as a blender with no heat function. Simply set up the soup maker as before and add your ingredients for blending.
The ingredients must reach a minimum depth of 3-4 cm so that the safety cut-out sensor does not activate but no more than the MAXIMUM fill level. It is not possible to blend dry ingredients, as the senor will not recognise them.
Insert the ingredients into the soup maker jug, connect the unit to the mains, and switch on. Press the Start/Stop button, and select P4 using the menu button or the +/- buttons.
The blend program is a repeating sequence of 15 seconds of high speed blending with a slight rest. To stop the cycle, press the Start/Stop button.
Boil Program (P5)
This programme is used to steam food such as eggs. Insert water into the jug, ensure the fill level is above the WATER MIN mark and the STEAM MAX mark. Insert the egg steamer and place on it the food to be steamed. The cycle lasts approximately 15 minutes.
Note: If using this program to steam eggs, be sure to prick the eggs prior to steaming. Ensure all other food is fully cooked prior to consumption.
"Appoint" (Time Delay)
The soup maker comes with a Time Delay feature that will allow you to program the unit to switch on automatically at your chosen time. Should you wish to use the Time Delay feature (Appoint) insert all your ingredients, connect your soup maker to the mains and switch it on. Press the "Appoint" button followed by the +/- buttons to set your time delay. This can range from 10 minutes up to a maximum of 24 hours. You can then choose the correct program.
"Speed"
Press the speed button to enter the motor speed, followed by the +/- buttons to select the speed you require. The default motor speed is 0.
"Time"
Press the Time button to enter the blending time setting, followed by the +/- buttons. The time will increase in 1 minute increments up to a maximum of 99 minutes. The default time is 0 minutes.
"Temp"
Press the Temp button to enter the cooking temperature setting, followed by the +/- buttons. The temperature ranges from 40°C to 100°C in 10°C increments. The default temperature setting is 40°C. You can adjust the temperature setting whenever you want.
Note: To reheat chunky soup, you can select a manual program using the Time and Temp buttons as described above. First set your time and then your temperature. This will heat without activating the blending mechanism ensuring that your soup stays chunky.
"Keep Warm/Reheat"
Press the Keep Warm button once to keep food warm. The maximum temperature is set at 50°C
Note: Food must be lower than 50°C prior to using the Keep Warm function. There is no blending during this setting.
Cleaning and Maintenance
- Always disconnect the soup maker from the mains power before hand washing.
- Do not clean the soup maker in a dishwasher.
- Do not immerse the soup maker or jug in water or any liquids.
- Clean the surface of the base unit and the outer of the jug with a soft damp cloth.
- Rinse the lid in warm, soapy water.
- To clean the inside of the jug, rinse to remove any remaining soup or large food particles. Wipe away any food remains using a soft cloth and mild detergent before rinsing again.
| The blades inside the jug are not removable and are very sharp Extreme caution must be taken when cleaning the inside of the jug. |
For stubborn stains it is possible to use the soup maker's programs to aid the cleaning process.
- Simply assemble the soup maker as previously described and add 800ml of hand hot water and a small amount of mild detergent. Fit the lid and switch the soup maker on. Press the blender or pulse and the blades will rotate to clean the jug. You can stop the cleaning process at any time by switching off the appliance. You can also complete this by selecting option P4 from the pre-selected menus
TROUBLESHOOTING
If, during the cooking process, the lights blink and the unit beeps continuously this means there is an error with the operation. Please check the following:
- Lid is not properly locked. Remove and relock in position.
- No water inside the jug – the dry sensor cut out is working. Add more liquid above the minimum line on the jug.
- Jug is not properly placed on the base unit – the safety Micro Switch has activated. Remove the jug and re-position.
- Heating base and motor have overheated – the overheat safety cut out has activated. Switch the unit off and allow to rest for 5 minutes to cool.
- Water or liquid in the jug exceed the MAXIMUM level – the hot liquid overflow sensor has activated. Remove some liquid from the unit.
- Water or Liquid is lower than the MINIMUM liquid setting – the dry sensor cut out has activated. Add more liquid to the soup maker.
| Problem: | Solutions: |
| The unit is not working and beeping |
|
| The unit has stopped mid program |
|
| Ingredient pieces are too large after the cooking cycle is completed. |
|
| The ingredients are undercooked at the end of the program |
|
| The soup is not hot and the cooking cycle has finished early |
|
| Food is burnt and stuck to the bottom of the unit. |
|
Guarantee
This product is guaranteed for a period of 1 year from the date of purchase against mechanical and electrical defects.
This guarantee is only valid if the appliance is used solely for domestic purposes in accordance with the instructions and it is not connected to an unsuitable electricity supply or dismantled or interfered with in any way or damaged through misuse.
Nothing in this guarantee or in the instructions relating to this product excludes, restricts or otherwise affects your statutory rights.
In line with our policy of continuous development, we reserve the right to change this product; packaging and documentation specification without notice.
Consumables are not guaranteed i.e. Plug and fuse.


Documents / Resources
References
Download manual
Here you can download full pdf version of manual, it may contain additional safety instructions, warranty information, FCC rules, etc.
Advertisement


Need help?
Do you have a question about the PKSM240 and is the answer not in the manual?
Questions and answers