PowerA ENHANCED WIRELESS CONTROLLER Manual
- User manual (2 pages)
Advertisement
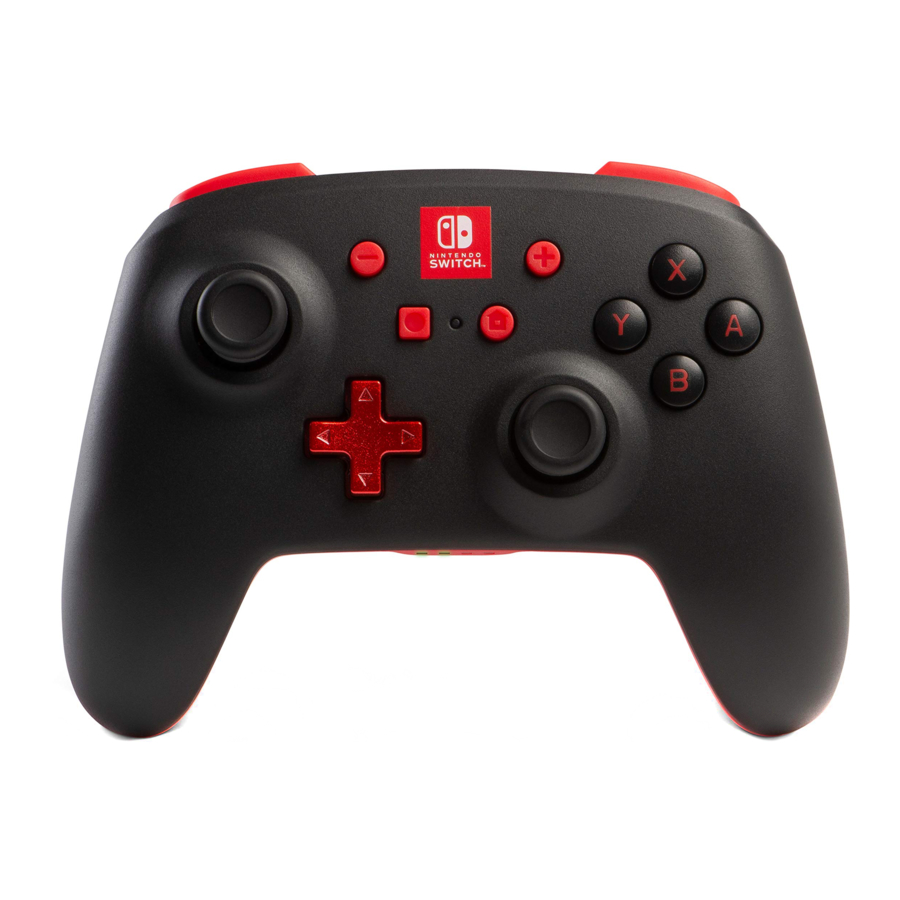
PARTS AND FEATURES
Front Side

Back Side

CONTENTS
- Enhanced Wireless Controller for Nintendo Switch
- (2) AA Batteries
- User Guide
SET UP
Check for system update. Nintendo system update version 6.0.0 or later is required for use of PowerA Wireless controllers.
- Connect your Nintendo Switch to the Internet
- Typically, system updates will be downloaded automatically when connected online.
- Select 'System Settings' from HOME menu, then scroll down to 'System' to see System Update version and automatically check for system update.
For additional help, search 'system update' from Nintendo Support website.
INSTALL BATTERIES
- Remove the battery door, and install (2) AA Alkaline Batteries (included)
- Confirm your Nintendo Switch Console is powered ON.
WIRELESS PAIRING
From the HOME Menu, select "Controllers," then "Change Grip and Order." While the following screen is displayed, press and hold down the SYNC Button for at least one second on the Controller you wish to pair.
 NOTE: Once controller is paired once, it will auto-connect next time.
UNDERSTANDING LED INDICATORS
There are three LED locations on this controller: top, front and bottom.
- The top LED near the Sync button will flash Red when the Alkaline batteries are getting near depletion. Replace Alkaline batteries once low battery indicator is flashing to avoid interrupting gameplay.
- The front LED (between Home/View buttons) indicates controller is powered and will flash during programming of Advanced Gaming Buttons.
- The four LED on the bottom indicate player number 1-8 and will cycle from left to right during wireless pairing.
ASSINGNING ADVANCED GAMING BUTTONS
- Press and hold the program button for 2-3 seconds on the back of the controller. The program LED indicator will flash, signaling the controller is in assign mode.
- Press 1 of the following buttons (A/B/X/Y/L/R/ZL/ZR/D-pad) to re-assign. Then press the Advanced Gaming Button (AGR or AGL) that you wish to assign. The Program LED indicator will stop flashing, signaling the Advanced Gaming Button has been set.
- Repeat for the remaining Advanced Gaming Button.
NOTE: Advanced Gaming Button assignments will remain in memory even after disconnected.
RESETTING ADVANCED GAMING BUTTONS
- Hold the program button down for 2-3 seconds. The LED Connection Indicator will slowly flash, signaling the controller is in program mode.
- Press and hold the Assign Program Button for 5 seconds to reset to no function.
TROUBLESHOOTING
Q1. My Wireless Controller is not pairing
A1. Confirm batteries are properly installed, and are not drained, used or damaged
A2. Confirm you are following the pairing process listed above
A3. Remove and replace the Alkaline batteries to reset the Wireless controller
SUPPORT
For support with your authentic PowerA accessories, please visit the Support section of PowerA.com,
email CustomerService@PowerA.com
or call (866)-308-4031. Mon-Fri 5:00AM-5:00PM PST

Documents / Resources
References
Download manual
Here you can download full pdf version of manual, it may contain additional safety instructions, warranty information, FCC rules, etc.
Advertisement


Need help?
Do you have a question about the ENHANCED WIRELESS CONTROLLER and is the answer not in the manual?
Questions and answers