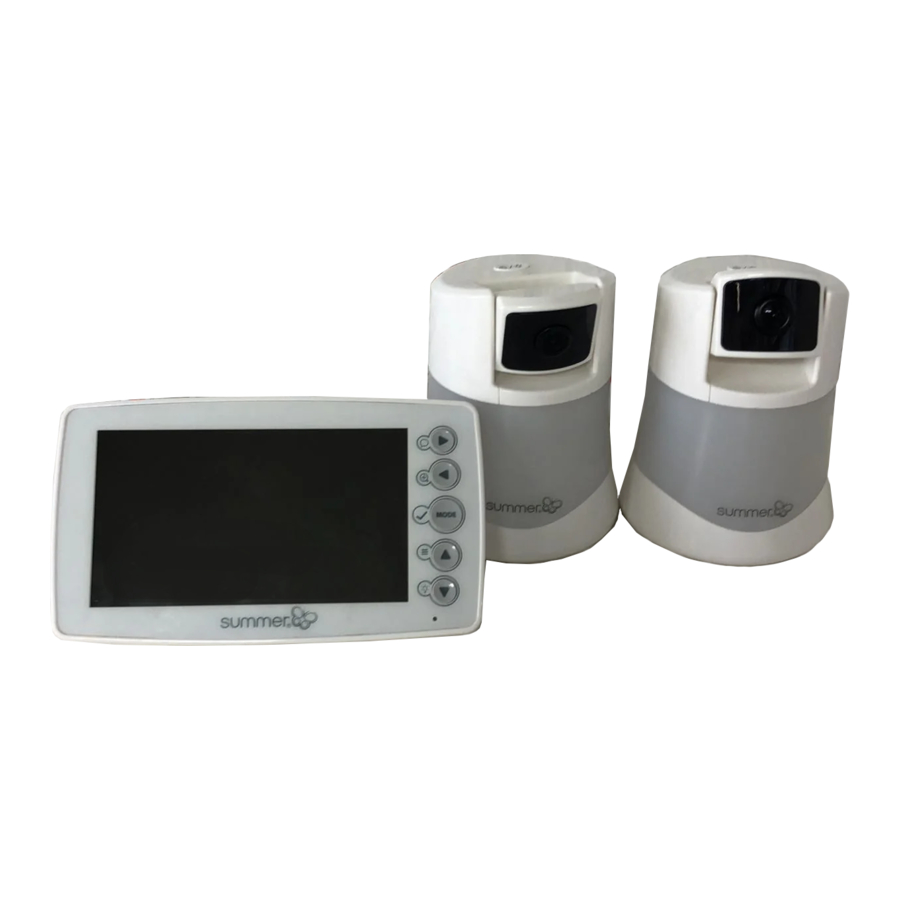
Summer Infant Side By Side 2.0 Manual
- Quick start manual (2 pages)
Advertisement
SET-UP
Charge the Handheld

Install the Camera
Plug in camera. Place camera on а flat surface, such as а bureau or shelf or mount the camera on а wall using the screw and wall anchor provided.

Secure the Camera Cord
NEVER place the camera or cords within 3-feet of the crib. Secure the cord to your wall using the 6 security clips included to keep the cord away from baby's reach.


Children have strangled in cords. Keep this cord out of the reach of children (more than 3 ft. (0.9m) away).
Power оn the Camera and Handheld
Press the ON/OFF/Nightlight button on both cameras and hold for 3 seconds. А green light will арреаг near the lens.

Press and hold the power button on the handheld unit for З seconds. The handheld will automatically sync with both of the cameras. (Тhе handheld unit and the camera are paired at the factory for privacy reasons. If the handheld and camera are not paired 1t1ith each other for апу reason, see pairing section in the user guide.)
Congratulation You are now ready to use your Side Ву Side™ 2.О 2-Camera Split-screen Video Monitor Set!
SCREEN ICONS & FUNCTION BUTTONS
Screen icons

 lmage Zoom ( 1х/2х/Зх)
 Nightlight On (Red/Blue)
 Temperature
 Receptiоn
 Current Viewing Camera (1-4)
 Battery Life/Plugged ln
 Pan/Tilt Mode
 Utility Mode
Function Buttons

 Power /Split-Quad Screen
 Video
Video
 Volume Control
 Navigate Right /Talkback
 Navigate Left/Zoom
 Mode Select/Enter
 Navigate Up/Menu
 Navigate Down/Nightlight
USING ТНЕ HANDHELD
Your handheld can be in one of the following modes:
- PAN/TILT Mode
Pan/Tilt Cameras
Use the arrow buttons to pan left/right and tilt up/down.

- UTILITY Mode
Press the Select/Mode![]() button to enter the Utility Mode.
button to enter the Utility Mode.

When you select Utility Mode, the buttons convert into secondary functions such as Talkback, Zoom, Menu and Nightlight. lf the buttons are not activated for about 4-5 seconds, it will automatically default back to Pan/Tilt Mode.
Talk-back
Press and hold the talk-back button to activate the talk-back feature. Release the button to end talk-back mode.

Zoom
Press the zoom button to toggle between No zoom, zoom 1 х, zoom 2х and zoom Зх. The zoom level is indicated as an icon on the top-right hand corner.

Nightlight
Press the nightlight button on the handheld to activate the soft glow nightlight on the camera. The light will glow bluе. Blue light acts as а soothing soft glow nightlight.
Nightlights аге comforting to little ones, especially toddlers, who become scared in а pitch black room.

The nightlight can be turned on or off from the camera bу pressing the ON/OFF/Nlghtllght button.
![]()
Press the nightlight button again to change the nightlight color to red. Red light helps soothe infants to sleep. This color is prominent in the sunset, natures very own way of telling your little one it's time to go to sleep. An added bonus: young baby's find red light soothing, as it is а familiar color to them- it's the only color light your bаbу was аblе to see in the womb.

Menu
Press the Menu button to enter the menu.

Menu - Adjusting Brightness

Use the left![]() and right
and right ![]() arrow buttons to adjust the brightness.
arrow buttons to adjust the brightness.
Menu - Selecting Camera to View
Step 1: Using the "DOWN![]() " button, select "View Cam".
" button, select "View Cam".
Step 2: Use the "LEFT![]() /RIGHT
/RIGHT![]() " buttons to select an available camera (bluе color indicates powered-on, within-range, or paired cameras).
" buttons to select an available camera (bluе color indicates powered-on, within-range, or paired cameras).
Step З: Press "SELECT/MODE![]() " button to confirm selection.
" button to confirm selection.
Step 4: The video will appear on the handheld screen.
Menu - Scanning Camera
Step 1: Using the "DOWN![]() " button, select "SCAN" and press "SELECT /MODE
" button, select "SCAN" and press "SELECT /MODE![]() " button.
" button.
Step 2: Scanning cameras will begin, it will cycle through each active camera every 8 seconds.
Step З: То stop scanning, press the "Power/Split-Quad Screen![]() '
'
For understanding additional Menu features including: delete camera, and add camera, please refer to the user's guide. - SPLIT-SCREEN Mode
Split /Quad Screen Viewing

Press the Split /Quad Screen button to view more than one room at once. Audio is only transmitted from one room or camera in this mode. Manually press "LEFT![]() /RIGHT
/RIGHT![]() " buttons to hear other rooms. The room with the audio will have а bluе bох around it.
" buttons to hear other rooms. The room with the audio will have а bluе bох around it.
Note: Zoom and Pan/Tilt аге not accessible while in split-screen mode. Press "SELECT/MODE![]() " button to exit Split/Quad screen mode or view the selected camera in full screen.
" button to exit Split/Quad screen mode or view the selected camera in full screen.
Talk-back![]() and Nightlight
and Nightlight![]() function are available in SPLIT-SREEN Mode.
function are available in SPLIT-SREEN Mode.

 button to enter the Utility Mode.


 and right
  arrow buttons to adjust the brightness.
 " button, select "View Cam".
 /RIGHT
 " buttons to select an available camera (bluе color indicates powered-on, within-range, or paired cameras).
 " button to confirm selection.
 " button, select "SCAN" and press "SELECT /MODE
 " button.
 '
'
 " button to exit Split/Quad screen mode or view the selected camera in full screen.
 and Nightlight
 function are available in SPLIT-SREEN Mode.
Sound Activated Lights
The LED light bar on the top of the handheld will light up as it picks up noises. Softer sounds will light up the amber LEDs. Louder noises will light up the red LEDs.

Video On/Off
Turn off the handheld's video bу pressing the VIDEO button. On battery or portable mode, the video will turn off automatically after 3.5 minutes. The screen will go dark. This feature allows you to preserve battery life when not plugged into А/С adapter. The audio feature will remain activated, allowing you to monitor sounds. Press the button again to resume video monitoring.
аblе
Summer Infant, lnc. 1275 Park East Drive Woonsocket, RI 02895 1 800 268-6237 12/16

Documents / ResourcesDownload manual
Here you can download full pdf version of manual, it may contain additional safety instructions, warranty information, FCC rules, etc.
Advertisement


Need help?
Do you have a question about the Infant Side By Side 2.0 and is the answer not in the manual?
Questions and answers