Table of Contents
Advertisement
Available languages
Available languages
Advertisement
Chapters
Table of Contents

Subscribe to Our Youtube Channel
Summary of Contents for Miditech PianoBox Pro Host
-
Page 2: Table Of Contents
Bedienungsanleitung V.1.0 Inhalt 1. Vorwort ................4 2. Basis Funktionen und Ports ...........5 3. Technische Spezifikationen ............6 4. Verbindungen und Panel Funktionen ........7 4.1 Vorderseite ..............7 4.2 Rückseite ..............7 4.3 Bedienpanel ..............8 5. Button Funktionen ..............8 5.1 Drum button ..............8 5.2 Sound Programm (Program) button ........8 5.3 Play/Stop button ............9 5.4 Kanal (Channel) button ..........9 5.5 Tempo button ...............9... - Page 3 6.6 DI Input Anschluss ............. 11 6.7 Panic Button ..............11 6.8 USB Host Eingang ............11 6.9 USB Host Port Indicator LED ......... 11 6.10 Power Schalter ............11 7. Benutzen von USB Host und USB Device Anschlüssen .... 12 8.
-
Page 4: Vorwort
1. Vorwort Vielen Dank, dass Sie sich für die Miditech PianoBox Pro Host als MIDI Expander entschieden haben. Mit diesem MIDI Expander finden Sie viele gute über MIDI spielbare Klänge. Die PianoBox Pro Host enthält 100 komplette Schlagzeugrhythmen und 128 General MIDI -Timbres. Sie enthält Funktionen für Hall, Tonveränderung und Lautstärkeregelung, um Ihre Komposition... -
Page 5: Basis Funktionen Und Ports
2. Basis Funktionen und Anschlüsse Kleines General MIDI Soundmodul mit 128 GM sounds 100 Drum Rhythmus Patterns LCD Display, LED Betriebsanzeige Eingabe-Drehregler mit verschiedenen Funktionen 6.35mm HI-Z TRS Input Anschluss 6.35mm TRS Audio Ausgang , 6.35mm Kopfhörer-Ausgang Drum, Program, Play/Stop, Channel, Tempo, Reverb, Transpose, Volume, 10 Funktions Knöpfe USB HOST Anschluss Standard DIN MIDI Anschluss, Input/Output... -
Page 6: Technische Spezifikationen
3. Technische Spezifikationen Einfach zu bedienendes Midi-Soundmodul für Computer mit MIDI-Software Regelbarer Kopfhörer Ausgang 32 Ω, 65mW, 20Hz-20kHz, total harmonic distortion 0.1% Line Out, 10kΩ, 1V, 20Hz-20kHz, thd 0.01% DI Eingang für Gitarre und Bass 10k Ω, 20Hz-20kHz Inklusive USB-Kabel und USB-5V-Netzteil USB Host Interface stellt DC 5V Stromversorgung zur Verfügung... -
Page 7: Verbindungen Und Panel Funktionen
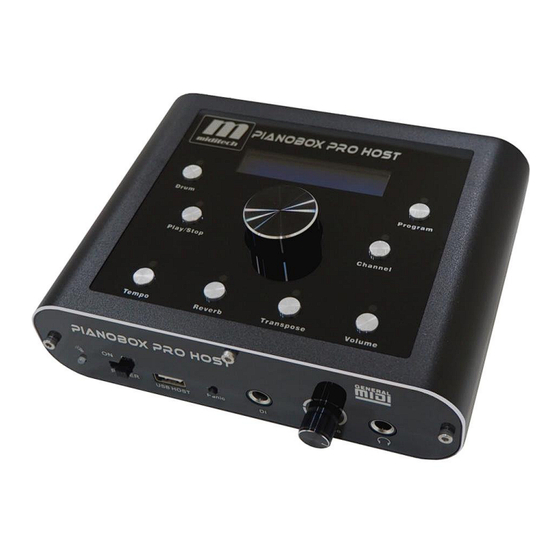
4. Anschluss- und Bedienfeldfunktionen 4.1 Frontseite Kopfhörer Host Anschluss Verbindungs anzeige Panic Lautstärke button Regler Power Schalter Instrumenten USB Host Eingang Anschluss 4.2 Rückseite Standard DIN Line Out USB 2.0 & MIDI IN & OUT Stereo 5V Strom Anschlüsse Ausgang Anschluss... -
Page 8: Bedienpanel
5.1 Drum button Drücken Sie die Taste [Drum], die Kontrollleuchte leuchtet auf und der Drum-Modus wird aktiviert. Wenn sich die PianoBox Pro Host im Schlagzeugmodus befindet, kann die aktuelle Schlagzeugrhythmus-Demonummer mit dem Wertedrehknopf geändert werden und das Display zeigt die aktuelle Schlagzeugrhythmus-Demonummer an. -
Page 9: Play/Stop Button
Schlagzeugrhythmus-Demo wird abgespielt. Drücken Sie die [Play/Stop]-Taste erneut, die Kontrollleuchte erlischt und das Schlagzeug-Rhythmus-Demo wird gestoppt. Wenn sich die PianoBox Pro Host im Schlagzeugmodus befindet, zeigt das Display den aktuellen Spielstatus 5.4 Channel button Drücken Sie die [Channel]-Taste und die Kontrollleuchte leuchtet auf, um die Kanaländerungsfunktion zu aktivieren. -
Page 10: Reset Button
5.9 Save button Halten Sie die [Program]-Taste 5 Sekunden lang gedrückt, und die Parameter werden erfolgreich gespeichert. Selbst wenn der Computer ausgeschaltet wird, kann sich PianoBox Pro Host Ihre neuen Einstellungen merken. Sie können die Funktion zum Speichern von Parametern je nach Bedarf mehrmals verwenden. 5.10 Reset button Halten Sie die Taste [Drum] 5 Sekunden lang gedrückt, um die Werkseinstellungen wiederherzustellen. -
Page 11: Usb 5V Power Anschluss
Instrumenteneingang, bitte verwenden Sie ein Audiokabel, um eine Gitarre oder ein anderes Instrument anzuschließen 6.7 Panic Button Wenn ein abnormales Geräusch oder ein Dauerton im Inneren der PianoBox Pro Host auftritt, drücken Sie bitte diese Taste, um alle Geräusche zu unterdrücken. 6.8 USB Host Anschluss Schließen Sie das externe MIDI-Keyboard über ein USB-Kabel an. -
Page 12: Power Schalter
6.10 Power Schalter Wenn der [USB 5V Power]-Anschluss der PianoBox Pro Host mit dem Stromnetz verbunden ist, schieben Sie bitte den Netzschalter in die Position ON, um anzuzeigen, dass das Gerät ingeschaltet ist; ein Wechsel zu OFF zeigt an, dass es ausgeschaltet ist Verwendung von USB-Host und USB-Device Die PianoBox Pro Host unterstützt die gleichzeitige Verwendung von USB-Gerät und USB-Host. -
Page 13: Liste Der Soundprogramme Und Der Drumpatterns
8. Liste der Soundprogramme und Drumpatterns 8.1 Liste der Soundprogramme... -
Page 14: Liste Der Drumpatterns
8.2 Liste der Drumpatterns... - Page 16 Manual version 1.0 www.miditech.de...
- Page 17 Contents 1. Preface ....................19 2. Basic functions and ports ................ 20 3. Technical specifications ................21 4. Connection and panel functions ............... 22 4.1 Front panel ..................22 4.2 Rear panel ................... 22 4.3 Overhead panel ..................23 5. Button function ..................23 5.1 Drum button ..................
- Page 18 6.10 Power switch ..................26 7. Use of USB Host and USB Device ............. 27 8. List of programs and drum demos ............28 8.1 List of the programs ................28 8.2 List of the drum demos ................. 29...
-
Page 19: Preface
USB HOST port of the PianoBox Pro Host. At this time, the audio source box acts as the audio source host. Now, all you need to do is connect your MIDI device to your PianoBox Pro Host audio source box, and then you can start your music journey. -
Page 20: Basic Functions And Ports
2. Basic functions and ports Miniature audio source module with 128 GM voices 100 drum rhythm demos LCD display, LED indication Adjustable value knob 6.35mm HI-Z TRS Input port 6.35mm TRS Audio output port , 6.35mm Headphone output port Drum, Program, Play/Stop, Channel, Tempo, Reverb, Transpose, Volume, 10 function buttons USB HOST port Standard MIDI input/output port... -
Page 21: Technical Specifications
3. Technical specifications Easy to use midi keyboard with computers with midi software Adjustable headphone output 32 Ω, 65mW, 20Hz-20kHz, total harmonic distortion 0.1% Line Out, 10kΩ, 1V, 20Hz-20kHz, thd 0.01% Guitar/bass 10k Ω, 20Hz-20kHz direct input Including USB device 2.0 and USB 5V power supply USB Host interface provides DC 5V power supply... -
Page 22: Connection And Panel Functions
4. Connection and panel functions 4.1 Front panel Host Headphone connection port indicator Panic Volume button adjustment Power switch knob Instrument input port USB Host port 4.2 Rear panel Standard Line Out USB 2.0 MIDI IN&OUT stereo output &5V Power port supply... -
Page 23: Overhead Panel
5.1 Drum button Press the [Drum] button, the indicator light will be on, and the drum mode will be enabled. When the PianoBox Pro Host is in drum mode, the current drum rhythm demo number can be changed by , and the display screen displays the value knob current drum rhythm demo number. -
Page 24: Play/Stop Button
Press the [Play/Stop] button, the indicator light will light up and the drum rhythm demo will play. Press the [Play/Stop] button again, the indicator light will go out and the drum rhythm demo will stop. When the PianoBox Pro Host is in drum mode, the display screen shows the current playing status. -
Page 25: Reset Button
remember your new settings. You can operate the function of saving parameters several times according to the requirements. 5.10 Reset button Press and hold the [Drum] button for 5 seconds, and the factory parameters are restored successfully. 6. Connection method 6.1 [USB 5V Power] Port Use USB-B wire to connect to personal computer or adapter for power supply. -
Page 26: Usb 5V Power] Port
At this time, PianoBox Pro Host acts as a host audio source box. 6.9 USB Host connection indicator When the USB Host port of the PianoBox Pro Host is not connected to an external MIDI device, this indicator is red; When the USB Host port of the PianoBox Pro Host is connected to an external MIDI device, this indicator appears green. -
Page 27: Use Of Usb Host And Usb Device
7. Use of USB Host and USB Device The PianoBox Pro Host supports the simultaneous use of USB Device and USB Host. The [USB 5V Power] port is connected to the computer, and the [USB Host] port is connected to the MIDI keyboard. The note information of the MIDI keyboard is transmitted to the computer through the PianoBox Pro Host. -
Page 28: List Of Programs And Drum Demos
8. List of programs and drum patterns 8.1 List of the programs... -
Page 29: List Of The Drum Demos
8.2 List of the drum patterns... - Page 31 Musikinstrumenten Umgebung konzipiert. Das Gerät darf ausschließlich zu diesem Zwecke und im Sinne der Bedienungsanleitung betrieben werden. Die detaillierte Bedienungsanleitung finden Sie auf unserer Homepag e www.miditech.de. Andere Verwendungszwecke und die Nutzung unserer Produkte unter anderen Betriebsbedingungen sind ausdrücklich nicht bestimmungsgemäß...
- Page 32 The device may only be used for this purpose and in accordance with the operating instructions. The detailed operating instructions can be found on our homepage www.miditech.de. Other uses and the use of our products under other operating conditions are expressly not intended and may lead to damage to property or personal injury! No liability is accepted for damage resulting from improper use.
- Page 33 If this symbol is on the packaging, the packaging of the product can be disposed of in the local recycling process. Miditech products should not be disposed of with normal household waste. This applies to all electrical and electronic equipment. Within the scope of your national regulations and guidelines, please take old appliances to the appropriate collection points or return them to your dealer for proper disposal.
Need help?
Do you have a question about the PianoBox Pro Host and is the answer not in the manual?
Questions and answers