Advertisement
Advertisement
Table of Contents

Related Manuals for Taiji TSK-130B


Summary of Contents for Taiji TSK-130B
- Page 1 Operating Instructions Sake Warmer Dispenser TSK-130B...
-
Page 2: Table Of Contents
Contents Introduction ............ 1 After Use ............Use ..............1 After-Sales Service ........6 Names of Parts ..........1 ..........Inspection and Preparation Before Use ..2 Instructions for Use ........2~4 Caution: Before attempting to connect or operate this product, please read the label on the bottom. -
Page 3: Introduction
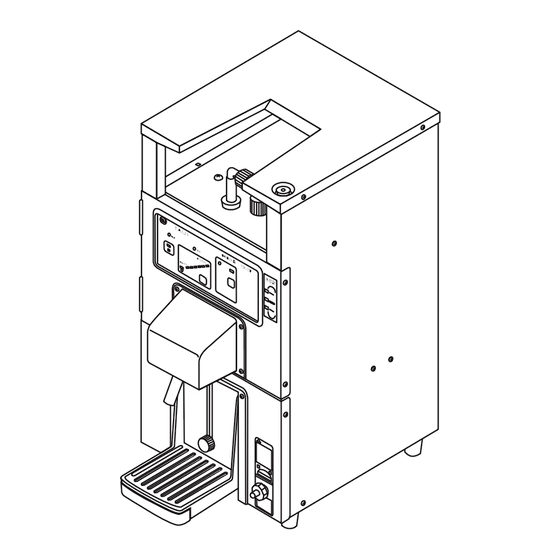
Introduction * To use your new purchase correctly and safely, you are advised to carefully read this manual and fully understand it before use. * Keep the manual at hand for quick reference after reading it. * The manual covers mainly safety precautions, the names of parts, instructions for use, after-sale service, and product specifications. * Failure to observe the precautions given in this manual may result in physical injuries. Exercise care not to use your new product in a manner which does not conform to the instructions given herein. This product is a sake warmer exclusively for indoor use. It is intended to make Japanese sake tasty, controlled to a favorite temperature. It should not be used for other purposes. Names of Parts Joint hose Air vent Water tank inlet Water supply lamp Dispensing lamp Power lamp Manual dispensing switch Power switch Temperature indicator lamp Water level indicator... -
Page 4: Inspection And Preparation Before Use
Inspection and Preparations Before Use Check the instruction manual, and the accessories. Choose a place for the sake warmer dispenser. * A level, stable place. * A well-ventilated place. * A place away from heat sources, such as a gas burner and cooking range, and free from exposure to direct sunlight. (Keep the dispenser at least 50 cm away from them.) * A place not so humid, not exposed to water. Use an independent outlet. - Page 5 Adjust the sake warming temperature. 1) When the “temperature control switch” is pressed once, the temperature setting mode is assumed. Initial setting is at [OFF]. ・The setting indication and the sake warming temperature are as specified below. However, they can change under various conditions, and they should be used as a guideline. Lukewarm Approx. 45 ° C Approx. 65 ° C 2) Each time the “temperature control switch” is pressed once, the temperature indicator lamp moves up from one after another along the diagonal line. (Fig. 8) Temperature Control 3) If ...
- Page 6 Dispense the warmed sake. 1) Fit the nozzle (sake outlet) into the mouth of your sake server bottle, lightly push the bottle until the nozzle is straight down, and place the server bottle on the server bottle holder. (Fig. 19) The dispensing lamp flashes and the warmed sake begins to come out. ・Sake dispensing time is approximately 14 to 19 seconds for 180ml of hot sake. ・ When the server bottle is filled with the required volume of sake, the dispensing operation stops automatically and the dispensing lamp goes out.
-
Page 7: After Use
After Use Daily maintenance (cleaning of sake passage) (1) Remove the used cubic container in the following procedure: ・ Leave the power switch turned ON. 1) Turn the knob of the stopcock to the left and adjust it to the “CLOSE” position. Throw the nozzle (sake outlet) down to drain the sake remaining inside. 2) After the nozzle has been thrown down, remove the joint part between the stopcock and the joint hose. For a machine that has no sake level indicator, the inner sake cannot be drained unless this work is finished first. 3) When the inner sake has been drained out, return the nozzle and remove the cubic container from the main body. 4) Remove the stopcock from the cubic container. (2) Pour about 2 liters of hot water (below. 70℃) in a cubic container intended for cleaning (an empty cubic container). After mounting the stopcock, place it on the main body and connect the stopcock to the joint hose. ・ Never use any detergent. (3) place an empty container under the nozzle to drain hot water. Turn the knob of the stopcock to the right and ... -
Page 8: After-Sales Service
• Check whether the nozzle area is contaminated. If contaminated, neatly clean the electrode part (metallic rod) in the nozzle by the use of a tooth brush. • Is the water bath tank full with water at the level of water level indicator? Feed water or warm water through the water tank inlet. Temperature does not rise. • Considered to be a problem in the temperature sensor. In this case, the replacement of sensor is required. • Is the sake warming temperature set at a favorite level? Temperature rises too high. • Considered to be a problem in the temperature sensor. In this case, the replacement of sensor is required. Disassembly Prohibited Very special techniques are required for repairing. Users are absolutely prohibited to carry out overhaul and fixing. Specifications The specifications and part of the appearance are subject to change for improvement without notice. TSK-130B Rating 110-120V AC, 50/60 Hz Heating method Electrical (indirect heating) Power consumption Sake feeder Cubic container, 5 to 18 liters Water bath tank, Approx. 4.7 liters Weight Approx. 9.3kg Dimensions W 250 x D 375 x H 515 mm Power cord Rubber sheathed cord, 2m in effective length Accessories Bottle holder funnel, 1 pc.
Need help?
Do you have a question about the TSK-130B and is the answer not in the manual?
Questions and answers