Table of Contents
Advertisement
Quick Links
Installation and User Manual
EN55022:2010 EN61000-6-2:2005 EN61000-6-4:2007
Load Cell Central follows a policy of continuous improvement and reserves the right to change specifications without notice. © 2018
Load Cell Central
28175 Route 220
Milan, PA 18831
version 1.00
WDESK-G
WINOX-G/2G
Unload
2014/30/EU
SYSTEM IDENTIFICATION
Web:
www.800loadcel.com
Email:
sales@800loadcel.com
Toll Free: 1-800-562-3235
Ph: 1-570-731-7048
Fax: 1-570-731-7054
Advertisement
Table of Contents

Summary of Contents for Load Cell Central WDESK-G
- Page 1 WINOX-G/2G Unload 2014/30/EU EN55022:2010 EN61000-6-2:2005 EN61000-6-4:2007 SYSTEM IDENTIFICATION Load Cell Central follows a policy of continuous improvement and reserves the right to change specifications without notice. © 2018 Load Cell Central Toll Free: 1-800-562-3235 28175 Route 220 Ph: 1-570-731-7048 Web: www.800loadcel.com...
- Page 2 KEY TO SYMBOLS Below are the symbols used in the manual to draw the reader's attention: Warning! Risk of electrocution. Warning! This operation must be performed by skilled workers. Read the following indications carefully. Further information. GUARANTEE 24 months from the delivery document date. The guarantee covers only defected parts and includes the replacement parts and labour.
-
Page 3: Table Of Contents
TABLE OF CONTENTS USER WARNINGS ........................1 RECOMMENDATIONS FOR CORRECT INSTALLATION OF WEIGHING INSTRUMENTS . 1 RECOMMENDATIONS FOR CORRECT INSTALLATION OF THE LOAD CELLS ....1 LOAD CELL INPUT TEST (QUICK ACCESS) ................3 LOAD CELL TESTING ....................... 3 ... - Page 4 ANALOG OUTPUT(ONLY FOR INSTRUMENTS WHERE THIS OPTION IS AVAILABLE) .. 26 SERIAL COMMUNICATION SETTING ..................28 RS232 SERIAL COMMUNICATION ....................29 RS485 SERIAL COMMUNICATION ....................29 DIRECT CONNECTION BETWEEN RS485 AND RS232 WITHOUT CONVERTER ...... 29 ...
- Page 5 MENU LOCKING ........................50 MENU UNLOCKING ......................... 50 TEMPORARY MENU UNLOCKING ..................50 DATA DELETION AND PROGRAM SELECTION ..............50 KEYPAD OR DISPLAY LOCKING ..................51 ...
-
Page 6: User Warnings
USER WARNINGS RECOMMENDATIONS FOR THE PROPER USE OF WEIGHING INSTRUMENT Keep away from heat sources and direct sunlight Repair the instrument from rain (except special IP versions) Do not wash with water jets (except special IP versions) Do not dip in water Do not spill liquid on the instrument Do not use solvents to clean the instrument Do not install in areas subject to explosion hazard (except special Atex versions) - Page 7 CONNECTING SEVERAL CELLS IN PARALLEL: Connect several cells in parallel by using - if necessary - a watertight junction box with terminal box. The cell connection extension cables must be shielded, led individually into their piping or conduit and laid as far as possible from the power cables (in case of 4-wire connections, use cables with 4x1 mm minimum cross-section).
-
Page 8: Load Cell Input Test (Quick Access)
LOAD CELL INPUT TEST (QUICK ACCESS) From the weight display, press ▲ for 3 seconds; the response signal of the load cells is displayed, expressed in mV with four decimals. LOAD CELL TESTING Load cell resistance measurement (use a digital multimeter): - Disconnect the load cells from the instrument and check that there is no moisture in the cell junction box caused by condensation or water infiltration. -
Page 9: Main Specifications Of The Instrument
Instruments with P, D type connectors: included switching power supply plug 24 V 450 mA, input 100÷240 VAC, 3 meters long cable. Display: Model Display Resolution Viewing area WDESK-G STN transmissive graphic LCD, white on 240x64 pixel 133x39 mm WINOX-G blue, backlit STN transmissive graphic LCD, white on... - Page 10 Wall installation with bracket 122x230x250 mm ca. (can also be installed on table) (bracket included) WINOX Type of connectors Max. encumbrance Drilling P - PG9 cable gland 206x286x108 mm IP68 protection rating 160x248 mm (connectors included) Power supply included Q - Removable terminal strip (panel front) 206x286x96 mm 160x248 mm...
-
Page 11: Buffer Battery
BUFFER BATTERY The instrument is equipped with an internal battery that allows to keep active the internal clock even in the event of power failure. At the first start and after long periods of inactivity, leave the instrument on for at least 12 hours to fully charge the battery. -
Page 12: Technical Specifications
TECHNICAL SPECIFICATIONS POWER SUPPLY and CONSUMPTION (VDC) 12/24 VDC ±10%; 6 W (standard) 115/230 VAC; 50-60 Hz; 6 VA POWER SUPPLY and CONSUMPTION (VAC) (optional only for WDESK – WINOX-P) NO. OF LOAD CELLS IN PARALLEL and SUPPLY max 8 (350 ohm); 5 VDC / 120 mA LINEARITY / ANALOG OUTPUT LINEARITY <... -
Page 13: Electrical Connections
ELECTRICAL CONNECTIONS BASIC INFORMATION - It is recommended that the power supply negative pole be grounded (WDESK-D, WINOX: connect the earthing system to the dedicated external terminal ). - It is possible to supply up to eight 350 ohm load cells or sixteen 700 ohm load cells. - For 4-wire load cells, make a jumper between EX- and REF- and between EX+ and REF+. -
Page 14: Changing Voltage 115Vac / 230Vac (Wdesk)
CHANGING VOLTAGE 115VAC / 230VAC (WDESK) Access instrument board by removing the six bottom screws and work on the welding side: join the red points using a stiff wire. 230 Vac 115 Vac KEY TO P, Q, X TYPE CONNECTORS Terminal Signal Terminal Signal OUTPUT No. -
Page 15: Key To D Type Connectors
OUTPUT No. 2: SET PHASE (115/230 VAC optional ver.) OUTPUT No. 3: CYCLE END NEUTRAL (115/230 VAC optional ver.) GROUND (115/230 VAC optional ver.) *) Use only as power supply for instrument inputs. To access the terminal strip on the WDESK instruments with cable glands, you need to remove the bottom of the instrument unscrewing the six screws. - Page 16 otherwise: -ANALOG OUTPUT COMMON E/EC OPTION: GND black ANALOG OUTPUT: SHIELD RS232: RXD yellow RS232: TXD blue Male RS232: SHIELD, GND black RS232 serial port +OUTPUT (24 VDC)* -OUTPUT (24 VDC)* black Male RS485: + yellow RS485: SHIELD, GND black RS485 serial port RS485: - blue...
-
Page 17: Introduction To The Operation
INTRODUCTION TO THE OPERATION The instrument is able to extract automatically a settable amount of product from the weighing structure, driving the batching organ (including two-speed) through the PRESET and SET contacts. The instrument has the following features: - Maximum 99 settable formulas (see section FORMULAS PROGRAMMING); - Batching resume after blackout (see section RESUME BATCHING AFTER A POWER CUT);... -
Page 18: Keys And Symbols Functions
KEYS AND SYMBOLS FUNCTIONS KEYS Short press Long press (3 s) Into menus Power-on Power-off Cancel or return to previous Semi-automatic zero Tare resetting menu Gross Net Net Gross Select figure to be modified Batching start Select figure to be modified Modify figure or go to next Batching stop menu item... -
Page 19: Menu Map
MENU MAP Into menus changes are applied right after pressing the ENTER key ( no further confirmation is required). SYSTEM PARAMETERS - 14 -... -
Page 20: Batching Constants
BATCHING CONSTANTS - 15 -... -
Page 21: Lcd Graphic Display
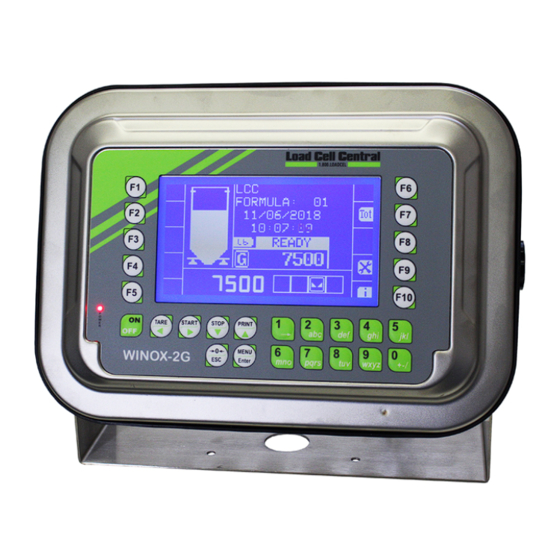
6) Instrument serial number These information are required to request technical assistance. As the start-up sequence is completed, if no error occurs, the instrument shows the main screen: WDESK-G, WINOX-G 1) Instrument or plant name 2) Next formula to be run... -
Page 22: Lcd Graphic Display Configuration
LCD GRAPHIC DISPLAY CONFIGURATION From the main screen press the function key to enter the LCD display configuration menu; use the keys ▲, ▼, ENTER, ESC or the function keys to move within menus: 1) Unit of measure 2) Gross weight symbol 3) Setpoint status and value 4) Gross weight value 5) Number of setpoint class*... -
Page 23: Customizing Messages Of Lcd Graphic Display
CUSTOMIZING MESSAGES OF LCD GRAPHIC DISPLAY The instrument allows to edit messages in the following way: > PLANT NAME > FORMULAS NAME > PRODUCTS NAME > LOT > MSG JOLLY* > EDIT MSG (only after having selected the JOLLY language) *) allows to edit all display messages Select the message to edit, the following screen appears: 1) Message box... -
Page 24: Instrument Commissioning
INSTRUMENT COMMISSIONING To turn on the instrument press ON. To turn it off press OFF for about 3 seconds: when appears release the key. After a blackout the instrument DOES NOT come on again automatically, you have to press ON. To guarantee an automatic restart after a blackout, disable the ON key (see section AFTER A BLACKOUT). -
Page 25: Programming Of System Parameters
PROGRAMMING OF SYSTEM PARAMETERS From the weight display, press simultaneously keys MENU and ESC to access the parameter setting. MENU/ENTER: to enter a menu/confirm the data entry. ▲ ▼: to modify the displayed value or menu item. ◄ ►: to select a new figure. ESC: to cancel and return to the previous menu. -
Page 26: Tare Weight Zero Setting
TARE WEIGHT ZERO SETTING This menu may also be accessed directly from the weight display, holding down the key for 3 seconds. Perform this procedure after having set the THEORETICAL CALIBRATION data. Use this function to set to zero the weight of the empty system after commissioning and then later on to compensate zero variations due to the presence of product residues. -
Page 27: Filter On The Weight
Example: for a system of maximum capacity 1000 kg and 1 kg division, two sample weights are available, one of 500 kg and the other one of 300 kg. Load both weights onto the system and correct the indicated weight to 800. Now remove the 300 kg weight, the system must show 500; remove the 500 kg weight, too;... -
Page 28: Anti Peak
The filter enables to stabilise a weight as long as its variations are smaller than the corresponding “response time”. It is necessary to set this filter according to the type of application and to the full scale value set. FILTER VALUE Response times Display and serial port refresh [ms]... -
Page 29: Zero Tracking
ZERO TRACKING (from 1 to 5, default: ): When the weight value is stable and, after a second, it deviates from zero by a figure in divisions smaller or equal to the figure in divisions set in this parameter, the weight is set to zero. To disable this function, set . Example: if the parameter ... -
Page 30: Semi-Automatic Tare (Net/Gross)
INPUTS - INPUT 1: START - INPUT 2: STOP - INPUT 3 (Default = ): It’s possible to select one of the following functions: - (NET/GROSS): by closing this input for no more than one second, it’s making an operation of SEMI-AUTOMATIC TARE and the display will show the net weight. -
Page 31: Analog Output(Only For Instruments Where This Option Is Available)
ANALOG OUTPUT(ONLY FOR INSTRUMENTS WHERE THIS OPTION IS AVAILABLE) - : it selects the analog output type (4÷20 mA, 0÷20 mA, 0÷10 V, 0÷5 V, ±10 V, ±5 V; default: 4÷20 mA). For the output ±10 V and ±5 V the soldered jumper SW1 must be closed: ▫... - Page 32 Minimum and maximum values which can be set for zero and full scale corrections: ANALOG OUTPUT TYPE Minimum Maximum 0÷10 V -0.150 10.200 0÷5 V -0.150 5.500 ±10 V -10.300 10.200 ±5 V -5.500 5.500 0÷20 mA -0.200 22.000 4÷20 mA -0.200 22.000 NOTE: the analog output may also be used in the opposite manner, i.e.
-
Page 33: Serial Communication Setting
SERIAL COMMUNICATION SETTING - / : communication port. - : it disables any type of communication (default). - : MODBUS-RTU protocol; possible addresses: from 1 to 99 (see Communication protocols manual). - : continuous weight transmission protocol to RIP5/20/60, RIP50SHA, RIPLED series remote displays;... -
Page 34: Rs232 Serial Communication
RS232 SERIAL COMMUNICATION INSTRUMENT RS232 TXD RS232 RXD DB9-F RS485 SERIAL COMMUNICATION INSTRUMENT INSTRUMENT INSTRUMENT max 500 m 24 VDC RS485 + RS485 + RS485 - RS485 - CONVLAU If the RS485 network exceeds 100 metres in length or baud-rate over 9600 are used, two terminating resistors are needed at the ends of the network. -
Page 35: Alarm Relay Closure
ALARM RELAY CLOSURE The ALARM relay closing can be enabled or disabled for each of the following alarms: approval contact ();formula not programmed (); insuffcient product (); no decrease in weight (); tolerance (); fall (); the PC did not read the batching data (). : in presence of alarm, the relay is closed (default) : the relay is not closed even in the presence of alarm TEST... -
Page 36: Date And Time Setting
DATE AND TIME SETTING Selecting the item in the main menu, access is obtained to the date and time display menu. Pressing ENTER several times scrolls through days - months – years and hours – minutes; by pressing the keys ◄ and ► the figure to change can be selected; by pressing the keys ▲ and ▼ or using the numerical keypad, the figure can be changed;... -
Page 37: Info Menu
INFO MENU : active options are displayed. PROGRAMMING OF BATCHING CONSTANTS From weight display press MENU, then press ▲ several times until is displayed and confirm. MENU/ENTER: to enter a menu/confirm the data entry. ▲ ▼: to modify the displayed value or menu item. ◄... -
Page 38: Waiting Time
WAITING TIME (from 0.0 to max 999.9 seconds; default 5.0): time elapsing between the SET batching end and the CYCLE END closing to allow the weight to become stable. By setting 0, the function is disabled (). NO PRODUCT UNLOAD TIME ... -
Page 39: Tolerance
(from 0 to maximum weight; default: 0): in this parameter it is possible to set the fall value for each formula (only if = 0) or to display and/or to modify the fall value calculated automatically by the instrument (only if is different from 0). TOLERANCE ... -
Page 40: Print At Cycle End
PRINT AT CYCLE END (Default ): function enabling to print batching data at cycle end. - : print enabled - : print disabled CHECKING PC PRESENCE (Default: ): check for a PC connected to the instrument. - : PC presence check active; the instrument checks for a PC every 10 seconds. If no PC presence is detected, the instrument will display an alarm signal ... -
Page 41: Formulas Programming
FORMULAS PROGRAMMING Select the formula that you wish to program and set and . It is possible to set max 99 formulas. is NOT displayed if a SLOW value has been set in the constants (). In case of attempt in or to set a value higher than the maximum weight () set in the batching constants, the message ... -
Page 42: Batching
BATCHING Note: In case of alarm, the batching may be canceled by pressing the ESC button or by closing the STOP input. After having selected the formula and set the desired number of batching cycles, the first batching cycle starts as follows: 1. -
Page 43: Automatic Loading
appears. If instead, the batched quantity is greater than the set amount plus this value, the alarm appears. Press ENTER to cancel the alarm and go on with the batching. 9. The system enters the cycle end phase: - The CYCLE END contact is closed; - The display shows the weight preceded by the letter ;... -
Page 44: Batching Start From External Contact
WARNING: Only if BIG BAG UNLOADING has been enabled ( = ) and if during the batching the weight reaches the minimum weight (), the instrument: - waits for the safe emptying time (); - pauses the batching (opening of the SET and PRESET contacts); - starts the AUTOMATIC LOADING phase (closing of the LOAD contact). -
Page 45: Displaying During Batching
DISPLAYING DURING BATCHING During the batching cycle the display shows the following screen: WDESK-G, WINOX-G 1) Product loading (the arrow indicates that product is loading) 2) Product level on the scale 3) Batching weight value (net or WINOX-2G gross) 4) Gross weight value... -
Page 46: Batching Stop
BATCHING STOP - Open the START contact and close the STOP contact to stop the batching. If the START contact is closed, the alarm is displayed. - To pause the batching at any time, press STOP, the prompt is displayed. Press ENTER to resume the batching or press again STOP to cancel it completely. -
Page 47: Totals Management
TOTALS MANAGEMENT CONSUMPTION This feature allows to store consumption of each product since the last deletion. To enable consumptions management: > CONSUMPTION (select YES to enable, NO to disable) - ENABLE To access consumptions data press function key: > CONSUMPTION (consumptions display) - DISPLAY (consumptions deletion) -
Page 48: Production
PRODUCTION This feature allows to store the quantity of batched product and the number of executed cycles for each formula since the last deletion. To enable production management: > PRODUCTION (select YES to enable, NO to disable) - ENABLE To access production data press function key: >... - Page 49 To access stocks data press function key: > STOCKS (stocks display and modification) - DISPLAY (stocks deletion) - DELETE (stocks print) - PRINT > MINIMUM STOCK (minimum stocks display and modification) - DISPLAY (minimum stocks deletion) - DELETE (minimum stocks print) - PRINT Select >...
-
Page 50: Alarms
ALARMS : it is displayed if, at batching start, the weight on the scale is lower than the quantity to be batched. Press ESC to return to the weight displaying. : alternated with weight display, it means that the automatic load is in progress (it is activated when the weight is lower than the minimum set and cleared when the weight is equal to or higher than the maximum weight).... - Page 51 maximum setting value; the weight value set in sample weight verification does not match the detected mV increase; the analog output correction goes beyond the permitted limits. lock active on menu item, keypad or display. : : It’s not possible to display properly the number because is greater than 999999 or less than -999999.
-
Page 52: Printing Examples
PRINTING EXAMPLES If the printer has been set (see section SERIAL COMMUNICATION SETTING), from the weight display press the PRINT key for less than 3 seconds: - : prints the displayed weight; - : prints the constants (minimum weight, maximum weight, etc.); - : prints one or all of the formulas;... - Page 53 FORMULA PRINTOUT Standard formula printout ( = 0) ----------------------- W--- UNLOAD Addr:01 DATE: 01/10/11 08:30:01 FORMULA: 2000 kg PSET 200 kg Formula printout with slow active ( = 100) ----------------------- W--- UNLOAD Addr:01 DATE: 01/10/11 08:30:01 FORMULA: 2000 kg SLOW 100 kg TOTALS PRINTOUT Minimum stocks values print...
- Page 54 WEIGHT PRINTOUT ----------------------- W--- UNLOAD Addr:01 DATE: 12/09/11 14:48:12 GROSS 1204 kg 831 kg TARE 373 kg - 49 -...
-
Page 55: Reserved For The Installer
RESERVED FOR THE INSTALLER MENU LOCKING Through this procedure, it’s possible to block the access to any menu on the instrument. Select the menu that you wish to lock: press ESC and ◄ simultaneously for 3 seconds, the display shows (the left point on the text indicates that this menu item is now locked). - Page 56 PROGRAM SELECTION: confirm and use the arrow keys to select the desired program: : basic program, setpoint management only. : to be used when the loaded weighing system correspond to not loaded cells and vice versa (product increases while weight on load cells actually decreases). : weight remote display program with setpoint.
Need help?
Do you have a question about the WDESK-G and is the answer not in the manual?
Questions and answers