Table of Contents
Advertisement
Advertisement
Table of Contents

Related Manuals for Ferre F6TX04EF

Summary of Contents for Ferre F6TX04EF
- Page 1 FULL ELECTRICAL OVEN WITH 4 HOTPLATE USER MANUAL MODEL: F6TX04EF...
- Page 2 Please read this manual first! Dear Customer, We wish you make the best of the product which is produced at the modern facilities and subject to rigorous quality control operations. For this reason, please first read this manual thoroughly prior to use of it and keep it as a reference.
-
Page 3: Table Of Contents
Table of Contents 1)Your product General View Technical Specifications Accessories 2) Important Safety Instructions General safety Safety for children Safety in connection with electric-related operations Intended use 3) Installation Pre-installation Installation and connections ... -
Page 4: Your Product
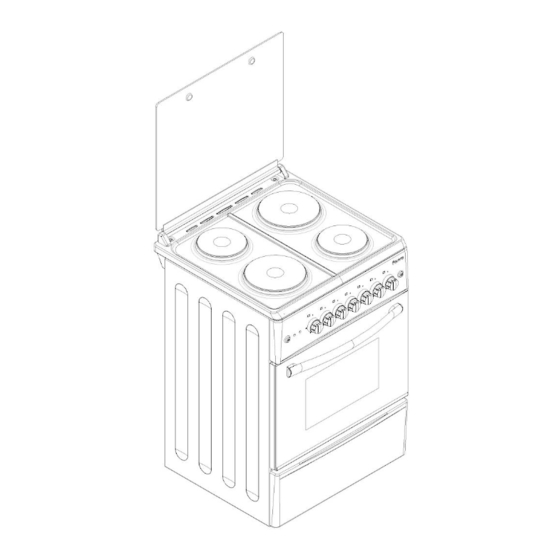
1) Your product GENERAL VIEW Ø145 Table Ø180 Control Panel Button Tray Front cover Foot Technical Specifications Voltage/frequency 220-240 V / 400 V 3 N – 50-60 Hz Total power consumption Min. 7 – max. 9 kW Fuse Min. 32 A Cable type/section 3 X 4 PVC –... -
Page 5: Accessories
Basis: For home-type electric cookers, energy label information is given as per EN 50304. Values are determined according to the standard load and lower/upper heater or fan-supported heating (if any) functions. Ürün Technical specifications may be changed without prior advise to improve product quality. -
Page 6: Important Safety Instructions
2) Important safety instructions This section contains safety instructions to prevent personal injury or property damage risks. Failure to comply with these instructions will make all warranty invalid. General Safety This product is not intended for use by persons (including children) having physical, sensory or metal incapability or uninformed or inexperienced, unless they are attended by a person to be responsible for safety or to give necessary instructions for use of... - Page 7 Be careful when you use alcohol when cooking. Alcohol evaporates quickly at high temperature and may burst into flame and cause fire when it contacts with hot surfaces. Do not heat the closed tin cans and glass jars. The resulting pressure may cause burst of them.
-
Page 8: Safety For Children
Do not use abrasive cleaning materials or sharp metal scrappers to clean the cooker cover (glass) as they may destroy the surface and cause break of the glass. CAUTION: Disconnect the power and allow it to cool down in order to eliminate electric shock prior to replacement of the cooker light. -
Page 9: Intended Use
Intended use This product is designed for use at home. It is not allowed for commercial use. “CAUTION: This product should be used only for cooking purpose. It should not be used for other purposes such as heating the room.” This product should not be used for heating plate under the grill, hang and dry towel or clothing on the handle or for heating purpose. -
Page 10: Installation And Connections
Installation and connections Physical damage! Do not use the cover and/or handle to carry or move the product. Product should be carried by two persons at least. Electric connection The product should be used with an earth line definitely! The manufacturing company will not be responsible for any damages if used without earth line. -
Page 11: Electric Wiring
Electric shock risk! Lease disconnect the power before starting any work on the electric wiring. Final check 1. Plug the power cable onto the outlet and enable the fuse of the equipment. 2. Check the functions. Waste of the Product Destruction of the packaging Packaging materials are dangerous for the children. -
Page 12: Disposal Of The Product
Disposal of the old product Dispose of the old product in such a way so as not to give any harm to the environment. The product has a symbol (WEEE) on it indicating the electric and electronic equipment waste should be collected separately. This means that in order to minimize effect on the environment, this product should be recycled or disassembled in accordance with EU Directive 2002/96/EC. -
Page 13: First Use
Thaw the frozen products before cooking them. First use First cleaning Some detergents or cleaning agents may give damage to tesurface. 1. Take out all the packaging materials. 2. Wipe surface of the product with a damp cloth orspone and dry with a cloth. - Page 14 Tips about cooking with the cooker Use appropriate metal and non-sticking plates or aluminum containers or heat-resistant silicone moulds. Use the area on the rack in an optimum way. Place the cooking mould in the center of the rack inside the cooker.
-
Page 15: Use Of Electric Cooker
Fire risk from the food not suitable for grill Grill only the food suitable for high grill fire. Do not place the food so much to the rear of it. It is the hottest point and oily food may catch fire. Use of electric cook Selection of temperature and operating mode Model... -
Page 16: Operating Modes
1 Temperature button 2 Function button 3 Timer button Operating modes of the electric cooker are selected by function button. Temperature setting is made by the temperature button. All cooker functions are switched off by brining the respective button to the Off (upper) position. - Page 17 Lower Heating Only the lower heating is on. For example, it is suitable for pizza or food you desire to become brownish on the bottom side. Lower+upper+turbo fan (optional) Upper+lower and turbo motor on. Food is heated more homogenously thanks to turbo motor. For example, it is suitable for cakes, yoghurt, pastries or cakes in the cooking molds and casserole.
-
Page 18: Use Of Cooker Timer
Grill + chicken spin roasting (optional) It is suitable for grilling and chicken spin roasting. Meat, chick and similar food arrange on the shish are cooked by roasting equally in character of grilling. Bring the temperature to the maximum level. Powerful grill + turbo fan (optional) Powerfull grill (upper and grill resistance) and turbo motor heating on. - Page 19 Digital timer is an electronic timing module that enables your food in the cooker to be ready for service at any time you desire. To this end, simply program the cooking time and the time of service you desire. Furthermore, it may also be used as alarm clock independently from the cooker.
- Page 20 1) Switch 2) Set 3) Displaywillbecome tothemanualmode theclockbyusing steadyafter 5 seconds. (+)or (-) ALARM TIME SETTING With this function, you may ensure the alarm to ring after the time you set expires. 3-After a couple of 1-Select the alarm time 2- Enterthe time byusing seconds, thedisplay setting...
- Page 21 AUTOMATIC COOKING PROGRAM If you will start cooking the food you put into the cooker, simply enter the cooking time. For example: We put our food into the cooker and want it to be cooked for 2 hours and 15 minutes. 2) Enterthecooking 1) Current time is 18:30 time settingmode.
- Page 22 when the food will be ready (end of cooking) and set it, if desired. In the example given below, the setting is made to ensure the food to be ready at 21:30. 2- Set the cooking 2-After a fewseconds, 1-The time for the food to be ready is shown the display shows the expiration time by using...
- Page 23 Note: The cooker will remain disengaged until you reset the cooker timer. In the example given above, the cooking time is entered and the automatically calculated cooking expiration time is changed by us; in this case, the cooking time will be automatically calculated and, if desired, changed in the second step.
- Page 24 2- Key symbol will appear on the 1-Press and hold the manual display. (Now the child lock is engaged) Mode for 3 seconds. Note: To unlock, you should press an hold the Manual Mode keys for 3 seconds. Note: If the alarm rings when the child key is enabled, you may silence the alarm by pressing and releasing the Manual Mode keys.
-
Page 25: Table Of Cooking Times
3) Now your alarm will ring at the volume you set last. Note: Default setting for alarm volume is at the highest level. In case of power failure, it will return to the default setting. Start of the cooking process When you select the cooking mode and temperature you desire to operate the cooker, you should also set the time. -
Page 26: Operation Of The Grill
1. The specified values were found at the laboratory. The values appropriate for you may be different from these values. 2. Switch off the cooker by use of function button and temperature button. Cooki e Cooker tray 170...190 25...35 Cri s py mi l l e- Cooker tray 180...190 25...35... -
Page 27: Use Of Range Part
Food Rack position Grill time (appr.) Fish 30…40 minutes* Chick part 40…50 minutes.* Lamp chop 25…35 minutes.* Beef steak 25…35 minutes.* Veal chop 25…35 minutes.* *depends on thickness. 6) Use of the hotplates To obtain maximum efficiency from the electric cooker, you are recommended to use pots 16-20cm in diameter. -
Page 28: Maintenance And Cleaning
Use pots with dry base on the hotplate. Do not place After you clean the hotplate, the pot cover, especially h eat it for several minutes to dry it. If damp ones on the hotplate. you will not use it for an extended time, lubricate the top of it by machine oil to form a thin film of lubricant. -
Page 29: Cleaning Of The Control Panel
Some detergents or cleaning agents may damage the surface. Do not use aggressive detergents, cleaning powders/creams or sharp objects for cleaning. Do not use steam cleaning products for cleaning. Cleaning the control panel Wipe clean the control panel and control buttons by a damp cloth and wipe dry by a cloth. -
Page 30: Proposed Solutions For The Problem
If there is round light in your cooker. 1. Disconnect the power of the product. 2. Remove the glass cover by turning anticlockwise. 3. Turn the cooker light anticlockwise to remove and replace it with a new one. 4. Put the glass cover in place again. 8) Proposed solutions for the problems Product does not operate ... - Page 31 2013 R0...
Need help?
Do you have a question about the F6TX04EF and is the answer not in the manual?
Questions and answers
What is the symbol for grill