Table of Contents
Advertisement
Quick Links
Rating:
Wattages:
Speed:
Sanding roller size:
Weight:
Need Assistance?
Please send e-mail to info@wellingtontool.com
Technical questions
Replacement parts
Parts missing from package
PRODUCT SPECIFICATIONS
230 V, 50 Hz AC
420 W
1,000 – 3,200 RPM (no load)
13
2
/
4" (100mm) wide
5 lb. 14 oz. (2.67 kg)
4" RESTORER
Model # WR352K1
Owner's Manual
" (72mm) diameter
16
TM
Advertisement
Table of Contents

Related Manuals for RESTORER WR352K1

Summary of Contents for RESTORER WR352K1
- Page 1 4" RESTORER Model # WR352K1 Owner’s Manual PRODUCT SPECIFICATIONS Rating: 230 V, 50 Hz AC Wattages: 420 W Speed: 1,000 – 3,200 RPM (no load) Sanding roller size: " (72mm) diameter 4" (100mm) wide Weight: 5 lb. 14 oz. (2.67 kg) Need Assistance? Please send e-mail to info@wellingtontool.com...
-
Page 2: Table Of Contents
Personal safety …………………………………………………………………………………... Power tool use and care .……………………………………………………………………….. Service ……………………………………………………………………………………………. Specific safety rules ……………………………………………………………………………... Guidelines for extension cords …………………………………………………………………. Symbols …………………………………………………………………………………………… Know your RESTORER ………………………………………………………......11–14 Assembly and operating ………………………………………………………………………… Changing sanding sleeve on roller …………………………………………………………….. 11–12 Variable speed control …………………………………………………………………………... -
Page 3: General Safety Warnings
GENERAL SAFETY WARNINGS WARNING: Before using this tool or any of its accessories, read this manual and follow all Safety Rules and Operating Instructions. The important precautions, safeguards and instructions appearing in this manual are not meant to cover all possible situations. It must be understood that common sense and caution are factors which cannot be built into the product. -
Page 4: Electrical Safety
GENERAL SAFETY WARNINGS WEAR A DUST MASK THAT IS DESIGNED TO BE USED WHEN OPERATING A POWER TOOL IN A DUSTY ENVIRONMENT. WARNING: Dust that is created by power sanding, sawing, grinding, drilling, and other construction activities may contain chemicals that are known to cause cancer, birth defects, or other genetic abnormalities. -
Page 5: Power Tool Safety
POWER TOOL SAFETY WARNING: When operating a power tool outdoors, use Read all safety an extension cord suitable for outdoor use. warnings and instructions. Failure to Use of a cord suitable for outdoor use reduces follow the warnings and instructions may result the risk of electric shock. -
Page 6: Power Tool Use And Care
POWER TOOL SAFETY Use the power tool, accessories and tool bits Personal safety – cont’d etc. in accordance with these instructions, If devices are provided for the connection of taking into account the working conditions dust extraction and collection facilities, and the work to be performed. -
Page 7: Specific Safety Rules
Always use two hands when operating the WARNING: Always use a dust mask RESTORER. One hand should be used on the when sanding or stripping paint. front handle and the other hand should be placed on the rear handle to operate the switches. Using... -
Page 8: Guidelines For Extension Cords
GUIDELINES FOR EXTENSION CORDS Make sure your extension cord is the proper When operating a power tool outdoors, use size. When using an extension cord, be sure to an outdoor extension cord marked “W -A” or use one heavy enough to carry the current the “W”. -
Page 9: Symbols
SYMBOLS WARNING: Some of the following symbols may appear on the RESTORER . Study these symbols and learn their meaning. Proper interpretation of these symbols will allow for more efficient and safer operation of this tool. Volts No load speed... -
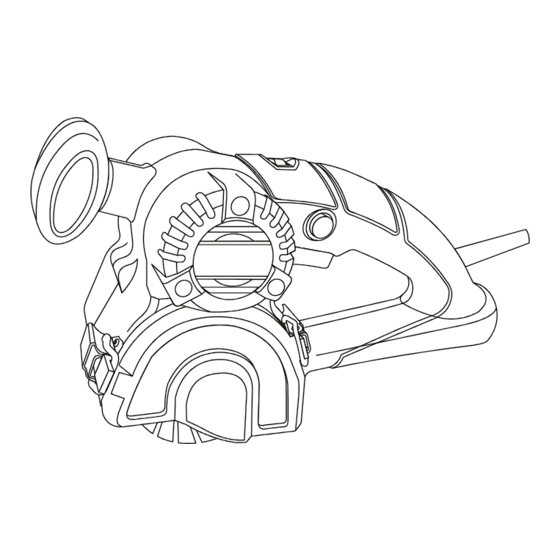
Page 10: Know Your Restorer
KNOW YOUR RESTORER Front Variable speed control handle Lock-on button ON/OFF trigger switch Main handle Dust Air vents port Roller end cover hasp Roller end cover clamp Roller end Roller cover Medium Rust and paint Coarse sanding sleeve sanding sleeve... -
Page 11: Assembly And Operating
ASSEMBLY AND OPERATING CHANGING SANDING SLEEVE ON ROLLER WARNING: Remove the plug from the power source before installing or removing a sanding roller. Lift the two roller end cover hasps (1) away from the main housing (2) (Fig. 1). Fig. 3 Slide the roller onto the roller shaft (Fig. -
Page 12: On/Off Trigger Switch
(Fig. 6). To turn the tool ON, the switch several times before plugging in your squeeze the trigger. To turn the tool OFF, RESTORER. Damage to your tool or personal release the trigger. injury may result. WARNING For safety reasons, the operator must read the sections of this Owner’s... -
Page 13: Sanding
Make sure you have a firm grip hidden fasteners could ignite flammable on the tool with both hands. materials. DO NOT FORCE THE RESTORER. The weight WARNING: An unsecured workpiece of the RESTORER usually provides adequate could be thrown toward the operator causing pressure. -
Page 14: Cleaning The Tool
"CLEANING THE TOOL" for details. WARNING: Do not at any time allow Always place the RESTORER on its “nose” brake fluids, gasoline, petroleum-based (balanced between the front handle and the products, penetrating oils, etc. to come in roller housing) when the tool is turned OFF and contact with plastic parts. -
Page 15: Maintenance
RESTORER with an air jet. WARNING: DO NOT attempt to modify Failure to take these safety precautions... -
Page 16: Exploded View
EXPLODED VIEW... -
Page 17: Parts List
If you need assistance regarding accessories, please send e-mail to info@wellingtontool.com. Any attempt to repair or replace electrical parts on this RESTORER may create a safety hazard unless repairs are performed by a qualified technician. -
Page 18: Warranty
90 DAY MONEY BACK GUARANTEE: If you are not completely satisfied with the performance of your Wellington Corp RESTORER for any reason, you can return it within 90 days from the date of purchase with a receipt for a full refund –...
Need help?
Do you have a question about the WR352K1 and is the answer not in the manual?
Questions and answers