
Summary of Contents for Visonic VIS-CRS05-B
- Page 1 VIS-CRS05-B 4K Conference Auto Tracking Recorder User Manual V1.0 VISSONIC ELECTRONICS LIMITED...
- Page 2 www.vissonic.com The meaning of symbols ■ Safety instructions For your safe and correct use of equipments, we use a lot of symbols on the equipments and in the manuals, demonstrating the risk of body hurt or possible damage to property for the user or others. Indications and their meanings are as follow.
- Page 3 www.vissonic.com Important note Warning In order to ensure the reliable performance of the equipment and the safety of the user, please observe the following matters during the process of installation, use and maintenance: The matters needing attention of installation Please do not use this product in the following places: the place of dust, soot and electric conductivity dust, corrosive gas, combustible gas;...
- Page 4 www.vissonic.com Matters needing attention in discarding product Electrolytic explosion: the burning of electrolytic capacitor on circuit boards may lead to explosion; Please collect and process according to the classification, do not put into life garbage; Please process it as industrial waste, or according to the local environmental protection regulations.
- Page 5 www.vissonic.com Preface This manual mainly describes the use, performance parameters and troubleshooting of VIS- CRS05-B 4K Conference Auto Tracking Recorder. If the technical parameters and system usage in this manual are changed, the manufacturer will update the version of the manual. Please use the latest user manual. The copyright of the manual belongs to VISSONIC ELECTRONICS LIMITED.
-
Page 6: Table Of Contents
www.vissonic.com Contexts 1. Product description .........................8 2. Specification parameter table ......................9 3. Equipment interface description ....................10 4. Host function and operation instructions ..................11 4.1. Start up ..........................11 4.2. Start-up guide screen ......................11 4.3. Record (video and audio) ....................11 4.4. - Page 7 www.vissonic.com 5.2.6. Date and time ......................42 5.2.7. Disk and storage .....................43 5.2.8. Networks and services ................... 44 5.2.8.1. Ethernet ......................44 5.2.8.2. Network test ....................45 5.2.9. Engineering settings ....................45 5.2.10. Installation and Commissioning ................46 5.2.10.1. Tracking machine ..................46 5.2.10.2.
-
Page 8: Product Description
VIS-CRS05-B is an integrated recording and broadcasting device integrating courseware recording, live broadcast, on-demand, intelligent broadcasting, storage and other functions. Based on the ARM architecture design, the product has powerful performance. The VIS-CRS05-B adopts H.265 encoding and supports 5-channel 4K video signal acquisition and encoding. From acquisition, recording to output, all support 4K resolution. -
Page 9: Specification Parameter Table
2. Specification parameter table Model VIS-CRS05-B video input 5 HDMI signal input video output 4 HDMI signal output Maximum Input 3840x2160@30fps Resolution Maximum output 3840x2160@30fps resolution 1 balanced input,3pin Phoenix terminal interface Audio input 1 unbalanced input,3.5mm interface 1 Balanced output,3pin Phoenix terminal Audio output 1 Unbalanced listening output interface,3.5mm Earphone hole... -
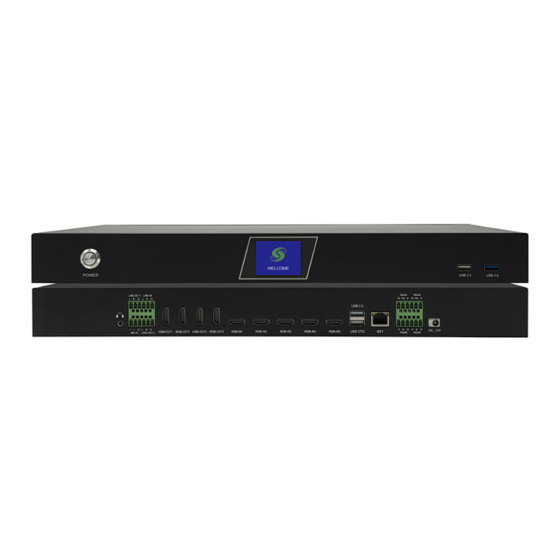
Page 10: Equipment Interface Description
www.vissonic.com 3. Equipment interface description Interface Number Illustration Identification 3.5mm headphone monitor jack L-IN1:Unbalanced audio input,Phoenix Terminal Connector MIC-IN:Balanced Audio Input,Phoenix Terminal Connector L-OUT1:Unbalanced audio input,Phoenix Terminal Connector L-OUT2:Unbalanced audio input,Phoenix Terminal Connector HDMI signal output, The output screen is a guide screen or a PGM. HDMI OUT 1-4 (Software can be set)... -
Page 11: Host Function And Operation Instructions
www.vissonic.com 4. Host function and operation instructions 4.1. Start up After the equipment power cord is connected ( DC12V/1A ) , Press the unit's power on/off button 4.2. Start-up guide screen The main interface of the guide includes "live screen (PGM/PGM2)", "resource channel preview", "guide"... -
Page 12: Push The Current (E.g. In Mechanics)
www.vissonic.com the "Start" icon will turn red, click "Start" icon again will pause the recording. At the same time, the "Start" icon will turn red, click "Start" icon again to pause the recording. Clicking the "Stop" button will end the recording task. ... - Page 13 www.vissonic.com Enter the account number and password, the account number and password need to be authorised to open, please contact our sales staff. Interactive classroom selection screen Select the classroom, as shown above, to enter based on the classroom name set by the interactive system;...
-
Page 14: Demerger
www.vissonic.com Click to send the PC's screen to the remote end. Click to start recording, click to start push stream, and click to return to the guide screen. Click to enter the menu and to exit the room. 4.6. Demerger There is a "Split"... -
Page 15: Especially Efficacious
www.vissonic.com where is a custom split option,Click to enter the custom setting interface, as shown below: When used with an electronic gantry camera, the system provides four splits by default to facilitate quick screen splits for teacher close-ups, student panoramas, and pc screens. 4.7. -
Page 16: Guide Mode Switching
www.vissonic.com Special effects selection 4.8. Guide mode switching The recording host supports single-click touch resource channel for PGM live channel image switching in manual guide mode. Mode switching In manual guide mode, the camera is not automatically tracked, and all operations can be set manually by clicking on the settings, such as split screen, special effects, switching to PGM and other operations. -
Page 17: Remotely
www.vissonic.com PTZ control In "Menu→Channel→Remote Channel→(check the channel stream address to be configured) →Setup→Panel Head→Setup", you can control the camera's up/down/right/left/right rotation and call the preset position in this interface in manual mode by setting the parameters of the Pan/Tilt protocol VISCA, the camera's IP address, the camera's port number, the camera's address number, and so on. -
Page 18: Resource Channel
www.vissonic.com Remote menu Click the button to enter the Remote Access screen, see "Remote Access" for details. 4.10.1. Resource channel Resource channel As shown in the above figure 6 small video windows are resource channels, in accordance with the order from top to bottom, from left to right, in order to display the file channel (video on demand playback channel). -
Page 19: One-Touch Start
www.vissonic.com ②Associated Resource Channel Recording: If you need to record in associated resource mode, click "Menu→Settings→Recording Settings→Recording Policies" in the main interface to tick the "RES" menu. 4.11. One-touch start One button can be associated with "Record", "Push Stream in Movie Mode", "Auto Guide", "Insert Credits in Movie Mode", "Insert Credits in Movie Mode"... -
Page 20: System Function
www.vissonic.com 5. System function As shown in the figure below, click - the main interface [menu], the system functions are mainly divided into seven modules: 1, "Channel"; 2, "Settings"; 3, "Maintenance"; 4, "Fil e Manager"; 5, "Teaching Information"; 6, "Conference Settings"; 7, "Interface Switching". System function To enter the menu, you need to enter the account password to verify that you can enter the default account/password are admin. -
Page 21: Local Channel
www.vissonic.com 5.1.1. Local channel Local Channel: Set the video encoding parameters of the local physical channel Local channel Select the local channel that needs to be set to enter the channel setting interface, such as HDMI-1 HDMI-1 Channel settings Monitor Window: set the order of resource channel preview for this channel in the main interface of the guide, C1 is the first window, C2 is the second window, and so on. -
Page 22: Ptz Operation
www.vissonic.com the split function. Auto Switching ID: Corresponds to the camera's auto-tracking procedure hair code, related to the recording and broadcasting host full-automatic switching. Display mode: divided into aspect ratio and full screen. When the video screen in the channel is not displayed full screen in PGM, you can modify it accordingly here. -
Page 23: Head Setup
www.vissonic.com :Used to save preset bits. :For clearing preset bits. 5.1.1.2. Head setup Click to enter the gimbal setting interface as shown below: PTZ Settings Interface Enable PTZ: PTZ switch for enabling or disabling this channel PTZ Protocol: Used for PTZ control protocol selection, support VISCA, PELCO-P, PELCO-D and other three protocols. -
Page 24: Image Settings
www.vissonic.com PTZ control in the PTZ setup menu or the main interface of the recording and broadcasting, in the main interface to operate the PTZ, you must first activate the corresponding channel on the resource channel, and then point the PTZ control button in order to be able to use it normally. 5.1.1.3. - Page 25 www.vissonic.com Code setting screen :Select the encoding parameter settings for the main stream and sub-streams. Resolution: the resolution of the main stream can be selected: commonly used 3840*2160, 1920*1080, 1600*900, 1280*720, 960*540, etc.; the resolution of the sub-stream can be selected: 1280*720, 960*540, 640*360, 480*270, 720*576, 352*288.
-
Page 26: Remote Access
www.vissonic.com 5.1.2. Remote access Used to automatically search for remote recording devices under LAN and add remote devices. As shown in the figure below: Remote access Add a remote recording device: When multiple recording hosts are on the same LAN, the left window will automatically search out the recording hosts under the LAN. - Page 27 www.vissonic.com side, and select the channel for and so on. To remove the device, click to remove the device. Manually add RTSP streams to the camera: Click , you can add devices that support the RTSP real-time streaming protocol, enter the stream address (Note: Generally, you can just enter the main stream, the box after the following sub-stream is empty) RSTP streaming Click OK, select the added stream address, click the following...
-
Page 28: Pgm
www.vissonic.com Remote channel setting interface Monitor Window: set the order of resource channel preview for this channel in the main interface of the guide, C1 is the first window, C2 is the second window, and so on. Channel name: set the name of the channel, support Chinese and English, the maximum display channel name in the main interface is 6 characters. - Page 29 www.vissonic.com PGM Channel Resolution: the set PGM resolution. Video format: input video display format and frame rate, 1920*1080p25 represents 1080p HD 25 fps. Channel name: (default is greyed out, not actionable here) Automatic ID switching: (default is greyed out, not actionable here) Audio and Video Synchronisation Compensation Time: Used for time compensation when audio and video are out of sync in guide mode or interactive mode.
-
Page 30: Window Order
www.vissonic.com 5.1.4. Window order Window order Window Order: Used to adjust the screen order of each channel in the master broadcasting interface; 5.2. Set up Set up As shown in the figure, the setup menu has a total of 9 settings: "Record Setup", "Guide Setup", "Live Setup", "Management Platform", "Users and Login", "Date and Time", "Disk and Storage", "Network and Service", "Engineering Setup", "Installation and Commissioning". -
Page 31: Recording Setup
www.vissonic.com 5.2.1. Recording setup Video Settings There are six settings in the Recording Settings menu: "Audio Encoding", "Audio Control", "Timed Recording", "Recording Policy", "FTP Upload", and "One Click Start Configuration". 5.2.1.1. Audio encoding Audio encoding As shown in the above figure, in the audio encoding setting menu, users can customise the sampling frequency (the default parameter is sufficient, and it is not recommended that users... - Page 32 www.vissonic.com modify it, as modification may cause sound anomalies); the audio encoding bit rate is selectable from 8000-128000Kbps. 5.2.1.2. Audio control Audio control As shown in the figure above, it is used for corresponding audio on/off control and input/output sound level adjustment. 5.2.1.3.
- Page 33 www.vissonic.com As shown in the above figure, it is used for the timed recording function of the recording system. Users can set eight time slots for timed recording parameters here, and copy the parameters of this day to any day of the week. 5.2.1.4.
-
Page 34: File Upload
www.vissonic.com As shown in the figure above, Resource Mode Recording selects the channel that needs to be recorded to be ticked. 5.2.1.5. File upload FTP upload and HTTP upload As shown in the above figure, the recording and broadcasting system supports automatically uploading video files to the set FTP server for storage after the video recording stops. -
Page 35: One Click To Start Configuration
www.vissonic.com 5.2.1.6. One click to start configuration One click to start configuration The functions associated with the One-Click Configuration menu are "Record", "Movie Mode Push Stream", "Auto-Introduction", "Auto-Introduction The functions associated with the menu are "Record", "Push Stream in Movie Mode", "Auto Pilot", "Auto Pilot", "Insert Title in Movie Mode", "Insert Ending in Movie Mode", and "Interactive"... -
Page 36: Mqtt (An Omission
www.vissonic.com 5.2.1.7. MQTT (an omission) 5.2.2. Guide settings Guide settings There are 4 settings in the Pilot Settings menu: Title Settings, Cursor Settings, Credits Settings, Subtitle Settings. During manual guide, it supports inserting information such as courseware information, station label, title and subtitle into live PGM and PGM2 channels after editing them in advance, so as to reduce the work of post-editing of the recorded courses. -
Page 37: Label Setting
www.vissonic.com Title Setting When manually guided, users can use class information can be inserted into the live channel PGM and PGM2 to increase the viewability of the video screen. 5.2.2.2. Label setting Label setting During manual guide, users can manually insert station logos into the PGM and PGM2 channels. As shown in Figure 53, the maximum supported number of station logos to be inserted in the PGM and PGM2 channels is four. - Page 38 www.vissonic.com image is png, and the resolution size of the best effect image is 200*100. 5.2.2.3. Opening and closing credits (of film) The recording system supports the insertion of opening and closing credits when recording a course, such as inserting school and teacher profiles, eliminating the need for post-editing. When you use it, you need to copy the opening and closing files to a USB flash drive, set the path of the opening and closing files in this menu after accessing the recording, and the default insertion length is 10 s.
-
Page 39: Subtitle Settings
www.vissonic.com 5.2.2.4. Subtitle settings Captions The recording system supports real-time insertion of subtitles in live channels PGM and PGM2, and users can edit up to 13 different subtitle files. Subtitles can only be displayed on one line in PGM and PGM2 channels, and the subtitles posted later will replace the subtitles posted earlier. 5.2.3. -
Page 40: Rtmp Push-Stream Setting
www.vissonic.com 5.2.3.1. RTMP push-stream setting RTMP pushstream setting As shown in the above figure, you can set the main and sub stream push address and push mode of PGM and PGM2 channels in RTMP push stream menu. The push mode is Live mode by default, the code stream and resolution of push can be adjusted in "Menu→Channel→PGM Coding Settings", the default code rate of main stream is 4000Kbps, the resolution is 19208*1080p30, the sub-stream is 400Kbps, and the resolution is 960*540, which can be adjusted by users according... -
Page 41: Users And Login
www.vissonic.com As shown in the figure above, this function is mainly docking resource platform, need to support the platform system to use. Fill in the server IP, port number, user name, password for binding. 5.2.5. Users and Login 5.2.5.1. User management User management As shown in the above figure, you can manage the addition and deletion of users and change the password in this interface. -
Page 42: Login Options
www.vissonic.com 5.2.5.2. Login options Login Options As shown in the figure above, you can set the login options of the system menu in this screen. 5.2.6. Date and time Date and time As shown in the above figure, the interface supports manual and automatic time update. By factory default, there is a web server domain name s1a.time.edu.cn, and users can also customise to fill in other domain names or IPs for NTP time synchronisation.The recording and broadcasting system will automatically synchronise the time according to the web server address after each... -
Page 43: Disk And Storage
www.vissonic.com power on. 5.2.7. Disk and storage Disk and Storage As shown in the above figure, the interface supports formatting, uninstalling, etc. of storage devices such as hard discs of recording and broadcasting hosts or peripheral USB flash drives. And you can view the capacity of the hard disc, the use of capacity and other corresponding parameters. -
Page 44: Networks And Services
www.vissonic.com 5.2.8. Networks and services Networks and Services 5.2.8.1. Ethernet Ethernet The factory default IP of the recording and broadcasting system is 192.168.101.53, and the default sub IP is 192.168.100.100. It supports manual IP setting and DHCP to get IP address automatically. Sub-IP setting can add 1 IP address of different network segment. -
Page 45: Network Test
www.vissonic.com 5.2.8.2. Network test Network test The test function of network ping is used to test whether the network of recording and broadcasting system and the switch are connected, and to verify whether the IP address of the recording and broadcasting host has ip conflict problem. 5.2.9. -
Page 46: Installation And Commissioning
www.vissonic.com open for use by use 5.2.10. Installation and Commissioning Installation and commissioning On-site commissioning mainly includes "tracking machine", "central control" and "guide keyboard" settings. 5.2.10.1.Tracking machine The action strategy is not the end of the last action code, but directly send the start of the next action code, that is: the tracking system to record the host code is corresponding to the switching... -
Page 47: Central Control Settings
www.vissonic.com of a certain channel, each time a command code is sent to the recording host, the recording received to switch, there is no transition between the special effects and the screen combination effect, etc., directly cut the channel to the PGM live channel. Select the action strategy, the recording host switching does not call the switching strategy, the switching strategy is to track the host to analyse and then send the corresponding command code to the recording host for hard switching. -
Page 48: Anchor Keyboard
www.vissonic.com 5.2.10.3.Anchor keyboard Anchor Keyboard 5.3. Safeguard Maintenance settings As shown in the above figure: maintenance includes "Restore Factory", "Configuration Import and Export", and "System Information";... -
Page 49: Restore The Factory
www.vissonic.com 5.3.1. Restore the factory Restore the factory Used to restore the device to factory settings and clear the configuration (but will not delete the video files inside the hard disc.) 5.3.2. Time-lapse video recording Reset It can be set to enable the timed reboot function of the recording host, set the reboot interval and reboot time point, the recording host will automatically reboot the operation. -
Page 50: Configuration Import And Export
www.vissonic.com 5.3.3. Configuration import and export Configuration import and export Import Configuration File: Click the button, select the configuration file you need to import, click the button to complete the operation, the system will automatically reboot after importing. Export Configuration File: Click the button, select the path where you need to export the configuration file, and click the button to complete the operation. -
Page 51: System Information
www.vissonic.com 5.3.4. System information System Information As shown in the above figure, you can view the recording system hardware ID number, software version, ROM version, APP version, device ID and kernel version in the system information menu. 5.4. File manager Document management The videos recorded by the recording host are stored in folders, and the file management supports copying, pasting and deleting the recorded files. -
Page 52: Teaching Information
www.vissonic.com There is a latest video file , which stores the video files of the last day, as shown below: 5.5. Teaching information Teaching information including course information Course Information As shown above, you can set the course information before recording. Where the grade, subject and presenter are related to the naming of the video catalogue. -
Page 53: Platforms & Accounts
www.vissonic.com Settings Conference settings As shown above, meeting settings include platform and account settings. 5.6.1. Platforms & Accounts Platforms & Accounts...
Need help?
Do you have a question about the VIS-CRS05-B and is the answer not in the manual?
Questions and answers