Lenovo IdeaCentre A600 Quick Reference Manual
All-in-one desktop pc
Hide thumbs
Also See for IdeaCentre A600:
- User manual (41 pages) ,
- Reference manual (49 pages) ,
- Specifications (4 pages)
Advertisement
Quick Links
Before using the accompanied peripherals, carefully read
the detailed information in the Safety and Warranty Guide.
Since different models have different peripherals, you
might not find all of the described items depending on the
actual model you purchased.
Note: The remote control cannot turn the computer on.
When using the computer for the first time, you need to
establish a connection from the wireless keyboard and
mouse to the computer. See section Wireless keyboard
and mouse instructions on this flyer for more details.
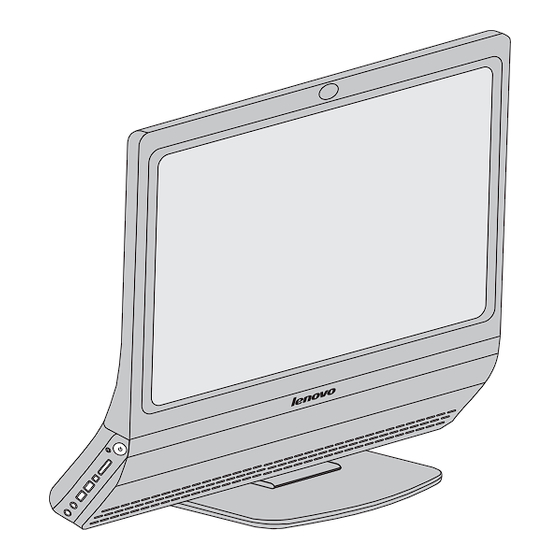
Computer instructions
6
10
9
8
1
7
2
3
4
Note: The buttons at the bottom of the screen
are touch buttons. When you touch these, the
indicator lights turn on.
Important information on how to use this computer
Insert a disc with
the non-label side
facing the user.
The disc cannot
be read if you
insert it the other
side up.
Do not hold the computer by the stand joint only.
Doing so could damage the stand joint.
Hold the computer firmly when you carry it.
Connect the power adapter to the computer and the
electrical outlet as shown below.
Power connector
Ethernet connector
TV tuner
(Select models only)
USB ports (4)
Power button
1
Power button
2
USB ports (2)
3
Headphone connector
4
Microphone connector
5
Optical drive slot
5
6
Camera
7
Brightness down touch button
8
Brightness up touch button
9
LCD On/Off
10
Optical drive eject touch button
To eject a
Do not obliquely insert
disc, press the
discs into the optical
eject button at
drive slot. Doing so will
the bottom of
damage the drive and
the touch
scratch the discs.
screen.
Important information on how to use the optical drive
1. Do not insert 3-inch discs into the optical drive slot.
2. Insert the disc into the optical drive slot and push
gently until the disc enters automatically.
3. Do not force the disk when it is being inserted/ejected.
4. Do not insert damaged discs.
5. Do not insert any other objects other than discs.
Not following the above guidelines could damage the
optical drive slot and disc.
Press the power button on the side of the
computer to turn it on.
Wireless keyboard and mouse instructions
1
1
Unpack and verify the
items in the box.
2
2
Open
Close
ON/OFF
Wireless
Put 2 AAA
Reset button
batteries in
the keyboard's
battery
Rear view
compartment.
Open the battery compartment cover.
3
3
Adjust the keyboard stand
to a more comfortable level
by adjusting the feet on the
back of the keyboard.
4
4
If you do not use the mouse for a long
After installing the batteries, press the
time, turn off the mouse power switch to
power button on the side of the keyboard.
save battery.
5
5
Turn the computer on and
then press Fn+F11 on the
keyboard for about 5-10
seconds to establish a
wireless connection
between the
keyboard
Turn the computer on and then press the wireless
and the
reset button on the back of the mouse for about
computer.
5 seconds to establish a wireless connection
between the mouse and the computer.
Adjust the angle for the best viewing experience.
Do not push the
screen back
beyond the stand's
fixed limit of 15
degrees, or the
computer could
fall over.
Do not pull the screen
forward beyond the
stand's fixed limit of 5
degrees, or the computer
could fall over and the
screen could be
damaged.
Note:
If the connection was not completed successfully, repeat the same steps.
Notes:
1) When establishing a wireless connection, it is recommended to keep
the distance from the keyboard/mouse to the computer less than
25 cm (10 inches).
2) The effective working distance of the wireless keyboard and mouse is
10 m (33 feet) (depending on the computer's working environment).
If the wireless device does not work, do the following:
1. Be sure there is no physical obstacle between the wireless device
and the computer.
2. Restart the computer, and verify the system devices are functional.
3. Repeat the procedure for establishing Bluetooth connection.
Front view
4. Replace the batteries.
5. Do not place the computer under a metal surface or table.
6. Make sure there are no electronic devices close by, such as speakers,
remote controls of electronic toys or mobiles, which might create high
electromagnetic fields that could interrupt the wireless connection.
7. Place the keyboard, mouse and remote control the right way up.
8. Remove the batteries from the keyboard, mouse and remote control
Adjust the cursor
if you do not use them for a long time.
response speed
9. If the batteries in the keyboard, mouse or remote control leak, clean
the battery compartments as soon as possible and place new batteries.
10. Use batteries of good quality to ensure the proper functioning of the
remote control.
11. When the battery power becomes low, the battery indicator light on
the keyboard will change from orange to red.
2 AA batteries
Battery
compartment
On the right side of the keyboard, there are touch buttons
and a touch panel. The touch buttons are:
Put 2 AA batteries in the battery
compartment, making sure the
position of the polarities is
Multimedia play key: Open the Mediaplay player.
identical to the image.
e
Internet key: Open IE.
E-Mail Key: Open the E-mail.
Turn on the mouse
power switch.
LVT
After entering Windows, press this key to
launch the LVT (Lenovo Vantage Technology)
program, Lenovo's pre-loaded Home PC
software. In addition to its own functions, the
LVT program will allow you to start other
Windows compatible software, specially
configured to run on this model of computer
Sleep.
Stop.
Previous.
Play or pause.
Press the wireless reset
Next.
button on the mouse.
Mute.
Volume down.
Turn the mouse
ON
OFF
Volume up.
on its back
connect
Do not put your
hand on the stand
joint when adjusting
the screen.
e
LVT
Version: 1.2
31039952
Advertisement

Related Manuals for Lenovo IdeaCentre A600


Summary of Contents for Lenovo IdeaCentre A600
- Page 1 Turn on the mouse power switch. After entering Windows, press this key to launch the LVT (Lenovo Vantage Technology) program, Lenovo's pre-loaded Home PC software. In addition to its own functions, the LVT program will allow you to start other...
- Page 2 Bluetooth configuration Install the batteries as indicated below. Pull the lid of the battery compartment When the Bluetooth indicator light blinks twice every on the back of the remote control. second and at the same time the remote control makes a beep sound, it means that the remote con- trol is waiting for Bluetooth connection and the steps Insert the batteries and close the to add Bluetooth devices to the OS can be started.
Need help?
Do you have a question about the IdeaCentre A600 and is the answer not in the manual?
Questions and answers