Table of Contents
Advertisement
Quick Links
Advertisement
Table of Contents

Summary of Contents for Heatstore AQUA PROFILE PLUS AQP8
- Page 1 Electric Showers Installation Instructions & User Guide AQUA PROFILE PLUS AQP8 & AQP9 Electric Shower 2 Year Guarantee Please keep this booklet for future reference. Installer, when you have read these instructions please ensure you leave them with the user.
-
Page 2: Table Of Contents
Contents Thank you for purchasing your new Electric shower. Featuring a contemporary design with lots of features, this electric shower collection has been designed to be easy to install and enjoyable to use. It has also been designed and tested in the UK to all of the relevant British Standards. -
Page 3: Important Safety Information
Important Safety Information • Please read these instructions thoroughly and retain for future use. • All products supplied are safe provided they are installed and used correctly; and receive regular maintenance in accordance with these instructions. • If you are in any doubt about your ability to install this product safely you must employ the services of a qualified electrician and plumber. -
Page 4: Product Features
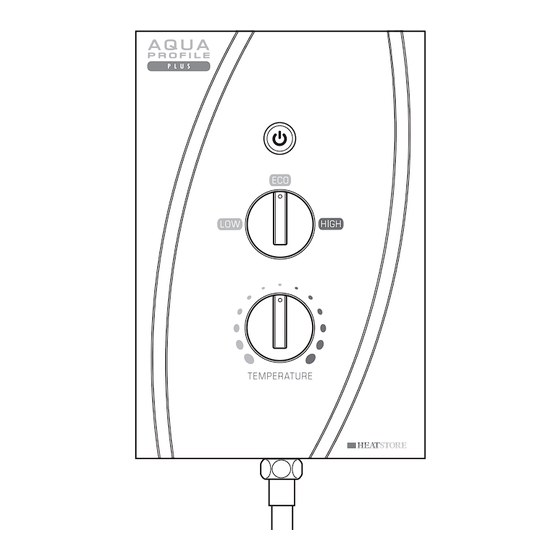
Product Features 1. Push Button STOP/START Button Press once to start the shower, press once again to stop the shower. 2. Power Control Adjustable power settings: Cold (LOW), Medium (ECO) and High (HIGH). 3. Temperature Control Adjustable temperature control. Temperature Control Device The Temperature Control Device will activate when the temperature is set too high and the water inside the water heater gets too hot. -
Page 5: Electrical Requirements
Electrical Requirements Warning: This appliance MUST Isolating Double pole valve switch be earthed! Rating at 240V Rating at 230V 8.5kW 7.8kW For Cable 9.5kW 8.7kW Capacity Shower unit see Cable Current Carrying Capacity The Electrical Installation and Circuit Protection of this Table on page 6 shower must comply with current I.E.E Wiring Regulations (BS 7671) and Building Regulations (Part P). - Page 6 Electrical Requirements cont. It is a requirement that a residual current device (RCD) formerly known as an earth leakage circuit breaker (ELCB) with a tripping current of 30mA, is incorporated in the circuit. This may be part of the existing consumer unit or a separate unit.
-
Page 7: Water Requirements
Water Requirements This fitting needs to be installed in accordance with the following Installation Requirements and Notes (IRN) to ensure they meet the requirements of the Water Supply (Water Fittings) Regulations 1999 and the Scottish Byelaws 2004. All water fittings connected to the plumbing system require an assessment of the risk of contamination by backflow. -
Page 8: Fixing Your Shower To The Wall
Fixing Your Shower to the Wall Remove Warning: Please check for any hidden pipes and cables cover screws before drilling holes in the wall. Remove the 4 cover retaining screws and lift off the cover. Do not try to remove the control knobs from the cover. They are an integral part of the cover and must not be removed. -
Page 9: Plumbing Connections
Plumbing Connections Inlet Entry Options Select the inlet option most suited to your situation. Bottom left inlet entry Bottom right inlet Top left inlet entry entry Rear left inlet entry - Rear right inlet entry - Rear left inlet entry - requiring rear access requiring rear access using a 15mm compression... - Page 10 Plumbing Connections cont. Warning: The outlet of the shower acts as a vent and must not be blocked, restricted or connected to any tap/ closure device other than the handset supplied. Do not solder within 300mm of the shower unit or allow solder or flux to fall onto the casings.
- Page 11 Plumbing Connections cont. Hole Cover Fitting Back of unit Top left entry: Depending on your choice of cold-water entry direction, you may need to remove thin areas of plastic cover to facilitate pipe work entry down through the top left of the unit.
-
Page 12: Electrical Connections
Electrical Connections Warning: This appliance and all connecting metal pipe work must be earthed. • Ensure that an earth continuity conductor is securely and permanently connected to all exposed metal parts of other services and appliances within the room where the shower is installed. - Page 13 Electrical Connections cont. Electrical Connection Entry Point Options - continued Alternatively, if preferred, it is possible to route the cable from the rear bottom right or bottom right positions as shown below by stripping the sheath back further. Select the cable inlet option most suited to your situation. ...
- Page 14 Electrical Connections cont. Switch OFF the electricity supply at the consumer unit. The power cable entry point is shown on the diagram. Electrical connection to be made at the terminal block as follows: Earth cable to the terminal marked with the Earth symbol Neutral cable to the terminal marked N Live cable to the terminal marked L Important: Terminals must be fully tightened onto the...
-
Page 15: Fitting Your Riser Rail To The Wall
Fixing Your Riser Rail to the Wall Fitting the Riser Rail Before proceeding with fitting the rail, identify each of the items supplied using the illustration on the right. The Slider should not be removed from the rail during fitting. The underside of the slider has a button to release the slider and allows the height to be adjusted. -
Page 16: Commissioning - Testing The System
Commissioning - Testing the System Warning: Before using the shower for the first time, it should receive a final flush through to remove any remaining debris that may be in the pipe work or hose and to ensure the heater unit contains water before the electrical elements are switched on. -
Page 17: Operating The Shower
Operating the Shower Please ensure the commissioning procedure has been carried out. If you did not fit this shower yourself and you are about to use it for the first time, check with the installer to ensure he or she has run the commissioning procedure as described on page 16. -
Page 18: Maintenance
Operating the Shower cont. Adjusting the Showerhead Your showerhead has 3 spray modes - spray, jet spray and combination. Simply rotate the spray head one way or the other until ‘clicks’ into the desired spray pattern. Note: The spray head mode may need to be altered during winter conditions (low flow conditions) to achieve a satisfactory spray. -
Page 19: Troubleshooting
Maintenance cont. Cleaning the Filter Periodically remove the inlet filter and rinse under clean running water. First isolate the electrical and water supply to the unit. To remove: Turn anti-clockwise using a large flatblade screwdriver. Note: A small amount of water will be discharged when the filter is removed - this is normal. -
Page 20: Guarantee
Heatstore will repair or replace (at our option), free of charge, any faulty components during the guarantee period, provided it has been maintained and operated in accordance with our instructions, and has not been misused or damaged.
Need help?
Do you have a question about the AQUA PROFILE PLUS AQP8 and is the answer not in the manual?
Questions and answers