
Related Manuals for DS18 POLARIS SLINGSHOT SLG-RSUB10


Summary of Contents for DS18 POLARIS SLINGSHOT SLG-RSUB10
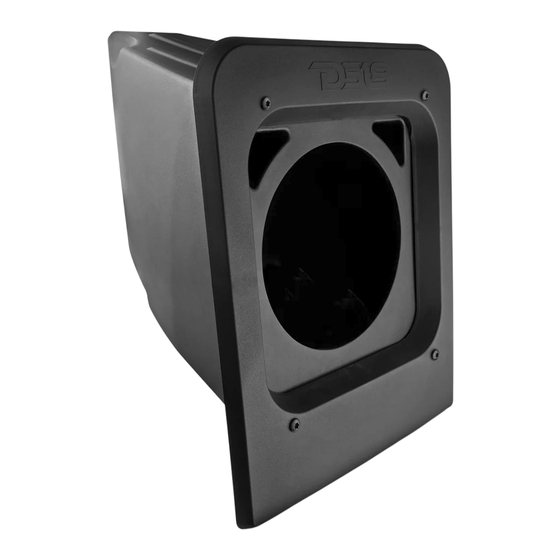
- Page 1 SLG-RSUB10 OWNER’S MANUAL MANUAL DEL USUARIO POLARIS SLINGSHOT 10” REAR STORAGE COMPARTMENT SUBWOOFER ENCLOSURE CAJA DE SUBWOOFER DE 10” PARA EL COMPARTIMIENTO TRASERO DEL POLARIS SLINGSHOT SPECIALLY DESIGNED FOR ENGLISH | ESPAÑOL...
- Page 2 Slingshot, puede considerar agregar esta caja para Polyethylene 10" Subwoofer Enclosure by DS18. Subwoofer de 10" de polietileno duradero de DS18. Esta This enclosure allows you to mount one 10" caja le permite montar un subwoofer de 10" usando el...
-
Page 3: Installation
INSTALLATION INSTALACIÓN Starts by moving the seats all away forward to get Comience moviendo todos los asientos hacia adelante easy access to this area, it is optional if you want para tener fácil acceso a esta área, es opcional si desea quitar los asientos para pasar cables o facilitar la to remove the seats for running wires or easy installation on both driver and passenger side of... - Page 4 SLG-RSUB10 INSTALLATION INSTALACIÓN Remove the Driver rear deck hump using a T25 Retire la joroba de la plataforma trasera del conductor con TORX socket to extract the (2) screws on front una punta TORX T25 para extraer los (2) tornillos en la bottom of the piece, then remove the gas cap and parte inferior delantera de la pieza, luego retire la tapa de la using an oversized pliers, un-screw the Ring-Nut...
- Page 5 INSTALLATION INSTALACIÓN Remove screws that were located underneath Retire los tornillos que estaban ubicados debajo the head covers once the humps are removed. de las cubiertas de la cabeza una vez que se quitaron las jorobas. (Imagen 5) (Picture 5) Remove the doors that cover both driver and Retire las puertas que cubren el compartimiento passenger side rear storage compartment.
- Page 6 SLG-RSUB10 INSTALLATION INSTALACIÓN Retire todos los tornillos TORX T40 y los (2) clips de presión Remove all T40 TORX screws and (2) push que se encuentran en el panel posterior. (Imagen 7) clips that are located on back panel. (Picture 7) For 2017 and newer models, use the six (6) supplied clip nuts on the left and right side to mount the cabinet.
- Page 7 INSTALACIÓN INSTALLATION Este kit necesita un amplificador del mercado de This kit needs an aftermarket amp pre-installed accesorios preinstalado con los cables de los altavoces en with the speaker wires in this location, only after esta ubicación, solo después de este paso puede conectar this step can you connect the speakers using the los altavoces usando el cable del altavoz del amplificador aftermarket amp's speaker wire and RGB LED...
- Page 8 SLG-RSUB10 INSTALLATION INSTALACIÓN Grab the top and bottom of the enclosure and slide the Subwoofer box into place in the rear compartment. (Picture 11) Tome la parte superior e inferior del gabinete y deslice la caja de Subwoofer en su lugar en el compartimiento trasero.
- Page 9 MEASUREMENTS / MEDIDAS: 15.28” / 388mm 18.05” / 458.50mm...
- Page 10 SLG-RSUB10 MEASUREMENTS / MEDIDAS: 14.31” / 363.35mm 13.68” / 347.35mm...
-
Page 11: Warranty
MEASUREMENTS / MEDIDAS: 18.05” / 458.50mm WARRANTY GARANTÍA Please visit our website DS18.com for more information Visita nuestra página web DS18.com para obtener más on our warranty policy. información sobre nuestra garantía. We reserve the right to change products and specifications Nos reservamos el derecho de cambiar productos y at any time without notice. - Page 12 SLG-RSUB10 FOR MORE INFORMATION PLEASE VISIT DS18.COM...
Need help?
Do you have a question about the POLARIS SLINGSHOT SLG-RSUB10 and is the answer not in the manual?
Questions and answers