Table of Contents
Advertisement
Available languages
Available languages
Quick Links
DCF-Funkwecker
DCF Radio-controlled alarm clock |
Despertador radio controlado DCF
Réveil radio-piloté DCF | Radiosveglia
DCF | Budzik radiowy DCF
Bedienungsanleitung
CK 1703 | 1703-1 | CK 1703-2
Operating instructions | Instrucciones de operación
Mode d'emploi | Istruzioni per l'uso | Instrukcja obsługi
Advertisement
Chapters
Table of Contents

Related Manuals for ADE CK 1703-2


Summary of Contents for ADE CK 1703-2
- Page 1 DCF Radio-controlled alarm clock | Despertador radio controlado DCF Réveil radio-piloté DCF | Radiosveglia DCF | Budzik radiowy DCF Bedienungsanleitung CK 1703 | 1703-1 | CK 1703-2 Operating instructions | Instrucciones de operación Mode d‘emploi | Istruzioni per l‘uso | Instrukcja obsługi...
-
Page 2: Lieferumfang
Liebe Kundin, lieber Kunde ! Sie haben sich für den Kauf eines qualitativ hochwertigen Produkts der Marke ADE entschieden, das intelligente Funktionen mit einem außergewöhnlichen Design vereint. Mit diesem Funkwecker haben Sie die Uhrzeit stets präzise im Blick. Die langjährige Erfahrung der Marke ADE stellt eine technisch hohen Standard und bewährte Qualität sicher. -
Page 3: Allgemeines
Allgemeines Über diese Anleitung Diese Bedienungsanleitung be- schreibt den sicheren Umgang und die Pflege des Artikels. Bewahren Sie diese Bedienungsanleitung auf, falls Sie später etwas nachlesen möchten. Wenn Sie den Artikel an jemand anderen wei- tergeben, geben Sie auch diese Anleitung mit. Die Nichtbeachtung dieser Bedienungsanlei- tung kann zu Verletzungen oder Schäden am Artikel führen. -
Page 4: Technische Daten
Dieses Symbol kennzeichnet zusätz- liche Informationen und allgemeine Hinweise. Technische Daten Modell: DCF-Funkwecker CK 1703-x 1703 (holzfarben) 1703-1 (schwarz) 1703-2 (weiß) Batterie: 2x LR/R6 (AA) / 1,5 V Bemessungsstrom: < 40 mA Messbereich: ca. -10 °C - 60 °C ca. 14 °F - 140 °F Inverkehrbringer GRENDS GmbH (keine Service-... -
Page 5: Table Of Contents
Inhaltsverzeichnis Lieferumfang ............2 Allgemeines ............3 Technische Daten ..........4 Sicherheit .............6 Bestimmungsgemäßer Gebrauch ....8 Auf einen Blick ...........9 Inbetriebnahme ..........10 Zeitsignal empfangen ........11 Über den Zeitzeichensender DCF77 ..16 Wecken ..............17 Sonstige Funktionen ........18 Reinigen ..............19 Störung / Abhilfe ..........19 Konformitätserklärung ........20 Garantie ..............21 Entsorgen ............21 DCF-Funkwecker CK 1703-x... -
Page 6: Sicherheit
Sicherheit ‚ Dieser Artikel kann von Kindern ab 8 Jah- ren und darüber sowie von Personen mit verringerten physischen, sensorischen oder mentalen Fähigkeiten oder Mangel an Erfahrung und Wissen benutzt werden, wenn sie beaufsichtigt oder bezüglich des sicheren Gebrauchs des Artikels unterwiesen wurden und die daraus resultierenden Gefahren ver- stehen. - Page 7 GEFAHR von Brand/ Verbrennung und/ oder Explosion ‚ Explosionsgefahr bei unsachgemäßem Aus- wechseln der Batterien. Batterien nur durch denselben oder einen gleichwertigen Batte- rietyp ersetzen. „Technische Daten“ beachten ‚ Batterien dürfen nicht geladen, mit anderen Mitteln reaktiviert, auseinander genommen, ins Feuer geworfen oder kurzgeschlossen werden.
-
Page 8: Bestimmungsgemäßer Gebrauch
‚ Batterien keinen extremen Bedingungen aus- setzen, indem diese z. B. auf Heizkörpern oder unter direkter Sonneneinstrahlung gelagert werden. Erhöhte Auslaufgefahr! ‚ Batterie- und Gerätekontakte bei Bedarf vor dem Einlegen reinigen. ‚ Keine Änderungen an dem Artikel vorneh- men. Reparaturen nur von einer Fachwerkstatt durchführen lassen. -
Page 9: Auf Einen Blick
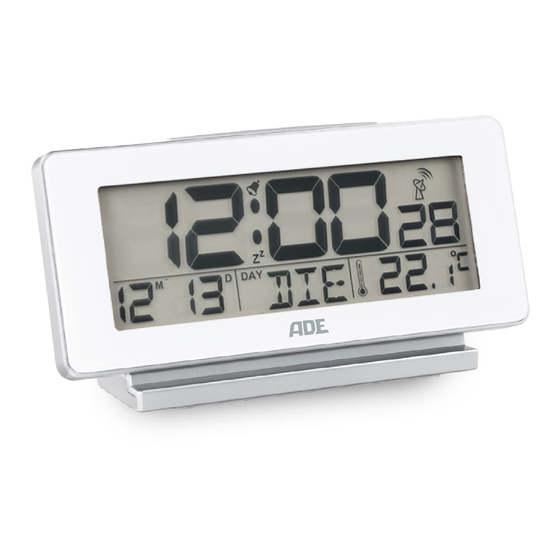
Auf einen Blick 1 Symbol für aktive Weckfunktion 2 Taste SNOOZE/LIGHT 3 Symbol für Funkempfang zum Zeitzeichen- sender DCF77 4 Uhrzeit (Stunden, Minuten, Sekunden) 5 Datum / Wochentag / Raumtemperatur (in °C oder °F) DCF-Funkwecker CK 1703-x... -
Page 10: Inbetriebnahme
Bedientasten SET, ALARM, , WAVE Batteriefach, 2x LR/R6 (AA) Inbetriebnahme Für den Gebrauch benötigen Sie zwei Batterien des Typs LR/R6 (AA), 1,5 V. 1. Verschlusslasche nach unten drücken und Bat- teriefachdeckel abklappen. 2. Batterien so einlegen, wie auf dem Boden des Batteriefachs abgebildet. -
Page 11: Zeitsignal Empfangen
Sobald die Batterien eingelegt sind, schaltet der Wecker auf Empfang, siehe nächstes Kapitel. Hinweise zum Batterienwechsel: ‚ Nur Batterietyp verwenden, der in den „Tech- nischen Daten“ angegeben ist. ‚ Immer alle Batterien wechseln. ‚ Alte Batterien umweltgerecht entsorgen, siehe „Entsorgen“. Zeitsignal empfangen Wenn die Batterien eingelegt sind, werden für einen kurzen Moment sämtliche Anzeigen... - Page 12 Wurde kein ausreichend starkes Signal emp- fangen, bricht der Funkwecker nach einigen Minuten den Empfangsvorgang ab und das Funk- turm-Symbol erlöscht. Der Empfangsvorgang wird zu einem späteren Zeitpunkt neu gestartet. Die Uhrzeit läuft in die- sem Fall (ausgehend von der Startzeit „00:00“) normal weiter.
- Page 13 Uhrzeit manuell einstellen ‚ Wenn zwischen zwei Tastendrü- cken mehr als ca. 30 Sekunden liegen, wird der Einstellvorgang automatisch beendet und Sie müssen ihn wiederholen. ‚ Jeder Tastendruck wird mit einem Piepton bestätigt. 1. Taste SET gedrückt halten, bis im Display die Anzeige für das 12- und 24-Stunden-Uhrzeit- format blinkt.
- Page 14 − Tag − Sprache (bezieht sich ausschließlich auf die Anzeige des Wochentages) 6. Abschließend SET drücken, um den Vorgang zu beenden. Funkempfang manuell starten Wird das nebenstehende Funksig- nal-Symbol nicht mehr angezeigt, werden die Funksignale des Zeitzei- chen-Senders nicht mehr empfangen. Die Uhrzeit-Anzeige läuft dennoch präzise weiter.
- Page 15 Standort wählen HINWEIS vor Sachschaden ‚ Schützen Sie den Funkwecker vor Staub, Stößen, extremen Tempe- raturen, direkter Sonneneinstrah- lung und Feuchtigkeit. Stellen Sie die ausschließlich in einem trocke- nen, geschlossenen Raum auf. ‚ Abstand zu Fernsehgeräten, Computern und Monitoren halten. Auch Basisstationen von schnurlosen Telefonen sollten sich nicht in unmittelbarer Nähe des Funkweckers befin- den.
-
Page 16: Über Den Zeitzeichensender Dcf77
Funkwecker aufstellen − Funkwecker möglichst in Fensternähe auf- stellen. Dort ist der Empfang in der Regel am besten. Über den Zeitzeichensender DCF77 Dieser Funkwecker erhält seine Funksignale vom Zeitzeichensender DCF77. Dieser strahlt auf seiner Langwellenfrequenz von 77,5 kHz die genaue und offizielle Uhrzeit der Bundesrepublik Deutschland aus. -
Page 17: Wecken
Wecken Weckzeit einstellen 1. Taste ALARM gedrückt halten, bis im Display die Weckstunde blinkt und „AL“ angezeigt wird. 2. Mit oder Weckstunde einstellen. 3. ALARM drücken. 4. Mit oder Weckminute einstellen. 5. ALARM drücken, um Weckzeit zu speichern. 6. Erneut ALARM drücken. Im Display wird angezeigt, die Weckfunk- tion ist aktiviert. -
Page 18: Sonstige Funktionen
Weckwiederholung (Snooze-Funktion) − 1x die Taste SNOOZE/LIGHT drücken, wenn das Wecksignal ertönt. Im Display blinken und z Nach ca. 5 Minuten schaltet sich das Gerät wieder ein und weckt Sie erneut. Dieser Vorgang kann mehrfach wiederholt werden. Weckfunktion ein- und ausschalten −... -
Page 19: Reinigen
Ist die Sommerzeit aktiv, wird im Display „DST“ (Daylight Saving Time) angezeigt. Funkwecker auf Auslieferzustand zurücksetzen Setzen Sie den Funkwecker auf seinen Ausliefer- zustand zurück, wenn im Display ungewöhnliche bzw. offensichtlich falsche Werte angezeigt werden. 1. Batterien aus dem Batteriefach nehmen und etwas warten. -
Page 20: Konformitätserklärung
CK 1703-x den Richtlinien 2014/53/EU und 2011/65/EU entspricht. Der vollständige Text der EU-Konformitätserklä- rung ist unter der folgenden Internetadresse ver- fügbar: www.ade-germany.de/doc Die Erklärung verliert ihre Gültigkeit, falls an dem Wecker eine nicht mit uns abgestimmte Änderung vorgenommen wurde. -
Page 21: Garantie
Garantie Die Firma GRENDS GmbH garantiert für 2 Jahre ab Kaufdatum die kostenfreie Behebung von Män- geln aufgrund von Material- oder Fabrikationsfeh- lern durch Reparatur oder Austausch. Bitte geben Sie den Artikel im Garantiefall mit dem Kaufbeleg (unter Angabe des Reklamations- grundes) an Ihren Händler zurück. - Page 22 Artikel entsorgen Entsorgen Sie den Artikel entsprechend der Vor- schriften, die in Ihrem Land gelten. Dieses Symbol besagt, dass dieses Elektro- bzw. Elektronikgerät am Ende seiner Lebensdauer nicht im Hausmüll entsorgt werden darf, sondern vom Endnutzer einer getrennten Samm- lung zugeführt werden muss. Zur Rückgabe stehen in Ihrer Nähe kostenfreie Sammelstellen für die Verwertung der Geräte zur Verfügung.
- Page 23 Dieses Symbol besagt, dass Batterien und Akkus nicht zusammen mit dem Hausmüll entsorgt werden dürfen. Sie sind gesetzlich verpflichtet, alle Batterien bei einer Sammelstelle ihrer Gemeinde/ihres Stadtteils oder im Handel abzugeben. Die Inhaltsstoffe sind giftig und gefährden bei unsachgemäßer Entsorgung die Umwelt und können gesundheitsschädigende Wirkungen auf Menschen, Tiere und Pflanzen haben.
-
Page 24: Scope Of Delivery
Dear Customer! You have chosen to purchase a high- quality product from the brand ADE, which combines intelligent functions with an exceptional design. With this radio-controlled alarm clock, you always have the exact time in view. The many years of experience of the brand ADE ensures a high technical standard and proven quality. -
Page 25: General Information
General information About this manual This operating manual describes how to safely use and care for your products. Keep this operating manual in a safe place in case you would like to refer to it later. If you pass this item on to someone else, pass on this manual as well. -
Page 26: Technical Data
This symbol signifies additional information and general advice. Technical Data Model: DCF Radio-controlled alarm clock CK 1703-x 1703 (wood color) 1703-1 (black) 1703-2 (white) Battery: 2x LR/R6 (AA)/1.5 V Rated current: < 40 mA Measuring range: approx. -10 °C - 60 °C approx. - Page 27 Table of Contents Scope of Delivery ..........24 General information ........25 Technical Data ..........26 Safety ..............28 Intended Use .............30 Overview ............31 Start-up ...............32 Receiving the time signal ......33 About the time signal transmitter DCF77 38 Alarm..............39 Other functions ..........40 Cleaning ..............41 Fault/Remedy ...........41 Declaration of Conformity ......42 Guarantee ............43...
-
Page 28: Safety
Safety ‚ This item can be used by children 8 years of age and above, as well as by persons with reduced physical, sensory, or mental capacities or lacking experience and knowledge, if they are supervised or have been instructed in the safe use of the item and understand the dangers that may arise. - Page 29 fire, or short-circuited. Otherwise there is an increased risk of explosion and of leakage; furthermore, gases may escape. ‚ Avoid contact of the battery fluid with skin, eyes, and mucosa. In case of contact, rinse the affected areas right away with plenty of clean water and consult a doctor immediately.
-
Page 30: Intended Use
Intended Use This DCF radio-controlled alarm clock is used to display the time, the date and the room temperature. The item is designed for private use and for use in dry areas. DCF Radio-controlled alarm clock CK 1703-x... -
Page 31: Overview
Overview Symbol for active alarm function SNOOZE/LIGHT button Symbol for radio reception for time signal transmitter DCF77 Time (hours, minutes, seconds) Date/day of the week/room temperature (in °C or °F) DCF Radio-controlled alarm clock CK 1703-x... -
Page 32: Start-Up
SET, ALARM, , WAVE control buttons Battery compartment, 2x LR/R6 (AA) Start-up For use, you will need two LR/R6 (AA), 1.5V batteries. 1. Push the locking tab downwards and fold down the battery compartment cover. 2. Insert the batteries as shown on the bottom of the battery compartment. -
Page 33: Receiving The Time Signal
As soon as the batteries are inserted, the alarm clock switches to reception, see next chapter. Notes on changing the battery: ‚ Only use the battery type specified in the “Technical Data”. ‚ Always exchange all of the batteries at the same time. - Page 34 If a sufficiently strong signal has not been received, the radio-controlled alarm clock will cancel the receiving process after a few minutes and the radio tower symbol goes out. The receiving process is started again at a later point in time. In this case, the time proceeds as usual (beginning with the start time of “00:00”).
- Page 35 Setting the time manually ‚ If there is more than approx. 30 seconds between two pushes of a button, the setting process automatically ends and you will have to repeat it. ‚ Each push of a button is confirmed with a beep. 1.
- Page 36 − Day − Language (relates exclusively to the weekday indicator) 6. Finally, press SET to exit. Starting signal reception manually If the radio signal symbol to the left is no longer displayed, the radio signals from the time signal transmitter are no longer being received.
- Page 37 Choosing a location NOTE on material damage ‚ Protect the radio-controlled alarm clock from dust, shocks, extreme temperatures, direct sunlight and moisture. Only place it in a dry, closed room. ‚ Maintain a distance from TV sets, computers and monitors. Base stations of cordless telephones should also not be in the immediate vicinity of the radio-controlled alarm clock.
-
Page 38: About The Time Signal Transmitter Dcf77
Setting up the radio-controlled alarm clock − Set up the radio-controlled alarm clock as close to a window as possible. Here, the reception will generally be best. About the time signal transmitter DCF77 This radio-controlled alarm clock receives its radio signals from the time signal transmitter DCF77. -
Page 39: Alarm
Alarm Setting the alarm time 1. Press and hold the ALARM button until the alarm hour flashes in the display and “AL” is displayed. 2. Use to set the alarm hour. 3. Press ALARM. 4. Use to set the alarm minute. 5. -
Page 40: Other Functions
Repeat alarm (snooze function) − Press the SNOOZE/LIGHT button 1x when the alarm sounds. and z flash in the display. After 5 minutes, the device switches on again and wakes you up again. This procedure can be repeated multiple times. Switching the alarm function on/off −... -
Page 41: Cleaning
Resetting the radio-controlled alarm clock to factory setting Reset the radio-controlled alarm clock to its factory setting if the display shows unusual or obviously incorrect values. 1. Remove the batteries from the battery compartment and wait a while. 2. Reinsert the batteries. Observe the correct polarity (+/-). -
Page 42: Declaration Of Conformity
EU directives 2014/53/EU and 2011/65/EU. The full text of the EU declaration of conformity is available at the following internet address: www.ade-germany.de/doc This declaration loses its validity if any modification is made to the alarm clock that has not been agreed with us in advance. -
Page 43: Guarantee
Guarantee The company GRENDS GmbH guarantees for 2 years from the purchase date the cost-free rectification of defects on the basis of material or fabrication errors through repair or exchange. In the event of a guarantee claim, please return the product with the proof of purchase (stipulating the reason for claim) to your dealer. - Page 44 Disposing of the product Dispose of the product in accordance with the regulations that apply in your country. Devices must not be disposed of in normal household waste At the end of its life, the product must be disposed of in an appropriate way. In this way, valuable materials contained in the device will be recycled and the burden on the environment avoided.
-
Page 46: Artículos Incluidos En La Entrega
¡Estimada/o cliente! Se ha decidido por la compra de un producto de gran calidad de la marca ADE, que aúna unas funciones inteligentes con un diseño extraordinario. Con este despertador radio controlado siempre tendrá a la vista la hora exacta. La larga experiencia de la marca ADE le asegura unos elevados estándares... -
Page 47: Información General
Información general Acerca de estas instrucciones Este manual de instrucciones describe el manejo seguro y el cuidado del artículo. Conserve este manual de instrucciones por si necesita volver a consultarlas. Si le entrega el artículo a otra persona, acompáñelo también de estas instrucciones. Si no se tienen en cuenta las recomendaciones de este manual de instrucciones, pueden producirse lesiones o daños en el artículo. -
Page 48: Datos Técnicos
Este símbolo significa información adicional e indicaciones generales. Datos técnicos Modelo: Despertador radio controlado DCF CK 1703-x 1703 (color de la madera) 1703-1 (negro) 1703-2 (blanco) Pilas: 2x LR/R6 (AA)/1,5 V Intensidad de < 40 mA corriente: Rango de medida: -10 °C - 60 °C aprox. - Page 49 Índice Artículos incluidos en la entrega ....46 Información general ........47 Datos técnicos ..........48 Seguridad ............50 Uso adecuado ...........52 De un vistazo ...........53 Puesta en funcionamiento ......54 Recepción de señal horaria ......55 Acerca del emisor de señal horaria DCF77 ..........60 Despertador ............61 Otras funciones ..........62 Limpieza .............63...
-
Page 50: Seguridad
Seguridad ‚ Este artículo puede ser utilizado por niños mayores de 8 años y por personas con discapacidad física, sensorial o mental o con falta de experiencia o conocimientos, siempre que estén supervisados o se les instruya sobre el uso seguro del artículo y comprendan los riesgos que pueden producirse. - Page 51 tipo Tenga en cuenta los "Datos técnicos". ‚ Las pilas no deben cargarse, reactivarse con otros medios, desmontarse, arrojarse al fuego o ponerse en cortocircuito. En caso contrario existe un riesgo mayor de explosión o fuga, y además pueden liberarse gases. ‚...
-
Page 52: Uso Adecuado
‚ Cuando sea necesario, limpie los contactos del aparato y de las pilas antes de colocarlas. ‚ No lleve a cabo ninguna modificación en el artículo. Realice las reparaciones únicamente en un taller especializado. Las reparaciones realizadas de forma inadecuada pueden suponer un riesgo elevado para el usuario. -
Page 53: De Un Vistazo
De un vistazo Símbolo de función despertador activada Botón SNOOZE/LIGHT Símbolo de recepción radio de la emisora de señal horaria DCF77 Hora (horas, minutos, segundos) Fecha/Día de la semana/Temperatura ambiente (en °C o °F) Despertador radio controlado DCF CK 1703-x... -
Page 54: Puesta En Funcionamiento
Botones de control SET, ALARM, WAVE Compartimento para pilas, 2x LR/R6 (AA) Puesta en funcionamiento Para el funcionamiento del aparato, son necesarias dos pilas del tipo LR/R6 (AA), 1,5 V. 1. Presione hacia abajo la solapa de cierre y deslice la tapa de las pilas. 2. -
Page 55: Recepción De Señal Horaria
En cuanto se ponen las pilas, el despertador se conecta como receptor; consulte el capítulo siguiente. Indicaciones para la sustitución de las pilas: ‚ Utilice únicamente el tipo de pilas especificado en los "Datos técnicos". ‚ Cambie siempre todas las pilas. ‚... - Page 56 Si no se recibe una señal suficientemente potente, el despertador interrumpe el proceso de recepción pasados unos minutos y desaparece el símbolo de la torre de emisión. El proceso de recepción se iniciará nuevamente en un momento posterior. En ese caso la hora comienza a avanzar normalmente (partiendo de las "00:00").
- Page 57 Ajustar la hora manualmente ‚ Cuando pasan más de 30 segundos entre una pulsación de botón y otra, el proceso de ajuste finaliza automáticamente y hay que volver a repetirlo. ‚ Cada pulsación de un botón se confirma mediante un pitido. 1.
- Page 58 − Día − Idioma (se refiere únicamente al indicador del día de la semana) 6. A continuación, pulse SET para finalizar el proceso. Iniciar manualmente la recepción de la señal Si el símbolo lateral de señal radio desaparece, es que ha dejado de recibirse la señal radio del emisor de señal horaria.
- Page 59 Elegir ubicación ADVERTENCIA de daños materiales ‚ Proteja el radio-despertador contra el polvo, golpes, temperaturas extremas, la exposición directa a la luz del sol y la humedad. Colóquelo exclusivamente en un espacio cerrado y seco. ‚ Póngalo separado de aparatos de televisión, ordenadores y monitores.
-
Page 60: Acerca Del Emisor De Señal Horaria Dcf77
Instalación del radio-despertador − Preferiblemente, instale el radio-despertador cerca de una ventana. Normalmente la recepción es mejor en ese lugar. Acerca del emisor de señal horaria DCF77 Este despertador radio controlado recibe una señal radio de la emisora de señal horaria DCF77. Esta emite la hora oficial de la República Federal de Alemania en onda larga con una frecuencia de 77,5 kHz. -
Page 61: Despertador
Despertador Ajustar hora de alarma 1. Mantenga pulsado el botón ALARM hasta que parpadee en pantalla la hora y se visualice el indicador "AL". , ajuste la hora de alarma. 2. Con 3. Pulse ALARM. , ajuste los minutos de la hora de 4. -
Page 62: Otras Funciones
Repetición de la alarma (Función Snooze) − Cuando oiga la señal de alarma, pulse una vez el botón SNOOZE/LIGHT. En la pantalla parpadean Después de 5 minutos, vuelve a conectarse el aparato y suena de nuevo el despertador. Este proceso puede repetirse varias veces. Conectar y desconectar la función despertador −... -
Page 63: Limpieza
Si está activada la hora de verano, en la pantalla aparecerá "DST" (Daylight Saving Time). Restaurar el despertador radio controlado a la configuración de fábrica Restablezca los valores de fábrica del despertador cuando en la pantalla se muestren valores inusuales o claramente erróneos. 1. -
Page 64: Declaración De Conformidad
2014/53/EU y 2011/65/EU. Se encuentra disponible el texto completo de la declaración de conformidad de la UE en la siguiente dirección de Internet: www.ade-germany.de/doc. Esta declaración será invalidada en caso de que el despertador sufriese modificaciones no consensuadas con el fabricante. -
Page 65: Garantía
Garantía La empresa GRENDS GmbH garantiza durante 2 años a partir de la fecha de compra, la eliminación de los defectos debidos a fallos de material o fabricación, mediante reparación o cambio del equipo. En caso de solicitar la aplicación de la garantía, lleve el artículo a su distribuidor con el justificante de compra (explicando el motivo de la reclamación). - Page 66 Eliminación del artículo Elimine el artículo conforme a la normativa correspondiente aplicable en su país. Los aparatos no deben eliminarse con la basura doméstica normal El artículo debe ser eliminado de forma adecuada al final de su vida útil. Para ello se deben reciclar las piezas del aparato y así...
-
Page 68: Contenu De L'emballage
Chère cliente, cher client ! Nous sommes ravis que vous ayez choisi un appareil de haute qualité de la marque ADE, qui allie des fonctions intelligentes à un design exceptionnel. Grâce à ce réveil radio-piloté, la ponctualité ne vous fera jamais défaut. -
Page 69: Généralités
Généralités À propos de ce mode d'emploi Ce mode d'emploi décrit l'utilisation conforme ainsi que les procédures d'entretien de l'article. Conservez ce manuel pour toute référence ultérieure. Si vous cédez l’article à une tierce personne, transmettez-lui également ce mode d’emploi. Le non-respect de ce mode d'emploi peut entraîner des blessures ou endommager l'article. -
Page 70: Caractéristiques Techniques
Ce symbole désigne des informations supplémentaires ainsi que des indications d'ordre général. Caractéristiques techniques Modèle : Réveil radio-piloté CK 1703-x à signal DCF 1703 (couleur bois) 1703-1 (noir) 1703-2 (blanc) Piles : 2 x LR/R6 (AA)/1,5 V Intensité nominale : < 40 mA Plage de mesure : env. - Page 71 Table des matières Contenu de l’emballage ....... 68 Généralités ............69 Caractéristiques techniques ......70 Sécurité ...............72 Utilisation conforme ........74 Vue d’ensemble ..........75 Mise en marche ..........76 Réception du signal horaire ......77 Par l’émetteur de signal horaire DCF77 ...82 Réveil ..............83 Autres fonctions ..........84 Nettoyage ............85 Problèmes/solutions ........85 Déclaration de conformité...
-
Page 72: Sécurité
Sécurité ‚ Cet article peut être utilisé par des enfants dès l’âge de 8 ans ainsi que par des personnes aux capacités physiques, sensorielles ou mentales limitées ou de peu d’expérience et de connaissances si ceux-ci sont sous surveillance ou ont été instruits de l’utilisation conforme de l’article et comprennent les risques qui en découlent. - Page 73 type de pile équivalent. Respecter les « Caractéristiques techniques ». ‚ Les piles ne doivent pas être chargées, réactivées avec d’autres moyens, démontées, jetées au feu ou court-circuitées. Dans le cas contraire, il existe un risque élevé d'explosion et de fuite, ainsi que d’échappement de gaz ! ‚...
-
Page 74: Utilisation Conforme
‚ Ne modifiez pas les composants de l’appareil. Les réparations doivent seulement être effectuées par un atelier spécialisé. Toute réparation incorrecte peut entraîner de graves dangers pour l'utilisateur. Utilisation conforme Ce réveil radio DCF permet d’afficher l’heure, la date ainsi que la température ambiante. Réservée à un usage privé, en intérieur et dans un milieu sec. -
Page 75: Vue D'ensemble
Vue d’ensemble Symbole d’une fonction de réveil active Bouton SNOOZE/LIGHT Symbole de réception du signal de l’émetteur DCF77. Heure (heures, minutes, secondes) Date/jour de la semaine/température ambiante (en °C ou °F) Réveil radio-piloté CK 1703-x à signal DCF... -
Page 76: Mise En Marche
Touches de commande SET, ALARM, , WAVE Compartiment à piles, 2x LR/R6 (AA) Mise en marche Pour son utilisation, vous avez besoin de deux batteries de type LR/R6 (AA), 1,5 V. 1. Appuyez les languettes de fermeture vers le bas et rabattre le couvercle du compartiment à... -
Page 77: Réception Du Signal Horaire
3. Relever le couvercle du compartiment à pile. La fermeture du couvercle doit produire un son audible. Une fois les piles en place, le réveil se met en mode réception. (Voir chapitre suivant.) Indications pour remplacer les piles : ‚ Utiliser seulement le type de pile indiqué dans les « Caractéristiques techniques ». - Page 78 Si le signal reçu n’est pas assez puissant, le réveil cesse de capter après quelques minutes et le symbole du signal disparaît. Le processus de réception est de nouveau initié plus tard. Dans ce cas, l’heure continue de fonctionner normalement (à partir de l’heure de départ « 00:00 »).
- Page 79 Définir l’heure manuellement ‚ S’il y a environ plus de 30 secondes d’écart entre deux touches, le réglage prend automatiquement fin et vous devez le refaire. ‚ Chaque pression sur un bouton est accompagnée d’un bip sonore. 1. Maintenir la touche SET enfoncée jusqu’à ce que l’affichage des formats horaires 12 et 24 heures clignote.
- Page 80 − Jour − Langue (uniquement pour l’affichage des jours de la semaine). 6. Enfin appuyer sur SET pour terminer le processus. Activer manuellement la réception du signal Si le symbole signal radio ci-contre ne s’affiche plus, les signaux radio de l’émetteur de signal horaire ne sont plus réceptionnés.
- Page 81 Choisir l’emplacement AVERTISSEMENT Risque de dommages matériels ‚ Protégez le réveil radio de la poussière, des chocs, des températures extrêmes, de l’exposition directe aux rayons de soleil et de l’humidité. Placer l’horloge uniquement dans un espace clos et sec. ‚ Placer le réveil à l’écart des téléviseurs, des ordinateurs et des moniteurs.
-
Page 82: Par L'émetteur De Signal Horaire Dcf77
Installer le réveil radio − Si possible, installer le réveil radio à proximité de la fenêtre. En général, c’est là que la réception est la meilleure. Par l’émetteur de signal horaire DCF77 Ce réveil radio-piloté reçoit le signal de l’émetteur DCF77. -
Page 83: Réveil
Réveil Régler l'heure de réveil 1. Maintenir la touche ALARME enfoncée jusqu’à ce que l’heure de réveil clignote et que l’écran affiche « AL ». 2. Régler l’heure du réveil avec 3. Appuyer sur ALARM. 4. Régler la minute avec 5. Appuyer sur l’alarme pour enregistrer l’heure de réveil. -
Page 84: Autres Fonctions
Répétition (fonction Snooze) − Appuyer une fois sur le bouton SNOOZE/ LIGHT lorsque l’alarme sonne. Le symbole et z clignotent à l’écran. Après 5 minutes, l’appareil se rallume et le réveil se redéclenche. Ce processus peut être répété plusieurs fois. Allumer/éteindre la fonction réveil −... -
Page 85: Nettoyage
Si l’heure d’été est activée, « DST » (Daylight Saving Time) s’affiche à l’écran. Revenir aux paramètres d’usine Revenir aux paramètres par défaut du réveil lorsque l’écran indique des données inhabituelles ou manifestement erronées. 1. Retirer les piles de leur compartiment et attendre un moment. -
Page 86: Déclaration De Conformité
CK 1703-x est conforme aux directives 2014/53/UE et 2011/65/UE. Le texte intégral de la déclaration de conformité UE est disponible à l’adresse Internet ci-dessous : www.ade-germany.de/doc Cette déclaration est rendue caduque si des modifications auxquelles nous n’avons pas consenti sont apportées au réveil. -
Page 87: Garantie
Garantie La société GRENDS GmbH garantit la prise en charge gratuite de défauts matériels ou de fabrication pendant 2 ans à partir de la date d’achat, par une réparation ou un remplacement. Dans le cas où vous souhaitez faire usage de cette garantie, veuillez remettre l'article ainsi que la preuve d'achat (en indiquant les raisons de votre réclamation) à... - Page 88 Mise au rebut de l'article Veuillez éliminer l'article selon les prescriptions en vigueur dans votre pays en matière de traitement des déchets. Les appareils électriques ne doivent pas être éliminés avec les déchets ménagers classiques À la fin de sa durée de vie, l'article doit être soumis à...
-
Page 90: Ambito Della Fornitura
Gentile cliente, La ringraziamo per aver scelto un prodotto di alta qualità della ADE che unisce funzioni intelligenti e un design fuori dal comune. Questa radiosveglia permette di vedere l'orario in modo preciso. La lunga esperienza della ADE garantisce standard tecnici elevati e qualità... -
Page 91: Informazioni Generali
Informazioni generali Informazioni sulle presenti istruzioni per l'uso Queste istruzioni per l'uso descrivono l'utilizzo sicuro e la cura del prodotto. Conservarle per eventuali consultazioni future. In caso di cessione del prodotto a terzi, consegnare anche le presenti istruzioni per l'uso. La mancata osservanza delle istruzioni per l'uso può... -
Page 92: Caratteristiche Tecniche
Questo simbolo indica ulteriori informazioni o indicazioni generali. Caratteristiche tecniche Modello: Radiosveglia DCF CK 1703-x 1703 (colore del legno) 1703-1 (nero) 1703-2 (bianco) Batterie: 2x LR/R6 (AA)/1,5 V Corrente nominale: < 40 mA Portata: ca. -10 °C - 60 °C ca. - Page 93 Indice dei contenuti Ambito della fornitura ........90 Informazioni generali........91 Caratteristiche tecniche ........92 Sicurezza ............94 Destinazione d’uso ........96 Descrizione ............97 Messa in funzione .......... 98 Ricezione del segnale orario ...... 99 Informazioni sul trasmettitore di segnale orario DCF77 ......104 Sveglia ..............
-
Page 94: Sicurezza
Sicurezza ‚ Il dispositivo può essere utilizzato da bambini con un età superiore a 8 anni e da persone che hanno capacità fisiche, sensoriali o mentali ridotte, oppure con mancanza di esperienza o di conoscenza, solo sotto la supervisione di una persona responsabile o se hanno ricevuto e compreso le istruzioni e i pericoli che potrebbero manifestarsi durante l’uso del dispositivo. - Page 95 PERICOLO di incendio, ustioni e/o esplosione ‚ La sostituzione non corretta delle batterie può costituire un pericolo di esplosione. Sostituire le batterie solo con batterie dello stesso tipo o equivalenti. Si veda "Dati tecnici". ‚ Le batterie non devono essere ricaricate, riattivate con altri mezzi, smontate, buttate nel fuoco o messe in cortocircuito.
-
Page 96: Destinazione D'uso
‚ Non sottoporre le batterie a temperature estreme, ad esempio conservandole vicino a termosifoni o alla luce diretta del sole. Serio rischio di fuoriuscita di liquido! ‚ Se necessario, pulire i contatti del dispositivo e le batterie prima di inserirle. ‚... -
Page 97: Descrizione
Descrizione Simbolo per funzione sveglia attiva Tasto SNOOZE/LIGHT Simbolo per la ricezione radio dal trasmettitore di segnale orario DCF77. Orario (ore, minuti, secondi) Data/Giorno della settimana/Temperatura ambiente (in °C o °F) Radiosveglia DCF CK 1703-x... -
Page 98: Messa In Funzione
Tasti funzione SET, ALARM, , WAVE Vano batterie, 2x LR/R6 (AA) Messa in funzione Per il funzionamento sono necessarie due batterie del tipo LR/R6 (AA), 1,5 V. 1. Premere la linguetta e rimuovere il coperchio del vano batteria. 2. Inserire le batterie come indicato sul fondo del vano batterie. -
Page 99: Ricezione Del Segnale Orario
Non appena le batterie sono inserite, la radio avvia la ricezione, si veda il capitolo successivo. Indicazioni sulla sostituzione delle batterie: ‚ Utilizzare solo il tipo di batterie indicato nei “Dati tecnici”. ‚ Sostituire sempre tutte le batterie. ‚ Provvedere allo smaltimento corretto delle batterie, vedi “Smaltimento”. - Page 100 Se non è ricevuto un segnale sufficientemente forte, la radiosveglia interrompe la procedura di ricezione dopo qualche minuto e l'icona della torre radio si spegne. La ricezione sarà riavviata in un secondo momento. In tal caso, l'indicazione dell'orario avviene lo stesso (a partire dall'orario iniziale "00:00").
- Page 101 Impostazione manuale dell'orario ‚ Se si attendono più di 30 secondi circa tra una pressione e l'altra dei tasti, il processo di regolazione termina automaticamente e sarà necessario ripeterlo da capo. ‚ Ogni pressione del tasto viene confermata con un segnale acustico. 1.
- Page 102 − Giorno − Lingua (si riferisce solo alla visualizzazione del giorno della settimana) 6. Infine premere SET, per terminare la procedura. Avvio manuale della ricezione radio Se il simbolo del segnale radio non appare nella parte sinistra dello schermo, vuol dire che il dispositivo non è...
- Page 103 Scelta della posizione ATTENZIONE a eventuali danni al prodotto ‚ Proteggere la radiosveglia da polvere, urti, temperature estreme e non esporre i dispositivi direttamente alla luce solare. Porlo solo in un ambiente chiuso e asciutto. ‚ Tenere lontano da televisori, computer e monitor.
-
Page 104: Informazioni Sul Trasmettitore Di Segnale Orario Dcf77
Installazione radiosveglia − Possibilmente installare la radiosveglia in prossimità della finestra. Qui di solito la ricezione è migliore. Informazioni sul trasmettitore di segnale orario DCF77 Questa radiosveglia riceve il suo segnale radio dal trasmettitore di segnale orario DCF77. Che trasmette l'ora esatta e ufficiale dalla Germania sulla frequenza a onde lunghe 77,5 kHz. -
Page 105: Sveglia
Sveglia Impostazione della sveglia 1. Tenere premuto il tasto ALARM, fino a quando sul display non lampeggia l'ora della sveglia e appare "AL". 2. Impostare l'ora della sveglia 3. Premere ALARM. 4. Impostare i minuti della sveglia con 5. Premere ALARM, per salvare l'orario della sveglia. -
Page 106: Altre Funzioni
Ripetizione sveglia (funzione Snooze) − Premere 1 volta il tasto SNOOZE/LIGHT, quando il segnale della sveglia suona. Sul display lampeggiano Dopo 5 minuti, il dispositivo si accende di nuovo e ricomincia a suonare. Questa azione può essere ripetuta più volte. Attivazione e disattivazione della sveglia −... -
Page 107: Pulizia
Se l'orario estivo è attivo, sul display appare "DST" (Daylight Saving Time). Ripristino della radiosveglia alle impostazioni di fabbrica Ripristinare i valori di fabbrica della radiosveglia, se sul display appaiono valori insoliti o chiaramente errati. 1. Estrarre le batterie dall'apposito vano e attendere qualche istante. -
Page 108: Dichiarazione Di Conformità
CK 1703-x è conforme alle direttive 2014/53/EU e 2011/65/EU. Il testo completo della dichiarazione di conformità EU è disponibile al seguente indirizzo Internet: www.ade-germany.de/doc. La presente dichiarazione perde ogni sua validità qualora alla sveglia vengano apportate modifiche senza la nostra autorizzazione. -
Page 109: Garanzia
Garanzia La ditta GRENDS GmbH garantisce la riparazione o la sostituzione gratuita dell'unità per un periodo di 2 anni a partire dalla data di acquisto, nel caso di difetti di materiale o fabbricazione del prodotto. A tale scopo, consegnare al rivenditore il prodotto e la prova di acquisto (citando i motivi del reclamo). - Page 110 Smaltimento del prodotto Smaltire il prodotto secondo le norme vigenti nel proprio paese. Il dispositivo non deve essere smaltito con i normali rifiuti domestici Al termine della sua vita utile, l'apparecchio deve essere smaltito in modo appropriato. In tal modo si rende possibile il riutilizzo del materiale riciclabile contenuto nell’apparecchio limitando l’impatto sull’ambiente.
-
Page 112: Zawartość Dostawy
Szanowny Kliencie! Zakupiony wysokiej jakości produkt marki ADE łączy w sobie inteligentne funkcje z wyjątkową stylistyką. Dzięki niniejszemu budzikowi radiowemu godzina jest zawsze precyzyjnie w zasięgu wzroku. Wieloletnie doświadczenie marki ADE gwarantuje wysoki standard techniczny oraz sprawdzoną jakość. Życzymy zawsze poczucia czasu bez pośpiechu! -
Page 113: Informacje Ogólne
Informacje ogólne O instrukcji Niniejsza instrukcja obsługi zawiera opis bezpiecznej obsługi i pielęgnacji artykułu. Instrukcję obsługi należy przechowywać w celu jej późniejszego wykorzystania. Jeżeli produkt będzie przekazywany innej osobie, należy przekazać również tę instrukcję. Nieprzestrzeganie instrukcji obsługi może spowodować obrażenia ciała lub uszkodzenie produktu. -
Page 114: Dane Techniczne
Ten symbol oznacza dodatkowe informacje i ogólne wskazówki. Dane techniczne Model: Budzik radiowy DCF CK 1703-x 1703 (kolor drewna) 1703-1 (czarny) 1703-2 (biały) Bateria: 2x LR/R6 (AA)/1,5 V Prąd znamionowy: < 40 mA Zakres pomiarowy: ok. -10 °C - 60 °C ok. - Page 115 Spis treści Zawartość dostawy ........112 Informacje ogólne .........113 Dane techniczne ..........114 Bezpieczeństwo ..........116 Użycie zgodne z przeznaczeniem ...118 W skrócie ............119 Uruchomienie ..........120 Odbiór sygnału czasu ........121 Informacje o nadajniku sygnału czasu DCF77 ........... 126 Budzenie ............127 Pozostałe funkcje ......... 128 Czyszczenie ............
-
Page 116: Bezpieczeństwo
Bezpieczeństwo ‚ Ten produkt może być używany przez dzieci w wielu do lat 8 oraz przez osoby z ograniczonymi zdolnościami fizycznymi, sensorycznymi lub umysłowymi, bądź którym brakuje doświadczenia i wiedzy tylko wtedy, gdy są nadzorowane lub przeszły przeszkolenie z zakresu bezpiecznego użytkowania produktu i rozumieją... - Page 117 rodzaj baterii. Przestrzegać parametrów z „Danych technicznych”. ‚ Baterii nie wolno ładować, reaktywować w inny sposób, rozkładać na części, wrzucać w ogień lub powodować ich zwarcia. W przeciwnym razie występuje podwyższone niebezpieczeństwo wybuchu i wycieku, poza tym mogą ulatniać się gazy! ‚...
-
Page 118: Użycie Zgodne Z Przeznaczeniem
‚ W razie potrzeby wyczyścić styki urządzenia i baterii przed ich włożeniem. ‚ Nie dokonywać zmian w produkcie. Naprawy należy przeprowadzać w wykwalifikowanym serwisie. Nieprawidłowo wykonane naprawy mogą spowodować poważne zagrożenia dla użytkownika. Użycie zgodne z przeznaczeniem Niniejszy budzik DCF służy do wskazywania godziny, daty oraz temperatury panującej w pomieszczeniu. -
Page 119: W Skrócie
W skrócie Symbol aktywnej funkcji budzenia. Przycisk SNOOZE/LIGHT Symbol odbioru radiowego z nadajnika DCF77 Czas (godziny, minuty, sekundy) Data/ dzień tygodnia/temperatura w pomieszczeniu (w °C lub °F) Budzik radiowy DCF CK 1703-x... -
Page 120: Uruchomienie
Przyciski obsługi SET, ALARM, , WAVE Komora na baterie, 2x LR/R6/AA Uruchomienie Do uruchomienia produktu niezbędne są dwie baterie typu LR/R6 (AA), 1,5 V. 1. Wcisnąć klapkę zamykającą i zdjąć pokrywę komory na baterię. 2. Baterie ułożyć w taki sposób, jak jest to przedstawione na spodzie komory na baterie. -
Page 121: Odbiór Sygnału Czasu
Po włożeniu baterii budzik przełącza się na tryb odbioru, patrz następny rozdział. Wskazówki dotyczące wymiany baterii: ‚ Należy korzystać tylko z typu baterii podanego w „Danych technicznych”. ‚ Zawsze należy wymieniać stare baterie. ‚ Stare baterie należy utylizować zgodnie z zasadami ochrony środowiska, patrz „Utylizacja”. - Page 122 Gdy sygnał odbioru nie jest wystarczająco mocny, budzik po kilku minutach przerywa tryb odbioru, a symbol wieży radiowej gaśnie. Proces ten jest wznawiany w późniejszym czasie. Godziny mijają w takiej sytuacji normalnie dalej (od początkowej godziny „00:00”). Lista kontrolna w przypadku braku wskazań...
- Page 123 Ręczne ustawienie godziny ‚ Jeżeli między dwoma naciśnięciami przycisku minie ok. 30 sekund, proces ustawiania zostanie automatycznie zakończony i trzeba będzie go powtórzyć. ‚ Każde naciśnięcie przycisku jest potwierdzone sygnałem dźwiękowym. 1. Trzymać wciśnięty przycisk SET do momentu, aż na wyświetlaczu zacznie migać wskaźnik trybu 12- lub 24-godzinnego.
- Page 124 − Miesiąc − Dzień − Język (odnosi się wyłącznie do wskaźnika dnia tygodnia) 6. Następnie wcisnąć SET, aby zakończyć proces. Ręczne włączanie trybu odbioru radiowego Jeżeli pokazany obok symbol sygnału radiowego nie wyświetla się, oznacza to, że sygnały radiowe nadajnika sygnału czasu nie są...
- Page 125 Wybór miejsca ustawienia WSKAZÓWKA dotycząca strat materialnych ‚ Chronić budzik przed kurzem, uderzeniami, ekstremalnymi temperaturami, miejscami narażonymi na bezpośrednie promieniowanie słoneczne oraz wilgocią. Należy umieścić go wyłącznie w suchych, zamkniętych pomieszczeniach. ‚ Zachować odstęp od telewizora, komputera i monitorów. Również stacje bazowe telefonów bezprzewodowych nie powinny znajdować...
-
Page 126: Informacje O Nadajniku Sygnału Czasu Dcf77
Ustawienie budzika radiowego − Ustawić budzik możliwie najbliżej okna. Tam odbiór jest z reguły najlepszy. Informacje o nadajniku sygnału czasu DCF77 Budzik otrzymuje sygnały dźwiękowe z nadajnika DCF77. Wysyła on na częstotliwości fal radiowych 77,5 kHz dokładny i oficjalny czas Republiki Federalnej Niemiec. -
Page 127: Budzenie
Budzenie Ustawianie czasu budzenia 1. Przycisk ALARM trzymać wduszony do momentu, aż na wyświetlaczu będzie migać godzina budzenia i pojawi się „AL”. 2. Za pomocą przycisków ustawić czas budzenia (godzinę). 3. Nacisnąć ALARM. 4. Za pomocą przycisków ustawić czas budzenia (minuty). 5. -
Page 128: Pozostałe Funkcje
Powtarzanie budzenia (Funkcja Snooze) − Nacisnąć raz przycisk SNOOZE/LIGHT po wybrzmieniu sygnału budzenia. Na wyświetlaczu będzie migać Po 5 minutach urządzenie włącza się ponownie i budzi jeszcze raz. Proces ten można powtarzać wielokrotnie. Włączanie i wyłączanie funkcji budzenia − Wcisnąć raz przycisk ALARM, aby wyłączyć funkcję... -
Page 129: Czyszczenie
Jeżeli czas letni jest aktywny, na wyświetlaczu pojawi się „DST” (Daylight Saving Time). Przestawienie budzika radiowego na ustawienia fabryczne Należy przestawić budzik na ustawienia fabryczne, gdy na wyświetlaczu pojawią się nietypowe lub nieprawdziwe wartości. 1. Wyjąć baterie z komory i zaczekać chwilę. 2. -
Page 130: Deklaracja Zgodności
CK 1703-x jest zgodna z dyrektywą 2014/53/UE i 2011/65/UE. Pełny tekst deklaracji zgodności UE jest dostępny pod poniższym adresem internetowym: www.ade-germany.de/doc. Deklaracja zgodności traci swoją ważność w przypadku dokonania nieuzgodnionych z nami zmian w budziku. Hamburg, marzec 2022... -
Page 131: Gwarancja
Gwarancja Firma GRENDS GmbH gwarantuje przez 2 lata od daty zakupu bezpłatne usuwanie braków z tytułu błędów materiałowych lub produkcyjnych w drodze naprawy lub wymiany. W przypadku korzystania z gwarancji prosimy o podanie sprzedawcy artykułu wraz z dowodem zakupu (podając również powód reklamacji). Utylizacja Utylizacja opakowania Opakowanie należy utylizować... - Page 132 Utylizacja produktu Produkt należy utylizować zgodnie z przepisami obowiązującymi w danym kraju. Urządzeń nie wolno wyrzucać razem ze zwykłymi odpadami domowymi Po zakończeniu okresu użytkowania produkt należy przekazać do odpowiedniej utylizacji. Surowce wtórne znajdujące się w urządzeniu zostaną przekazane do recyklingu, co zmniejszy zanieczyszczenie środowiska.
Need help?
Do you have a question about the CK 1703-2 and is the answer not in the manual?
Questions and answers