
Summary of Contents for SpectronIQ PDV-808
- Page 1 PDV-808 8.5” Portable DVD Player Reproductor de DVD portátil de 8.5” Lecteur DVD portable 8.5 po User’s Manual Manual del usuario Guide de l’utilisateur...
- Page 3 Spectroniq PDV-808 Portable DVD Manual del usuario del Reproduc- Player User’s Manual. tor de DVD portátil Spectroniq PDV-808. © 2006 Protron Digital Corpora- tion (DBA Spectroniq). All rights © 2006 Protron Digital Corpora- reserved. tion (DBA Under copyright law, this manual derechos reservados.
-
Page 4: Product Cautions
Product Cautions Precauciones a tomar al manejar el producto TO PREVENT POSSIBLE DANGER, ELECTRIC SHOCK, PARA EVITAR UN POSIBLE AND INJURY WHEN HANDLING DAÑO, CHOQUE ELÉCTRICO Y YOUR PORTABLE DVD PLAYER, LESIONES CUANDO MANEJE PLEASE BE AWARE OF ALL SU REPRODUCTOR DE DVD WARNINGS AND SAFETY PRE- PORTÁTIL, TENGA PRESENTE CAUTIONS LISTED BELOW. -
Page 5: Conformity And Compliance
Conformity and Conformidad y Compliance cumplimiento FCC Compliance Statement Declaración de cumplimiento This equipment has been tested con FCC and found to comply with the Este equipo se sometió a pruebas limits for a Class B digital device, y se detectó que cumple con los pursuant to Part 15 of the FCC límites para un dispositivo digital Rules. - Page 6 Radio Frequency Interference anular el derecho del usuario de Statement operar el equipo. Warning: Declaración de interferencia de This is a Class B product. In a radiofrecuencia domestic environment this product may cause radio interference, in Advertencia: which case the user may be re- Éste es un producto Clase B.
-
Page 7: Table Of Contents
Table of Contents Contenido Introduction ....1 Introducción ....1 Features . - Page 8 Enabling Slideshow Transition Ef- Navegación de la estructura del fects ....20 directorio....17 Navigating the Directory Struc- Repetición de pistas .
-
Page 9: Caractéristiques
Introduction Introducción Congratulations on purchasing ¡Felicitaciones por adquirir su your new Spectroniq Portable DVD nuevo Reproductor de DVD portátil Player! de Spectroniq! With a large 8.5” screen and over Con una pantalla grande de 8.5” y two and a half hours of battery más de dos horas y media de dura-... -
Page 10: Unpacking Your New Dvd Player
Unpacking Your New DVD Player Before using your new portable DVD player, you should unpack the contents of the box and check to make sure everything is present and undamaged. To unpack the player: 1. Open the box. 2. Remove the carrying case, which holds the player. - Page 11 Unpacking Your New DVD Player • Desempaque su nuevo Reproductor de DVD • Déballage de votre nouveau lecteur DVD 5. Open the disc receptacle by 5. Abra el receptáculo del disco pressing the OPEN button, presionando el botón OPEN, remove the paper laser retire el protector de papel del protector, then close the láser, luego cierre el receptáculo.
-
Page 12: Funcionamiento Del Reproductor
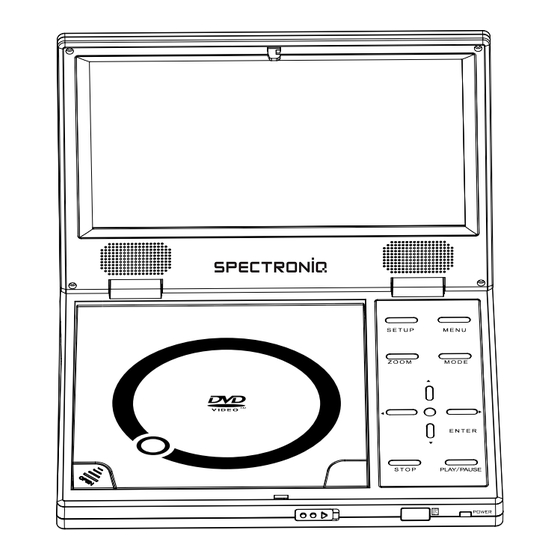
Operating the Funcionamiento del Player Reproductor Short Press(within 1 Short Press(within 1 second)MODE button: second)MODE button: - Rotate the screen. It also - Rotate the screen. It also enables viewing from many direc- enables viewing from many direc tions. tions. - Pressing the “MODE”button - Pressing the “... -
Page 13: Acceso Al Menú Configuración
Operating the Player • Funcionamiento del Reproductor • Fonctionnement du lecteur ed and press encuentra directamente debajo de either “ ” or “ ”. la pantalla. The menu will disappear after a few seconds of inactivity. Para insertar un disco: 1. -
Page 14: Accessing The Setup Menu
and press either DOWN or UP. configurar el funcionamiento del The menu will disappear after a reproductor. Puede cambiar el few seconds of inactivity. vídeo, audio y configuraciones de idioma, controlar el acceso Bringing Up the On-Screen a la programación de adultos y Display configurar otros comportamientos The On-Screen Display (OSD) -
Page 15: Navegación De Los Menús
Playing DVDs Reproducción de Los DVD se reproducirán al DVDs will play upon insertion. The insertarlos. El reproductor puede player can perform all standard realizar todas las funciones de DVD playback and search func- búsqueda y reproducción estándar tions. de DVD. La Visualización en pantalla The On-Screen Display El OSD de DVD tiene dos modos:... -
Page 16: Selección Del Canal Del Subtítulo
Playing DVDs • Reproducción de DVD • Lecture de disques DVD Press PLAY or PLAY/PAUSE to return to normal play mode or to start playing the DVD again when it is stopped. Press MENU to return to the last DVD menu. Press TITLE to return to the main menu. -
Page 17: Repeating An Arbitrary Section
To search to a time: Para buscar un tiempo: 1. Press SEARCH twice to bring 1. Presione SEARCH dos veces up the time search display. para hacer aparecer la pantalla 2. Enter the desired time using the de búsqueda de tiempo. keypad. -
Page 18: Marquage Et Retour À Des Emplace Ments Précis
Playing DVDs • Reproducción de DVD • Lecture de disques DVD sequence. To return to normal sequential playback, press PROGRAM twice. Marking and Returning to Loca- tions Using the MARK button, you can mark and return to up to six loca- tions on the current DVD. -
Page 19: La Visualización En Pantalla
Playing Video CDs Reproducción de CD de vídeo Los CD de vídeo pueden contener Video CDs can contain video or vídeo o imágenes fijas, como las still images, such as photos. Your fotografías. Su reproductor de DVD portable DVD player will play all portátil reproducirá... -
Page 20: Ture
Playing Video CDs • Reproducción de CD de vídeo • Lecture de CD vidéo PAUSE to pause the video or slideshow. When the video is paused, press PAUSE/STEP to step forward one frame at a time. Press STOP once to stop play- back. -
Page 21: Marquage Et Retour À Des Emplace Ments Précis
Marking and Returning to columnaPista. Locations 5. Seleccione la pista a program- Using the MARK button, you can ar en el emplazamiento selec- mark and return to up to six loca- cionado y presione ENTER. tions on the current disc. 6. -
Page 22: Controlling Playback
Playing Audio CDs Reproducción de CD de audio Los CD de audio se reproducirán Audio CDs will play upon insertion. al insertarlos. Todas las caracter- All standard CD navigation features ísticas de navegación estándar de are available. CD se encuentran disponibles. The On-Screen Display La Visualización en pantalla The OSD shows the current track... -
Page 23: Repetición De Pistas
Repeating Tracks Para buscar un tiempo: Press REPEAT to cycle through 1. Presione SEARCH para hacer the repeat options: the current aparecer la pantalla de track, the current disc, and off. búsqueda de tiempo. 2. Ingrese el tiempo deseado Repeating an Arbitrary Section utilizando el teclado. -
Page 24: Marquage Et Retour À Des Emplace Ments Précis
Playing Audio CDs • Reproducción de CD de audio • Lecture de CD audio 3. Press ENTER to store the cur- rent location in the selected slot. At this point you can exit the mark display by pressing MARK again. To return to a marked location: 1. -
Page 25: Control De Reproducción
Playing MP3 CDs Reproducción de CD de MP3 Al insertar un CD de MP3, el Upon inserting an MP3 CD, the reproductor empezará a reproducir player will begin playing the MP3 las pistas de MP3 almacenadas en tracks stored on the disc and bring el disco y lo llevará... -
Page 26: Programming Playback
Playing MP3 CDs • Reproducción de CD de MP3 • Lecture de CD MP3 Press ENTER to enter a folder or play back an MP3 track. Repeating Tracks Press REPEAT to cycle through the repeat options: the current track, the current folder, the current disc, and off. -
Page 27: The On-Screen Display
Playing Kodak Pic- Reproducción de ture CDs CD de fotografías Kodak Al momento de la inserción, el Upon insertion, the player will reproductor leerá y empezará la read and begin to play your Kodak reproducción de su CD de foto- Picture CD, displaying a slideshow grafías Kodak, visualizando una of the images on the disc. -
Page 28: Transforming Images
Playing Kodak Picture CDs • Reproducción de CD de fotografías Kodak • Lecture de CD Image Kodak Transforming Images Press the right. Press the left. Press zontally. Press vertically. Enabling Slideshow Transition Effects Press ANGLE to scroll through the available slideshow transition effects: •... -
Page 29: Ture
Playing Kodak Picture CDs • Reproducción de CD de fotografías Kodak • Lecture de CD Image Kodak Navigating the Directory Struc- • Efecto 8—Dibuja la nueva ture imagen sobre la anterior desde Press MENU while the slideshow la parte superior a la inferior is playing to bring up the directory •... -
Page 30: Playing Other Picture Cds
Playing Other Pic- Reproducción de ture CDs otro CD de foto- grafías Cuando inserta un CD de datos, el When you insert a data CD, the reproductor lo detectará y mostrará player will detect and display in a en una presentación de diapositi- slideshow any JPEG format im- vas cualquier imagen con formato ages stored on the disc. -
Page 31: Transforming Images
Playing Other Picture CDs • Reproducción de otro CD de fotografías • Lecture d’autre CD image Transforming Images Navigating the Directory Structure Press to rotate the image 90° to Press STOP while the slideshow the right. is playing to bring up the directory Press to rotate the image 90°... -
Page 32: Enabling Slideshow Transition Activación De Los Efectos De Tran- Sición De La Presentación De Dia-Repeating Images
Playing Other Picture CDs • Reproducción de otro CD de fotografías • Lecture d’autre CD image Repeating Images Press the REPEAT button to scroll through the repeat modes: the cur- rent image, the current folder, the entire disc, and off. Programming Playback You can program a slideshow sequence using the PROGRAM... -
Page 33: Using The Remote Control
Using the Remote Control Uso del Control remoto Utilisation de la télécommande Button Function Botón Función Touche Fonction Brings up the On-Screen Display (OSD), which shows current playback information Hace aparecer la Visualización en pantalla (OSD), que muestra la información actual de reproducción Active l’affichage à... - Page 34 Using the Remote Control • Uso del Control remoto • Utilisation de la télécommande Button Function Botón Función Touche Fonction Zooms in on the picture When viewing a DVD or Video CD, pressing this button repeatedly cycles through three zoom levels: ×1, ×2, and ×4.
- Page 35 Button Function Botón Función Touche Fonction Brings up the search display, which you can use to skip to a specified location Hace aparecer la pantalla de búsqueda, que puede utilizar para llegar a una ubicación especificada Affiche l’écran de recherche, lequel permet de sauter vers un emplacement choisi Used to navigate menus and displays Se utiliza para navegar en los menús y las pantallas Permet de naviguer dans les menus et les écrans d’affichage...
- Page 36 Using the Remote Control • Uso del Control remoto • Utilisation de la télécommande Button Function Botón Función Touche Fonction Skips to the next chapter, track, or photo Pasa al capítulo, pista o fotografía siguiente Saute à la piste, photo ou chapitre suivant When in normal play mode, this button pauses playback.
-
Page 37: Replacing The Remote Battery
Using the Remote Control • Uso del Control remoto • Utilisation de la télécommande Replacing the Remote Battery Reemplazo de la batería del The remote requires a CR2502 control remoto battery, which is held in a small en- El control remoto necesita una closure at the bottom of the remote. -
Page 38: Configuring The Player
Configuring the Configuración del Player Reproductor The Setup menu allows you to El menú Configuración le permite configure the operation of the configurar el funcionamiento del re- player. You can change video, au- productor. Puede cambiar el vídeo, dio, and language settings, control audio y configuraciones de idioma, access to mature programming, controlar el acceso a la program-... -
Page 39: Screen Setup
Configuring the Player • Configuración del Reproductor • Configuration du lecteur Menu Menú Changes the language used for Cambia el idioma utilizado para los DVD menus. menús de DVD Audio Audio Changes the language used for Cambia el idioma utilizado para el DVD audio. -
Page 40: Audio Setup
Configuring the Player • Configuración del Reproductor • Configuration du lecteur an external display. • PAL 2—Use PAL 2 when playing PAL- format media on the player itself. Brightness Controls the brightness of the im- age: Normal, Bright, or Soft Contrast Controls the variance between light and dark in the image... -
Page 41: Exit Setup
Configuring the Player • Configuración del Reproductor • Configuration du lecteur Password • 5 Sets the password for parental • 6: R control. The factory default pass- • 7: NC-17 word is ‘8888’. • 8 Angle Mark Contraseña When this is turned on, a small Configura la contraseña para el icon will display in the corner of the control de los padres. -
Page 42: Using The Player In A Vehicle
Using the Player in Uso del Reproduc- a Vehicle tor en un vehículo Your portable DVD player is de- Su reproductor de DVD portátil signed to accommodate usage in a está diseñado para acomodarse vehicle. A vehicle power adapter is al uso en un vehículo. -
Page 43: Connexion À D'autres Appareils
Connecting the Conexión a otros Player to Other dispositivos Devices Puede conectar su reproductor de You can connect your portable DVD portátil a una pantalla externa DVD player to an external display para obtener una imagen más for a larger picture, or to an exter- grande o a un sistema de audio nal audio system for better sound. - Page 44 Connecting the Player to Other Devices• Conexión a otros dispositivos • Connexion à d’autres appareils To connect to an analog system, attach the red (left) and white (right) connectors on the included audio adapter cable to an audio system input, and connect the other end of the cable to the AV jack on the player.
-
Page 45: Using The Battery
Using the Battery The battery life of the included battery is more than two and a half hours. It attaches to the rear of the player and may be charged separately or while connected to the player. Connecting the Battery To connect the battery to the player, align the notches on the battery with the holes on the bot-... -
Page 46: Troubleshooting
Troubleshooting Solución de problemas Dépannage Possible Cause Symptom Posible causa Síntoma Cause possible Symptôme Player is in power saving No picture mode Sin imagen El reproductor está en el Absence d’image modo de ahorro de energía Le lecteur est en mode d’économie d’énergie No signal No picture on external... - Page 47 Possible Cause Symptom Posible causa Síntoma Cause possible Symptôme Signal cable(s) not securely Unclear or noisy picture connected on external display El(los) cable(s) de la señal no Imagen difusa o ruidosa está(n) bien conectado(s) en la pantalla externa Le ou les câbles du signal ne Image pas nette ou sont pas branchés correcte- embrouillée sur l’écran...
- Page 48 Troubleshooting • Solución de problemas • Dépannage Possible Cause Symptom Posible causa Síntoma Cause possible Symptôme Battery inserted improperly Remote control not La batería no se insertó cor- functioning rectamente El control remoto no Pile mal insérée funciona La télécommande ne Battery low on energy marche pas La batería tiene poca energía...
- Page 49 (voir « Caractéristiques » à la page 42). Nota: Puede encontrar infor- Remarque: D’autres informations mación adicional sobre la solución de problemas en el sitio Web de Spectroniq en www.Spectroniq.com. de dépannage peuvent être consultées sur le site Web Spectroniq à...
-
Page 50: Support Information
“Desempaque su nuevo Reproduc- tor de DVD” en la página 2 y se haya comunicado con el centro de servicio al cliente. La mercadería no se puede devolver a Spectroniq sin un formulario de devolución autorizado. Antes de comunicarse con el servicio al cliente de Spectroniq, registre la siguiente información,... -
Page 51: Specifications
Specifications Especificaciones Caractéristiques General • Generales • Gé- néralités 9.3 (230) W × 1.3 (32) H × 6.7 (170) D Dimensions—in. (mm) 9.3 (230) W × 1.3 (32) H × 6.7 (170) Prof Dimensiones—pu (mm) 9.3 (230) W × 1.3 Dimensions—po (mm) 3.1lbs Weight... -
Page 52: Audio/Video
Display • Pantalla • Écran Panel Type Tipo de panel Type de panneau Screen Size Tamaño de la pantalla Dimension de l’écran Resolution Resolución Résolution Pixel Pitch Píxel Pitch Densité par pixel Contrast Ratio Relación de contraste Rapport de contraste d’image Brightness Brillo Luminosité... -
Page 53: Limited Warranty
Cómo obtener servicio: Support line at 1-888-257-8899. • Comuníquese con la línea de If the issue cannot be resolved Apoyo al cliente de Spectroniq al over the phone, a servic tag 1-888-257-8899. Si no se puede number will be issued and resolver el problema por teléfono,... -
Page 54: Pantalla
What we will do: • Spectroniq will assess the product and cover all labor charges to repair your product. • Spectroniq will provide new, or at our discretion, refurbished replacement parts required to repair your product. This warranty is void if: •... - Page 55 à la période de cette garan- tie expresse et aucune garantie expresse ou implicite ne pourra s’appliquer au produit par la suite. SPECTRONIQ ne peut en aucun cas être tenue responsable pour des pertes ou dommages con- sécutifs découlant de l’utilisation de ce produit.
- Page 57 Protron Digital Corporation(DBA Spectroniq) http://www.spectroniq.com/ PDV-808 OMPDV808...
Need help?
Do you have a question about the PDV-808 and is the answer not in the manual?
Questions and answers