Table of Contents
Advertisement
Model No.: YLW6336
Rev 1
Note: This appliance's specifications and/or components are subject to change without prior notice.
If any Accessories should fail during use, please call 1300 105 888 (Australia) or 09 8870 447 (New Zealand)
for an immediate replacement. This will save you from returning the product to the store.
If we can assist you in any other way, please feel free to contact us
Carpet Spot Cleaner
For Household Use Only
Advertisement
Table of Contents

Related Manuals for anko YLW6336


Summary of Contents for anko YLW6336
- Page 1 Carpet Spot Cleaner For Household Use Only Model No.: YLW6336 Rev 1 Note: This appliance's specifications and/or components are subject to change without prior notice. If any Accessories should fail during use, please call 1300 105 888 (Australia) or 09 8870 447 (New Zealand) for an immediate replacement.
-
Page 2: Table Of Contents
IMPORTANT ......................3 Warnings ......................3 Safety ........................3 Transporting your Carpet Spot Cleaner ............6 Dog Cleaning....................... 6 Floor Surfaces..................... 6 Carpet Cleaning Solution ................... 6 Components ......................8 Handle Holder Assembly ................... 9 Operation ......................9 10.1 Attaching the Floor Head ............9 10.2 Attaching / Removing the Floor Heads ........ -
Page 3: Important
IMPORTANT Please note: it is very important that the filters, water containers and components are kept clean and the cleaning heads are free from blockages, etc. Failure to keep it clean and well-maintained will reduce the performance of your Spot Cleaner, and may cause the motor to overheat. Please refer to the “User Maintenance”... - Page 4 DO NOT pick up toxic material (i.e., chlorine bleach, ammonia, drain cleaner, etc.) DO NOT vacuum Toner (for laser printers, copy machines etc.) as there is a risk of fire and explosion. DO NOT vacuum plaster, cement etc. as the unit will become blocked. DO NOT store or use the appliance near high-temperature areas.
- Page 5 DO NOT use cleaner if it has been dropped, damaged, left outdoors, or dropped into liquid (water etc.) DO NOT handle the plug or cleaner with wet hands. DO NOT put any objects into openings. DO NOT use with any openings blocked and do not restrict airflow. DO NOT use the appliance if it is blocked.
-
Page 6: Transporting Your Carpet Spot Cleaner
ONLY for domestic use. Industrial or commercial use invalidates the warranty. Read and Save These Instructions Transporting your Carpet Spot Cleaner To move your cleaner from room to room, unplug the unit and carry using the carry handle. Never pull or carry the cleaner by its cord. Dog Cleaning Please refer to the separate section “Operation as a Dog Cleaner”... - Page 7 The Clean Water Tank will hold approx. 1L (1000ml) of clean water when filled to the “Max” fill line. Important: Check the recommended mixing ratio found in the instructions supplied with the cleaning solution. Add the required amount of cleaning solution to the 1 Litre of clean water in the water tank.
-
Page 8: Components
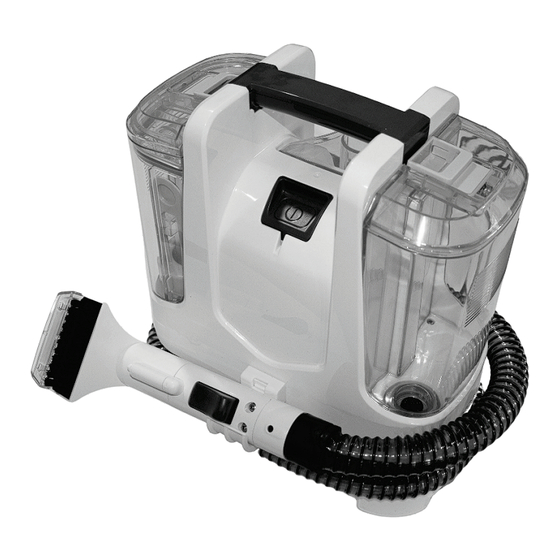
Components Carry Handle Vacuum Floor Head - Plain Clean Water Tank 1.1L Capacity Dog Brush: Rubber Comb – Short Fur On / Off Switch Dog Brush: Metal Comb – Long Fur Flexible Hose (Water Pipe Internal) Dog Brush Nozzle Handle with Water Trigger Clean Water Tank Cap –... -
Page 9: Handle Holder Assembly
Handle Holder Assembly Before first use, fit the Handle Holder as follows: Take the hook and position it over the lug on the front of the unit then push it down • hard until it locks in place. Operation 10.1 Attaching the Floor Head There are two different floor heads you can choose from. -
Page 10: 10.2 Attaching / Removing The Floor Heads
10.2 Attaching / Removing the Floor Heads To attach and remove the floor heads to and from the handle, follow the steps following: Plain Floor Head – Align the handle with the back of the floor head, ensuring the water spigot aligns with its mating hole as shown, then push in hard until the lock button on top of the handle locks into the hole in the top of the Floor Head: Scrub Brush Floor Head –... -
Page 11: Filling With Water / Cleaning Solution
10.3 Filling with Water / Cleaning Solution IMPORTANT: Only use a Low Foaming carpet cleaning solution. Always follow the instructions on the Cleaning Solution Bottle. Before use, please refer to the sections “Floor Surfaces” and “Carpet Cleaning Solution” in this manual. Remove the Clean Water Tank by sliding the latch open then slide the water tank straight up and out, then turn the water tank over to access the filling hole. - Page 12 Screw on the Cap (clockwise) and tighten securely. Do Not overtighten. • Rotate the water tank so that the cap is at the bottom and then slide it down into the • base unit as shown and push down until the latch locks it in place. Ensure the Dirty Water Tank lid and tank are fitted correctly and latched in place.
- Page 13 Ensuring you have fitted the required floor head, fully unravel the power cord then • insert the plug into the power point and switch on the power point. Press the On / Off switch to “On” and the vacuum motor will turn on. •...
-
Page 14: Operation As A Dry Vacuum Cleaner
Plain Floor Head This floorhead can be used where scrubbing is not needed, and also used in • conjunction with the floorhead with the scrub brush to rinse the carpet and to remove excess water. Operate the trigger to apply the cleaning solution to the area to be cleaned / rinsed. •... -
Page 15: Operation As A Dog Cleaner
Operation as a Dog Cleaner This appliance, along with the special Dog cleaning nozzle and brushes, can be used for cleaning your dog’s fur. This can reduce the frequency of bathing your dog but does not replace a proper dog bath. It is suggested that when you use this appliance for the first time with your dog, allow your dog to get used to the vacuum noise by turning the appliance on while keeping your dog 1 - 2 meters apart. - Page 16 Attach the Dog Cleaning Nozzle to the end of the flexible hose. Plug the appliance into the power point, switch on and start the appliance. Squeeze the water trigger on the Dog Cleaning Nozzle, away from your dog, to ensure there is a steady stream. Allow your dog to acclimatise to the noise for as long as needed, then bring your dog to the appliance.
-
Page 17: User Maintenance
User Maintenance WARNING: The appliance must be switched off and the plug must be removed from the power point before any maintenance, cleaning, filling the Clean Water Tank or emptying the Dirty Water Tank, etc. 13.1 Emptying the Dirty Water Tank Empty the Dirty Water Tank before the water level reaches the “MAX”... -
Page 18: Cleaning Floor Heads
Empty the dirty water and remove any debris that may be caught inside. • • Wash out the tank and the lid with warm water and mild dishwashing detergent and rinse. It is best if all components are allowed to dry before reassembling. DO NOT place in a dishwasher. -
Page 19: Plain Floor Head
13.2.1 Plain Floor Head To clean the Plain Floor Head, remove it from the handle as described previously • and wash it in warm water (40°C or less) with mild dishwashing detergent. • Rinse in clean cold water and allow to completely dry. DO NOT place in a dishwasher DO NOT use a hairdryer or place it in an oven to dry the components. -
Page 20: Dog Cleaning Nozzle And Brushes
Reassemble the front part by hooking it onto the lower front of the floor head, • swing it back and then push down firmly until the tab clips shut. 13.2.3 Dog Cleaning Nozzle and Brushes • To clean the Dog Cleaning Nozzle, remove it from the handle. Remove the Brush by holding the head firmly and with your other hand, grasp and •... -
Page 21: Cleaning The Filters
13.3 Cleaning the Filters Vacuum Pre-Motor Filter There is a small round foam filter between the Dirty Water Tank and the Vacuum Motor. This filter prevents large particles from being sucked into the motor, which will need periodic cleaning. To access this filter, first remove the Dirty Water Tank as described previously, then grasp the small filter with your thumb and index finger and pull out. -
Page 22: Cleaning The Main Unit
13.4 Cleaning the Main Unit CAUTION: DO NOT IMMERSE THE APPLIANCE IN WATER OR LIQUID. Turn off and unplug from the power point before cleaning. • Never use abrasive cleaners, solvents, steel wool, scouring pads, stiff brushes, or • strong chemicals that might or might not be flammable and/or damaging to the product. -
Page 23: Troubleshooting
Troubleshooting Power Not Switched On. Switch On at power point. No power is being supplied to Check your circuit breakers. the power point. No water / cleaning solution in Add water / cleaning solution No Water is being the clean water tank. to the clean water tank. -
Page 24: Warranty Against Defect
Warranty Against Defect 12 Month Warranty Thank you for your purchase from Kmart. Kmart Australia Ltd warrants your new product to be free from defects in materials and workmanship for the period stated above, from the date of purchase, provided that the product is used in accordance with accompanying recommendations or instructions where provided.
Need help?
Do you have a question about the YLW6336 and is the answer not in the manual?
Questions and answers