Advertisement
- 1 SPECIFICATIONS
- 2 PACKAGE CONTENTS
- 3 SAFETY PRECAUTIONS
- 4 ABOUT
- 5 PRODUCT OVERVIEW
- 6 CONTROL PANEL OVERVIEW
- 7 PORT PANEL OVERVIEW
- 8 FILM INSTALLATION
- 9 OPERATING INSTRUCTIONS
- 10 MENU FUNCTIONS
- 11 CUSTOMER SERVICE
- 12 WARRANTY
- 13 Documents / Resources
SPECIFICATIONS
Dimensions: 12.4' x 6.1' x 8.4' (31,5 x 15,4 x 21,3 cm)
Image sensor: 8.08 megapixels (3280 x 2464) 1/3" CMOS sensor
Native resolution: 1296p
Display: 5' TFT LCD
Memory capacity: Up to 128 GB SD™ card
File output format: MPEG-4
Power source: 12 V DC
Exposure control: Auto, manual (-2 to +2 EV)
White balance: Auto
Frame rate: 20 frames/sec
Focus system: Fixed focus
Scan speed: 2 frames/sec
Language options: English/Spanish/French/German/Italian
Support systems: Windows XP, Vista/Windows 7, 8, and 10/Mac 10.7.3
Compatible film reel sizes: 3" - 9" film reels
PACKAGE CONTENTS
KODAK REELZ Film Digitizer
7' empty film reel AC/DC adapter
Gray reel adapter
Red reel adapter
Micro USB cable
Cleaning cloth
User guide
SAFETY PRECAUTIONS
![]()
CHOKING HAZARD – Small parts. This product contains small parts and is not suitable for children under 3 years old.- Remove all packaging before using this device. Please keep all packaging materials out of reach of children and pets.
- Properly dispose of all packing materials immediately after unpacking the product, as the bags used for packaging could present a suffocation or choking hazard.
- Read all instructions carefully before attempting to operate this device. Improper usage could result in a reduction in efficacy.
- Do not attempt to disassemble or modify any part of this device.
- Do not use the device if smoke or unknown smell arises.
- Do not use products such as alcohol, gasoline, thinner, or any other organic solvents to clean this device.
- Do not operate the device in dusty or wet areas.
- Make sure the device is properly clean before operating it.
- Keep the scanner out of reach of children.
![shock hazard]() Never handle the scanner with damp or wet hands. This could damage the scanner or create the risk of electric shock.
Never handle the scanner with damp or wet hands. This could damage the scanner or create the risk of electric shock.- Do not place, drop, or submerge the scanner in water or any other liquid.
- If the scanner somehow falls into water despite you taking all of the above precautions, please do not reach into the water to retrieve it. Unplug it immediately and then retrieve it.
- Take care that objects do not fall and liquids are not spilled onto the scanner.

 Never handle the scanner with damp or wet hands. This could damage the scanner or create the risk of electric shock.
ABOUT
- Convert 8 mm and Super 8 reels into digital video files
- Easy to operate
- Transfer your converted video files to an SD card
- No computers, software, or drivers required
- High-quality, frame-by-frame digitizing process
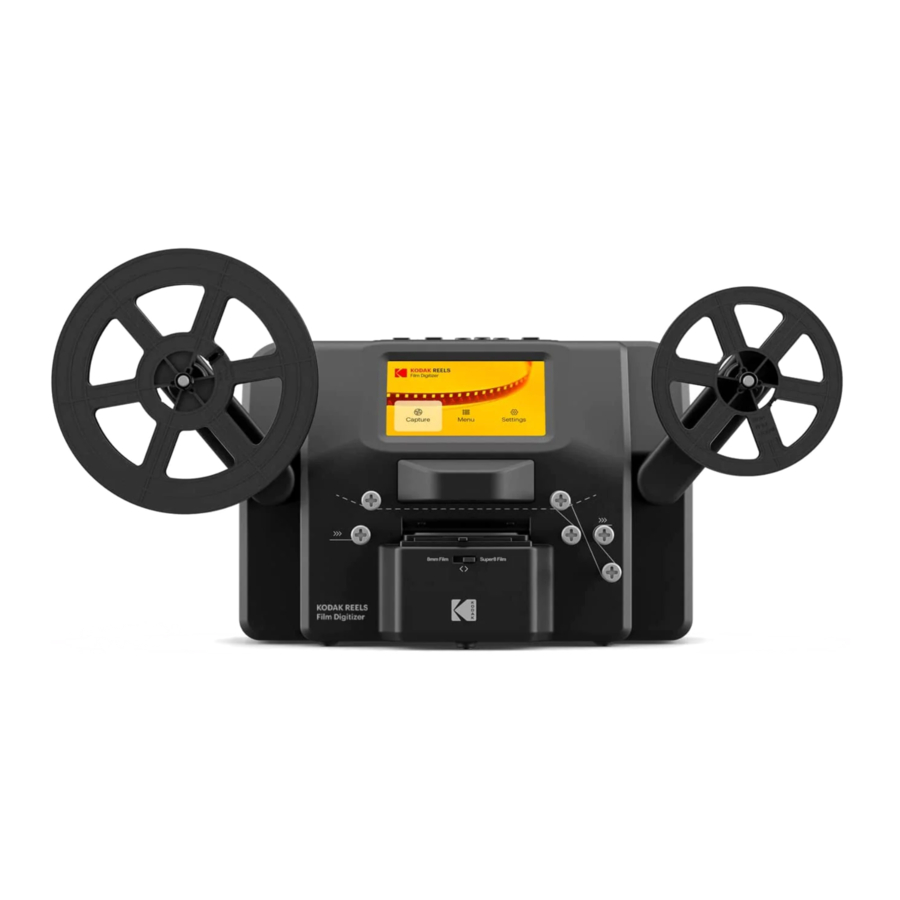
PRODUCT OVERVIEW

- Control panel
- Display screen
- Reel shafts
- Film type switch
- Film spools
- Film lid
- Film lid tab
- Empty reel
CONTROL PANEL OVERVIEW

- Power
- OK/Enter
- Back
- Left
- Down
- Right
- Up
- Minus
- Plus
PORT PANEL OVERVIEW

- SD card slot
- MICRO USB slot
- DC 12 V port
FILM INSTALLATION
- Unfold the two (2) reel shafts until they click into place.
- Carefully pull out the end of the film on your 8mm or Super 8 reel (not included). Then, fold up the end of the film nice and tight and slowly insert the end of the film in the slot on the empty reel (included). This process will help you connect your film to the empty reel.
- Spin your empty reel around a few times to make sure your film is now securely connected to the empty reel.
- Insert your reel onto the left reel shaft and place the empty reel onto the right reel shaft. (If the reel you're using has a big mounting hole, use the provided red color reel adapter. If adapters are needed, always place red color adapter on the left reel shaft; gray color adapter on the right reel shaft.)
- Take the film between the two (2) reels and carefully thread it through the scanner. Use the white, solid line on the film scanner to follow how to thread the film on the film spools.
- Push the film lid tab to the left to lift the film lid and gently wipe down the film area with the cleaning cloth (included) before placing the film.
- Hold the film firmly in between your pointer finger and thumb. Slowly place the film under the first black tab (tab farthest left in the film area). Then, carefully twist the film and place it under the second black tab in the film area.
- Twist the film slightly again to fit the film under the third tab.
- Press the film down near the fourth tab and make sure the film clips in place.

- Press your finger down once more on the film to make sure the film is under all four (4) tabs. A click should be heard when the film is probably under each tab.

NOTES: If the film is placed into the slot correctly, the gray pin will automatically adjust itself into the correct position when recording begins.
When loading a new film into the film scanner, your film may appear out of frame when first on screen. To properly center and position your film correctly, slide the film type switch back and forth once. By sliding the film type switch back and forth, the reel on the reel shaft will spin moving the film into its proper position. When using 8 mm film, slide the switch over to the Super 8 film selection then back over to the 8 mm film selection. When using Super 8 film, slide the switch over to the 8 mm film selection then back over to the Super 8 mm film selection.

8 mm film, also known as Standard 8, has a frame size of 4.5 x 3.3 mm. Super 8 film has a frame size of 5.79 x 4.01 mm. Make sure you adjust to the film type switch to the correct film type you are currently using.

NOTE: If your picture is upside down, then you are at the end of the film and need to be rewind onto another reel.
OPERATING INSTRUCTIONS
- Connect the power adapter to the scanner. Then, plug the other end of the power adapter into a power outlet.
- Insert an SD card (not included) into the SD card slot. Make sure to insert the memory card facing up.
- Press the Power button to turn on the scanner and the main menu will appear. The scanner will take a few seconds to turn on. The white LED light will indicate that the scanner is on.
NOTES: The scanner will automatically shut down after 15 minutes of inactivity.
Keep in mind that it is common for the scanner to jam if parts of the film are distorted. Make sure film is in good condition. The scanner will not be able to operate on film that is damaged, overlapping, torn, unaligned, or crooked.
Scotch tape can be used to repair torn parts of the film. Make sure to carefully apply the tape and only use a small amount. Overusing the scotch tape can cause the film to jam the scanner.
MENU FUNCTIONS
Power On/Off Function
- Press the Power button to start the machine and the main menu interface will appear.

- Press the Power button again to shut down the machine when it is on.

NOTES: When the KODAK REELZ Film Digitizer is powered on, the light next to the power button will light up, but it takes a few extra seconds for the screen to turn on.
The scanner doesn't record sound.
MAIN MENU: CAPTURE
Select "Capture" in the main menu interface and press the OK/Enter button to enter the interface of "Video Preview Mode". In the video preview mode interface, you should see the options: Recording, Frame Adjust, and Picture.

Recording Function
- Choose the "Record" option in the Video Preview Mode. Once selected, the record icon will appear white.
- Press the OK/Enter button to enter the prompt interface for switching between Super 8 and 8mm.
- Use the film type switch in front of the film scanner to select film type. Then, press the OK/Enter button to record.


NOTE: The 'Set film type' screen will only appear once per use of the device.
During this process, the device will capture each image of the film and combine it into a digital video. The area in the film slot will light up the film from the bottom as the film is scanned with the camera above it. The film is scanned in the scanning area of the film slot frame by frame. The scanned video is then transferred into your inserted SD card.
NOTES: If the film has damages or gets stuck, lift the film lid and push the damaged area past the lit-up scanning area. Then, make sure the film is firmly in place and reclose the lid.
You can press the OK/Enter button while the recording is in process to stop it. This will also automatically save the MP4 files.
Every time you stop and start a recording a new video file will be created by default.
Frame Adjust Function
- Press the Up or Down button to choose the "Frame Adjust" option in the Video Preview Mode. Then, press the OK/Enter button to enter the adjustment interface.
- After entering the adjustment interface, press the directional arrow buttons to adjust the margin and press the Plus or Minus button to zoom in or out.

- Once the desired settings are reached, press the OK/Enter to confirm.

NOTE: Film framing may need to be adjusted before starting the recording. This can be done easily on the device. Move the image around or zoom in or out to properly frame the film. It is important to adjust the camera framing, so the scanner records the film efficiently.
Picture Function
- Press the Up or Down button to choose the "Picture" option in the Video Preview Mode. Then, press the OK/Enter button to enter the picture setting interface.
- After entering the picture setting interface, press the Up or Down button to select the "Exposure", "Sharpness", "Tint", or "Reset to Default Values" option. Press the Plus or Minus button to set parameter values.

- Once the desired settings are reached, press the OK/Enter button to confirm.

NOTE: This function is used to adjust the display of the image. Enhance how the picture of your film looks by choosing the desired settings in this option. Exposure is the overall brightness or darkness of the film. Sharpness refers to the image clarity. Tint is used to adjust the color of the image. And Reset to Default Values sets everything back how it was.
MAIN MENU: MENU
Select "Menu" in the main menu interface and press the OK/Enter button to enter the menu interface. In the menu interface, you should see the options: My Recordings, Rewind, and Fast Forward.
My Recordings Function
- Select "My Recordings" in the submenu and press the OK/Enter button to enter the option.
- Use the directional arrow buttons to select an MP4 file.

- Press the OK/Enter button to play the file or press the Minus button to delete the file.

Rewind Function
- Press the Up or Down button to choose the "Rewind" option in the Menu.
- Press the OK/Enter button to enter the option.
- Follow the directions on screen to start the rewind process.
(The machine only operates from left to right so reels must be swapped for the rewinding process.)


NOTE: Use the dotted line to thread the negative for the rewind process.
The film should be lifted out of the film slot so the gray pin doesn't slow down the film.
Fast Forward Function
- Press the Up or Down button to choose the "Fast Forward" option in the Menu.
- Press the OK/Enter button to enter the option.
- After entering, press the OK/Enter button according to the prompts.


NOTE: Fast forward and rewind are both used to wind up your reel. The only difference is that in order to rewind, you must swap the placement of the reels. For rewinding, reels must be swapped so the film can still be scanned correctly. Fast forward is used to decide where you will start recording. Use fast forward to speed through certain parts of your film.
Use the dotted line to thread the negative for the fast forward process.
The film should be lifted out of the film slot so the gray pin doesn't slow down the film.
MAIN MENU: SETTINGS
Select "Settings" in the main menu interface and press the OK/Enter button to enter the settings interface. In the settings interface, you should see the options: Language, Filmtype, USB Upload, Erase SD card, Factory Reset, and About.

Language Section
- Select "Language" in the submenu and press the OK/Enter button to confirm.
- Use the directional arrow buttons to select a language and press the OK/Enter button to confirm your selection.


USB Upload Section
MP4 video files will save onto the SD card inserted into the KODAK REELZ Film Digitizer. With the Micro USB cable (included), you can easily connect the device to your computer to quickly transfer your files.
- Connect your device to a PC via USB.
- Select USB upload then the screen will show that the device is connected to the PC and SD card storage can be accessed via PC.


NOTE: The micro USB cable must be plugged in before going to the "USB Upload" screen.
Erase SD Card Section
- Press the Up or Down button to select "Erase SD Card" and then press the OK/Enter button to confirm.
- Select "No" and press OK/Enter button to go back to the previous screen.

- Select "Yes" and press OK/Enter button to clear files on the SD card.

Factory Reset Section
- Press the Up or Down button to select "Factory Reset" and then press the OK/Enter button to confirm.
- Select "No" and press the OK/Enter button to go back to the previous screen.

- Select "Yes" and press the OK/Enter button to return settings to default.

About Section
- Press the Up or Down button to select "About" and then press the OK/Enter button to view the website and version.

- Press the OK/Enter or Back button to exit from the screen.

CUSTOMER SERVICE
Should you experience any problems with your product, please contact us before returning the item to the place of purchase. We're here to help!
U.S. Support: kodak@camarketing.com | 844-516-1539
International Support: kodakintl@camarketing.com | 844-516-1540
WARRANTY
This product is covered by a limited one-year warranty. Coverage is subject to limits and exclusions.
LIMITED WARRANTY TO ORIGINAL CONSUMER
This KODAK REELZ Film Digitizer ("Product"), including any accessories included in the original packaging, as supplied and distributed new by an authorized retailer is warranted by C&A Marketing, Inc. (the "Company") to the original consumer purchaser only, against certain defects in material and workmanship ("Warranty") as follows:
To receive Warranty service, the original consumer purchaser must contact the Company or its authorized service provider for problem determination and service procedures. Proof of purchase in the form of a bill of sale or receipted invoice, evidencing that the Product is within the applicable Warranty period(s), MUST be presented to the Company or its authorized service provider in order to obtain the requested service.

Documents / ResourcesDownload manual
Here you can download full pdf version of manual, it may contain additional safety instructions, warranty information, FCC rules, etc.
Download KODAK REELZ Film Digitizer for 8mm & Super 8mm Film Manual
Advertisement


Need help?
Do you have a question about the REELZ Film Digitizer and is the answer not in the manual?
Questions and answers