Advertisement
Available languages
Available languages
Quick Links
LEDC06/LEDC07
RGB LED CONTROLLER WITH REMOTE CONTROL
RGB LED-CONTROLLER MET AFSTANDSBEDIENING
CONTRÔLEUR LED RVB AVEC TÉLÉCOMMANDE
CONTROLADOR LED RGB CON MANDO A
DISTANCIA
RGB LED-CONTROLLER MIT FERNBEDIENUNG
4
8
12
16
20
Advertisement

Related Manuals for Perel LEDC06


Summary of Contents for Perel LEDC06
-
Page 1: Table Of Contents
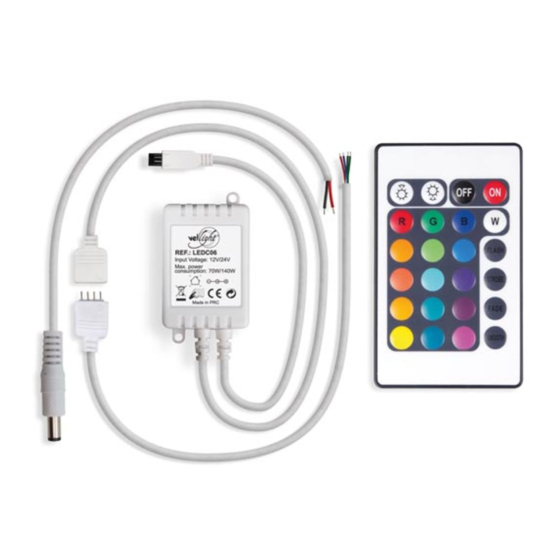
LEDC06/LEDC07 RGB LED CONTROLLER WITH REMOTE CONTROL RGB LED-CONTROLLER MET AFSTANDSBEDIENING CONTRÔLEUR LED RVB AVEC TÉLÉCOMMANDE CONTROLADOR LED RGB CON MANDO A DISTANCIA RGB LED-CONTROLLER MIT FERNBEDIENUNG USER MANUAL GEBRUIKERSHANDLEIDING MODE D'EMPLOI MANUAL DEL USUARIO BEDIENUNGSANLEITUNG... - Page 2 LEDC06/LEDC07 to LED strip naar ledstrip vers ruban LED hacia la cinta con LEDs zu LED-Leiste IR LED infraroodled LED infrarouge LED infrarrojo IR-LED power input voedingsingang entrée d’alimentation entrada de alimentación Netzeingang V. 01 – 05/11/2013 ©Velleman nv...
- Page 3 LEDC06/LEDC07 V. 01 – 05/11/2013 ©Velleman nv...
-
Page 4: User Manual
LEDC06/LEDC07 USER MANUAL Introduction To all residents of the European Union Important environmental information about this product This symbol on the device or the package indicates that disposal of the device after its lifecycle could harm the environment. Do not dispose of the unit (or batteries) as unsorted municipal waste;... - Page 5 1. Aim the remote control [4,5] towards the IR LED [2] of the controller to control the output of the LED strip. 2. LEDC06: Switch the LED strip on with the ON button on the remote control. To switch it off again, press the OFF button.
- Page 6 LEDC06/LEDC07 5. Press the effect buttons to generate different effects. LEDC06 effects: Button Effect FLASH 7 colours switching STROBE gradual change FADE 7 colours gradually changing SMOOTH red, green, blue colours switching LEDC07 effects: 1. Press the effect buttons to generate different effects:...
- Page 7 3 x 2 A PWM frequency: ± 500 Hz dimensions: controller 50 x 35 x 22 mm; IR remote control: LEDC06 85 x 51 x 7 mm, LEDC07 125 x 56 x 7 mm weight: controller ± 30 g; IR remote control: LEDC06 ±...
-
Page 8: Gebruikershandleiding
LEDC06/LEDC07 GEBRUIKERSHANDLEIDING Inleiding Aan alle ingezetenen van de Europese Unie Belangrijke milieu-informatie betreffende dit product Dit symbool op het toestel of de verpakking geeft aan dat, als het na zijn levenscyclus wordt weggeworpen, dit toestel schade kan toebrengen aan het milieu. Gooi dit toestel (en eventuele batterijen) niet bij het gewone huishoudelijke afval;... - Page 9 Gebruik 1. Richt de afstandsbediening [4,5] naar de infraroodled [2] van de controller. 2. LEDC06: Schakel de ledstrip in met de ON-knop van de afstandsbediening. Druk op de OFF-knop om de strip opnieuw uit te schakelen. LEDC07: Schakel de ledstrip in of uit met de -knop van de afstandsbediening.
- Page 10 LEDC06/LEDC07 DIY-knoppen. Zie verder voor meer informatie. 4. Druk op om de lichtsterkte te verhogen of te verlagen. 5. Druk op een effectknop om het overeenstemmende effect te verkrijgen. LEDC06 effecten: Knop Effect FLASH 7 kleuren wisselen STROBE geleidelijke overgang...
- Page 11 3 x 2 A PWM-frequentie: ± 500 Hz afmetingen: controller 50 x 35 x 22 mm; IR-afstandsbediening: LEDC06 85 x 51 x 7 mm, LEDC07 125 x 56 x 7 mm gewicht: controller ± 30 g; IR-afstandsbediening: LEDC06 ± 19 g, LEDC07 ± 35 g voeding: afstandsbediening 3 V-lithiumbatterij type CR2025, meegelev.
-
Page 12: Mode D'emploi
LEDC06/LEDC07 MODE D'EMPLOI Introduction Aux résidents de l'Union européenne Informations environnementales importantes concernant ce produit Ce symbole sur l'appareil ou l'emballage indique que l’élimination d’un appareil en fin de vie peut polluer l'environnement. Ne pas jeter un appareil électrique ou électronique (et des piles éventuelles) parmi les déchets municipaux non... - Page 13 Utilisation 1. Pointer la télécommande [4,5] vers l’œil IR du contrôleur [2]. 2. LEDC06 : Allumer la bande LED avec le bouton ON de la télécommande. Pour l’éteindre de nouveau, appuyer sur le bouton OFF. LEDC07 : Allumer ou éteindre la bande LED avec le bouton de la télécommande.
- Page 14 DIY. Pour plus d'informations, consulter le mode d'emploi. 4. Augmenter ou diminuer l’intensité du flexible avec le bouton 5. Sélectionner un effet en enfonçant le bouton correspondant. Effets LEDC06 : Bouton Effet FLASH les 7 couleurs changent STROBE...
- Page 15 MLI: ± 500 Hz dimensions: contrôleur 50 x 35 x 22 mm ; télécommande IR : LEDC06 85 x 51 x 7 mm, LEDC07 125 x 56 x 7 mm poids : contrôleur ± 30 g ; télécommande IR : LEDC06 ±...
-
Page 16: Manual Del Usuario
LEDC06/LEDC07 © DROITS D’AUTEUR – SA Velleman est l’ayant droit des droits d’auteur pour cette notice. Tous droits mondiaux réservés. Toute reproduction, traduction, copie ou diffusion, intégrale ou partielle, du contenu de cette notice par quelque procédé ou sur tout support électronique que ce soit est interdite sans l’accord... - Page 17 (véase especificaciones). 1. Apunte el mando a distancia [4,5] hacia el ojo IR del controlador [2] para controlar la cinta de LEDs. 2. LEDC06: Active la cinta con el botón ON del mando a V. 01 – 05/11/2013 ©Velleman nv...
- Page 18 Para más información, véase a continuación. 4. Aumente o disminuya la intensidad de la cinta con el botón 5. Seleccione un efecto al pulsar el botón correspondiente. Efectos LEDC06: Botón Efecto FLASH cambio de color: 7 colores STROBE...
- Page 19 PWM (modulación de ancho de pulso): ± 500 Hz dimensiones: controlador 50 x 35 x 22 mm; mando a distancia IR: LEDC06 85 x 51 x 7 mm, LEDC07 125 x 56 x 7 mm peso: controlador ± 30 g; mando a distancia IR: LEDC06 ±...
-
Page 20: Bedienungsanleitung
LEDC06/LEDC07 Se pueden modificar las especificaciones y el contenido de este manual sin previo aviso. © DERECHOS DE AUTOR – Velleman NV dispone de los derechos de autor para este manual del usuario. Todos los derechos mundiales reservados. Está estrictamente... - Page 21 LEDC06/LEDC07 Sicherheitshinweise Halten Sie Kinder und Unbefugte vom Gerät fern. Es gibt keine zu wartenden Teile. Bestellen Sie eventuelle Ersatzteile bei Ihrem Fachhändler. Allgemeine Richtlinien Siehe Velleman® Service- und Qualitätsgarantie am Ende dieser Bedienungsanleitung. Schützen Sie das Gerät vor Staub. Schützen Sie das Gerät vor extremen Temperaturen.
- Page 22 Anwendung 1. Richten Sie die Fernbedienung [4,5] auf die IR-LED [2] des Controllers, um die LED-Leiste zu bedienen. 2. LEDC06: Schalten Sie die LED-Leiste mit der ON- Taste der Fernbedienung ein. Schalten Sie die LED- Leiste mit der OFF-Taste aus.
- Page 23 LEDC06/LEDC07 (Farbübergang, 7 Farben). 2. Möchten Sie die Geschwindigkeit eines Effekts erhöhen, dann drücken Sie Quick. Um die Geschwindigkeit zu verringern, drücken Sie Slow. 3. Um einen Effekt zu pausieren, drücken Sie die Taste. Drücken Sie diese wieder, um neu zu starten.
- Page 24 Belastung: 3 x 2 A PWM-Frequenz: ± 500 Hz Abmessungen: Controller 50 x 35 x 22 mm; IR-Fernbedienung: LEDC06 85 x 51 x 7 mm, LEDC07 125 x 56 x 7 mm Gewicht: Controller ± 30 g; IR-Fernbedienung: LEDC06 ± 19 g, LEDC07 ± 35 g...
- Page 25 • Not covered by warranty: - all direct or indirect damage caused after delivery to the article Velleman® Service and Quality (e.g. by oxidation, shocks, falls, Warranty dust, dirt, humidity...), and by the Since its foundation in 1972, article, as well as its contents (e.g. Velleman®...
- Page 26 • Repairs occurring after warranty verhouding zijn, kan Velleman® expiration are subject to shipping beslissen het desbetreffende artikel costs. te vervangen door een • The above conditions are without gelijkwaardig artikel of de prejudice to all commercial aankoopsom van het artikel warranties.
- Page 27 - schade veroorzaakt door à des dispositions légales en onvoldoende bescherming bij vigueur dans l’UE. Afin de garantir transport van het apparaat. la qualité, nous soumettons - alle schade door wijzigingen, régulièrement nos produits à des reparaties of modificaties contrôles de qualité uitgevoerd door derden zonder supplémentaires, tant par notre toestemming van Velleman®.
- Page 28 - toute pièce ou accessoire défectueux qui s’avère en bon état nécessitant un remplacement de marche pourra faire l’objet d’une causé par un usage normal comme note de frais à charge du p.ex. piles (rechargeables comme consommateur ; non rechargeables, intégrées ou •...
- Page 29 materiales desde la adquisición se reducirá a 6 meses con uso original; profesional); • Si la queja está fundada y si la - daños causados por un uso reparación o sustitución de un incorrecto o un uso ajeno al que artículo no es posible, o si los está...
- Page 30 oder eine Rückzahlung im Werte von 50 % im Falle eines Defektes im zweiten Jahr. Velleman® Service- und • Von der Garantie Qualitätsgarantie ausgeschlossen sind: Seit der Gründung in 1972 hat - alle direkten oder indirekten Velleman® sehr viel Erfahrung als Schäden, die nach Lieferung am Verteiler in der Elektronikwelt in Gerät und durch das Gerät...
- Page 31 Erlaubnis von Velleman® vorgenommen werden. • Im Fall einer Reparatur, wenden Sie sich an Ihren Velleman®- Verteiler. Legen Sie das Produkt ordnungsgemäß verpackt (vorzugsweise die Originalverpackung) und mit dem Original-Kaufbeleg vor. Fügen Sie eine deutliche Fehlerbeschreibung hinzu. • Hinweis: Um Kosten und Zeit zu sparen, lesen Sie die Bedienungsanleitung nochmals und überprüfen Sie, ob es keinen auf de...
Need help?
Do you have a question about the LEDC06 and is the answer not in the manual?
Questions and answers