
Related Manuals for Yolink YS4003-UC

Summary of Contents for Yolink YS4003-UC
- Page 1 YoLink Thermostat (Heat Pump Compatible) YS4003-UC Installation Manual & User Guide Rev 1.1 March 29,2023...
-
Page 2: Table Of Contents
SECTION TOPIC PAGE Welcome! Before You Begin What's in the Box? Install the YoLink App Add Your Thermostat to the App Prepare for Installation Installation Get to Know Your Thermostat Set the Cooling or Heating Setpoint Navigating the Menu System Schedules: Editing &... -
Page 3: A Welcome
The YoLink Thermostat is the perfect choice if you travel, own a vacation home, business or rental property, or simply want the peace of mind of a smart thermostat with 24/7 remote access and supervision. -
Page 4: B Before You Begin
Please also note, your smart Thermostat connects to the internet via one of our hubs (original YoLink Hub or the SpeakerHub), and it does not connect directly to your WiFi or local network. In order for remote access to the Thermostat from the app, and for full-functionality, a hub is required. -
Page 5: C What's In The Box
What’s in the Box? Quick Start Guide Thermostat Screws (2) Mounting Plate Drywall Anchors (2) (“Back Plate”) xxxxxx xxxxxx xxxxxx xxxxxx xxxxxx xxxxxx Wire Labels... -
Page 6: D Install The Yolink App
Install the YoLink App If you are new to YoLink, please install the app on your phone or tablet, if you have not already. Otherwise, please proceed to part Scan the appropriate QR code below or find the “YoLink app” on the appropriate app store. - Page 7 Install the YoLink App, Continued You will immediately receive an email from no-reply@yosmart.com with some helpful information. Please mark the yosmart.com domain as safe, to ensure you receive important messages in the future. Log in to the app using your new username and password. The app opens to the Favorite screen, as shown.
-
Page 8: E Add Your Thermostat To The App
Add Your Thermostat to the App Approve access to the camera, if requested. A viewfinder will be shown on the app. Hold the phone over the QR code (on the rear of the thermostat) so that the code appears in the viewfinder. If successful, the Add Device screen will be displayed Refer to Figure 1 on the next page. - Page 9 Figure 2. Figure 1 Figure 2 If this is your first YoLink system, please visit our product support area at yosmart.com for an introduction to the app, and for tutorials, videos, and other support resources. Ensure your YoLink Hub or SpeakerHub is setup and online before...
-
Page 10: F Prepare For Installation
Prepare for Installation The following items may be required for the installation of your Thermostat: Drill with Drill Bits Multimeter Medium Phillips Screwdriver Small Slotted Screwdriver Pencil Level Alternative Mounting Hardware... -
Page 11: G Installation
Installation Please Note: This installation manual assumes the Thermostat is replacing an existing thermostat. For new installations, please disregard references to the existing thermostat, etc. Referring to the chart below, match up your thermostat wires with their matching screw terminal on the Thermostat terminal strip. THERMOSTAT TYPICAL WIRE TERMINAL... - Page 12 Installation, Continued CAUTION: To prevent personal injury and damage to property, always remove power to the thermostat by turning off the HVAC equipment at the circuit breaker panel, prior to performing any steps related to connecting or changing the thermostat wiring! Turn off power, as required, to ensure there are no energized wires at the thermostat location.
- Page 13 Installation, Continued Terminate each conductor on its respective screw terminal. You will need to loosen each screw terminal, first. When finished, gently tug on each wire, to ensure a good connection. Refer to the rear of the Thermostat. Set the HP/GAS slide switch to HP for heat pump systems, otherwise to GAS.
- Page 14 Installation, Continued Turn on power to the unit. The Thermostat display should immediately turn on. If not, doublecheck your wire terminations, power-off the unit and correct any mistakes as needed. If the thermostat still does not turn on, refer to the Troubleshooting, section U.
-
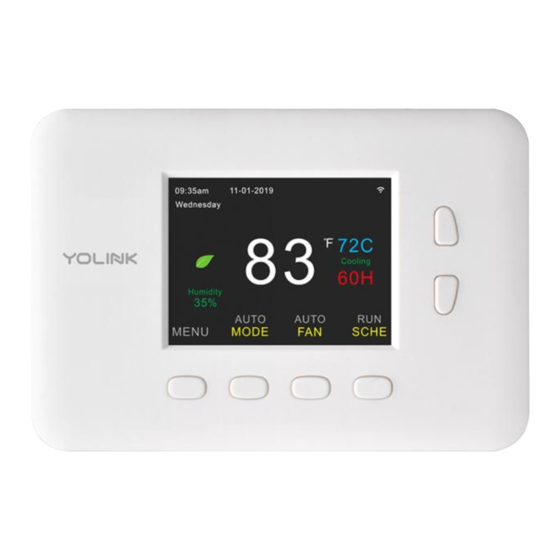
Page 15: H Get To Know Your Thermostat
Get to Know Your Thermostat Please take a moment to familiarize yourself with your new Thermostat. 14) Fan status (“AUTO” if fan will run on 1) Current day of the week demand, “ON” if the fan is on (running) 2) Current time of day 3) Current Date 15) Fan button (press to switch the fan between Auto and On mode... -
Page 16: I Set The Cooling Or Heating Setpoint
Set the Cooling or Heating Setpoint First, tap the up or down button. Tap the appropriate buttons, to adjust the setpoint up or down. When finished, tap the DONE button. To exit this process, tap the BACK button. Tap to raise the setpoint C o o l T e m p... -
Page 17: J Navigating The Menu System
Navigating the Menu System First, tap the MENU button. Use the UP and DOWN buttons to navigate up or down the menu items Use the ENTER button to select an item. Tap DONE when finished, or tap BACK to exit without saving Tap to navigate M e n u S e l e c t i o n... -
Page 18: K Schedules: Editing & Copying
Schedules: Editing & Copying This section demonstrates viewing and editing the schedule from the thermostat. See section Q for viewing/editing from the app. The Scheduling Submenu: • One day of the week is displayed at a time. The current day is identified at the top of the screen, abbreviated Mon, Tue, Wed, etcetera. - Page 19 Schedules: Editing & Copying To edit a schedule, tap MENU. Navigate to Schedules, tap ENTER To change the selected day, tap the NEXT button until the correct day is displayed. Use the left and right arrow buttons to navigate between items. Selected items are identified by green colored text.
- Page 20 Schedules: Editing & Copying After editing a day of the week that you wish to copy to another day, select Copy To. Tap the COPY button. A screen similar to the one below is displayed, showing the six other days of the week. Use the left and right arrow buttons to scroll between the days of the week.
-
Page 21: L Y & Aux Config
Y & Aux Config This menu screen allows for configuring heat pump-related settings for the thermostat. If in doubt about the correct setting, please contact customer support (refer to the last page of this user guide). Y OFF: Set to YES, if your compressor should turn off if the temperature is below your minimum level (determined in the next setting) Y OFF under: This temperature, if Y OFF is set to YES, will... -
Page 22: M Date & Time
Date & Time This menu screen allows for changing the time and date. You have the option of either manually changing the time and date, or time and date being managed by the app. As the app uses your phone’s time and date, and as this is automatically updated and synchronized, setting Auto Update to YES is recommended. -
Page 23: N Temperature Settings
Temperature Settings This menu screen allows for changing temperature-related settings for your Thermostat, such as Fahrenheit or Celsius format. ECO: (Energy Conservation Operation). While in ECO mode, your thermostat will adjust your normal setpoint to a more economical setting (e.g. hotter setpoint in the summer), based on the offset number of degrees in the ECO setting. -
Page 24: O Display & Sound
Display & Sound This menu screen allows for changing settings related to the appearance and sound of your Thermostat. BG Color: Select Black or Blue background color Brightness: Adjust screen brightness or intensity BL Timeout: To maximize the life of the LCD display, brightness is typically adjusted down while not in use. -
Page 25: P Factory Reset
Factory reset will not delete the thermostat from the app. Performing a network reset forces the thermostat to reconnect to the YoLink wireless network. If your thermostat is offline, performing a network reset may resolve the offline status. Factory Reset: Select this item, then tap ENTER to start the factory reset. -
Page 26: Q App Functions: Device Screen
App Functions: Device Screen You have full access to thermostat functions and settings from the app. This section explains the main screen, known as the device screen, for the thermostat. This screen is your ‘every day’ interface for the thermostat, and your alternative for remote control when the thermostat is not in reach. - Page 27 App Functions: Device Screen, Cont. Device support Device settings Swipe left or right to adjust Connection the current setpoint status Current temperature Heat/Cool Setpoints Status Current Humidity Setpoint up/down adjustment Indicates current fan mode Indicates the current (green if on, gray if auto) mode (green if active, Gray if inactive/disabled) Indicates the current run mode.
-
Page 28: R App Functions: Device Details Screen
App Functions: Device Details Screen This screen allows you to view and edit device settings, view various device status indicators, and perform a firmware update. Refer to the next page for a summary of each item. - Page 29 Device Details Screen, Continued Type: Device type (Thermostat) Name: Device name. You can change the name. Tap to edit the device name Room: You can assign a device to a room, allowing for organizing your devices, especially helpful for larger systems Favorite: Tap to turn on the red heart icon.
-
Page 30: S Automation
Automation You can control thermostat modes via scenes or automations in the app. For example, you can automatically turn off the air conditioning or heat, if a door or window is left open. This example is shown below. The automation also sends a notification (via app push notification, email, SMS or SpeakerHub broadcast) reminding the door needs to be closed, before turning it back on. -
Page 31: T Voice Assistants & Integrations
Voice Assistants & Integrations The YoLink Thermostat works with several voice assistants, including Alexa and Google, and it works with other automation platforms such as IFTTT. Visit the thermostat support pages on our website for up-to-date information. To set up voice assistant integrations, in the app, go to Settings,... -
Page 32: U Troubleshooting
Troubleshooting SYMPTOM POSSIBLE CAUSE CORRECTIVE ACTION 1.) Blown fuse or tripped circuit breaker 1.) Replace fuse or reset breaker 2.) Furnace power switch to OFF 2.) Turn switch to ON 3.) Furnace blower compartment door panel 3.) Replace door panel in proper position to loose or not properly installed engage safety interlock or door switch No Display, No Heat, No... -
Page 33: Vce Mark Warning
The simplified UK declaration of conformity referred shall be provided as follows: Hereby, YoSmart Inc. declare that the radio equipment type YoLink SpeakerHub is in compliance with Directive UK Radio Equipment Regulations (SI 2017/1206);... -
Page 34: Wfcc Statement
Any changes or modifications not expressly approved by the party responsible for compliance could void the user’s authority to operate the equipment. PRODUCT NAME: RESPONSIBLE PARTY: TELEPHONE: YOLINK THERMOSTAT YOSMART, INC. (949) 825-5958 MODEL NUMBER: ADDRESS: EMAIL: SERVICE@YOSMART.COM... -
Page 35: 1-Year Warranty
This warranty does not cover abuse or misused products or products used in commercial applications. This warranty does not apply to YoLink devices that have been improperly installed, modified, put to a use other than designed, or subjected to acts of God (such as floods, lightning, earthquakes, etc.). -
Page 36: Z Contact Us & Customer Support
Contact Us / Customer Support We are here for you, if you ever need any assistance installing, setting up or using a YoLink app or product! Please email us 24/7: support@yosmarthelp.zendesk.com You can use our online chat service by visiting our website, www.yosmart.com or by scanning the QR code...
Need help?
Do you have a question about the YS4003-UC and is the answer not in the manual?
Questions and answers